How to Build a Fleet Management Portal
Keeping track of vehicles in the field is a huge challenge. In particular, gaining an accurate snapshot of our vehicle’s locations, statuses, conditions, and maintenance needs can create mountains of administrative work.
Today, we’re looking at one solution - building a custom fleet management portal.
See, the problem here ultimately comes down to a need to centralize fleet data and related workflows.
Our goal today is to demonstrate how Budibase empowers teams to build secure, custom portals on top of just about any data. Even better, we can achieve highly advanced solutions in a fraction of the time required for traditional developments.
But first, let’s get a little bit of background.
What is a fleet management portal?
A fleet management portal is a unified tool where various stakeholders can carry out defined tasks relating to our vehicle data.
Of course, this applies at separate but related levels. For instance, drivers or other field agents may need to submit information about individual vehicles, while head office teams might need to handle this data at a broader level.
Therefore, fleet portals often provide varying levels of access, data exposure, and functionality to different kinds of users, depending on their roles within relevant processes.
This can include a variety of tasks, including field data collection, asset tracking, cost analysis, maintenance scheduling, performance monitoring, and more.
As such, fleet portals will often have relatively complex data models in order to represent the various entities that we need within our processes. This is a particular area where most no/low-code platforms fall short.
With that in mind…
What are we building?
We’re building a simple fleet management portal on top of an existing MySQL database.
Specifically, our portal will:
- Enable drivers to submit regular check-ins, including their vehicle’s current location and mileage.
- Allow maintenance teams to submit reports when they carry out maintenance work.
- Provide admin users with a centralized view of all relevant information relating to each vehicle, including its current location and maintenance needs.
Of course, this is by no means the limits of what’s possible in Budibase.
Rather, we want to show off the speed and ease with which we can build out admin functions in Budibase, although we could always extend and scale this later if we want to.
Our portal will also leverage Budibase’s built-in RBAC system. In fact, we’re building this out for three distinct user personas, with Basic, Power, and Admin users each having the ability to access different screens, view different data, and carry out different actions.
Let’s jump in.
How to build a fleet management portal in 6 steps
If you haven’t already, you can sign up for a free Budibase account to start building as many custom applications as you’d like.
1. Setting up our database
We’ll start by creating a new Budibase application. As always, we have the choice of using a template or importing an existing app dump, but today we’re starting from scratch.
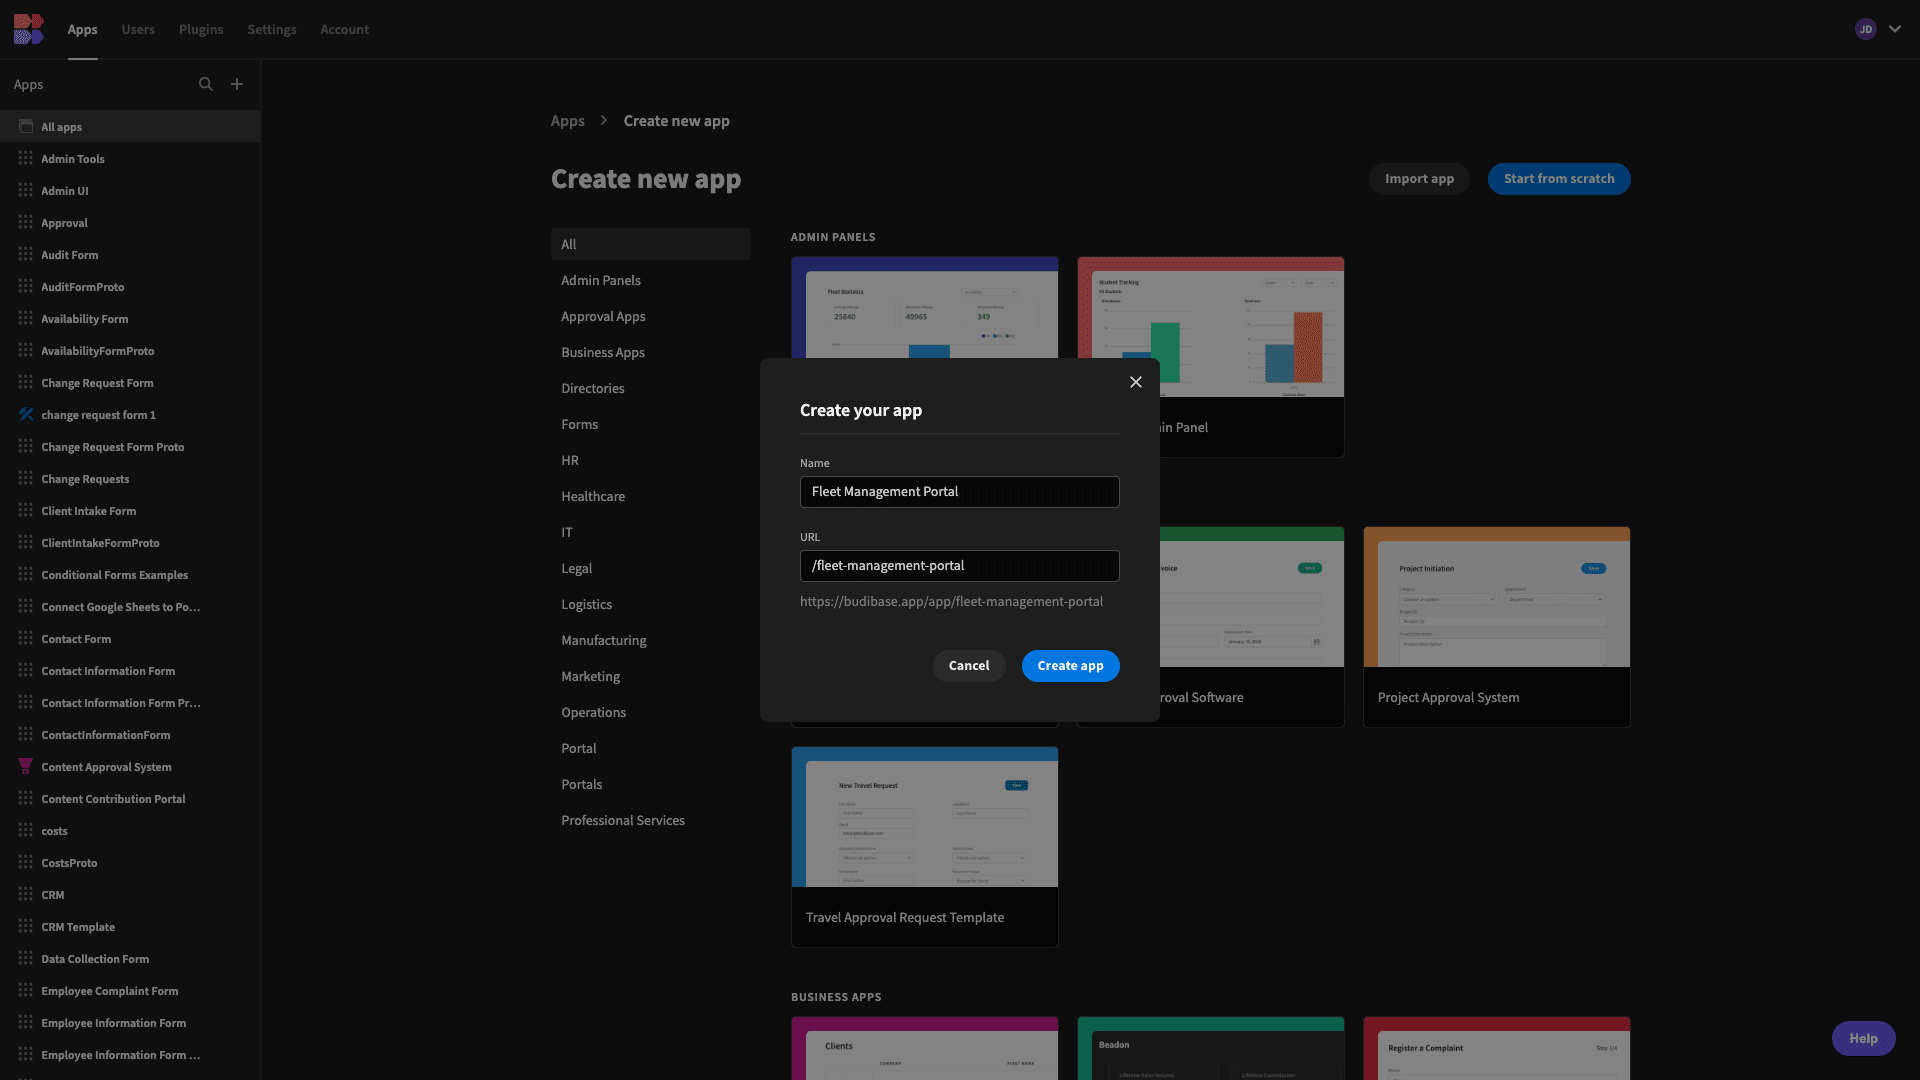
When we choose this option, we’re prompted to give our new app a name and URL extension. We’re going to go with Fleet Management Portal.
Then, we’re asked which kind of data source we’d like to connect our app to.
Budibase offers dedicated connectors for querying relational databases, NoSQL tools, APIs, Google Sheets, and more - alongside our internal low-code database.

As we said a minute ago, today, we’re using an existing MySQL database. We’ll provide the queries necessary to create this in a second.
First, we’re prompted to input our configuration details.
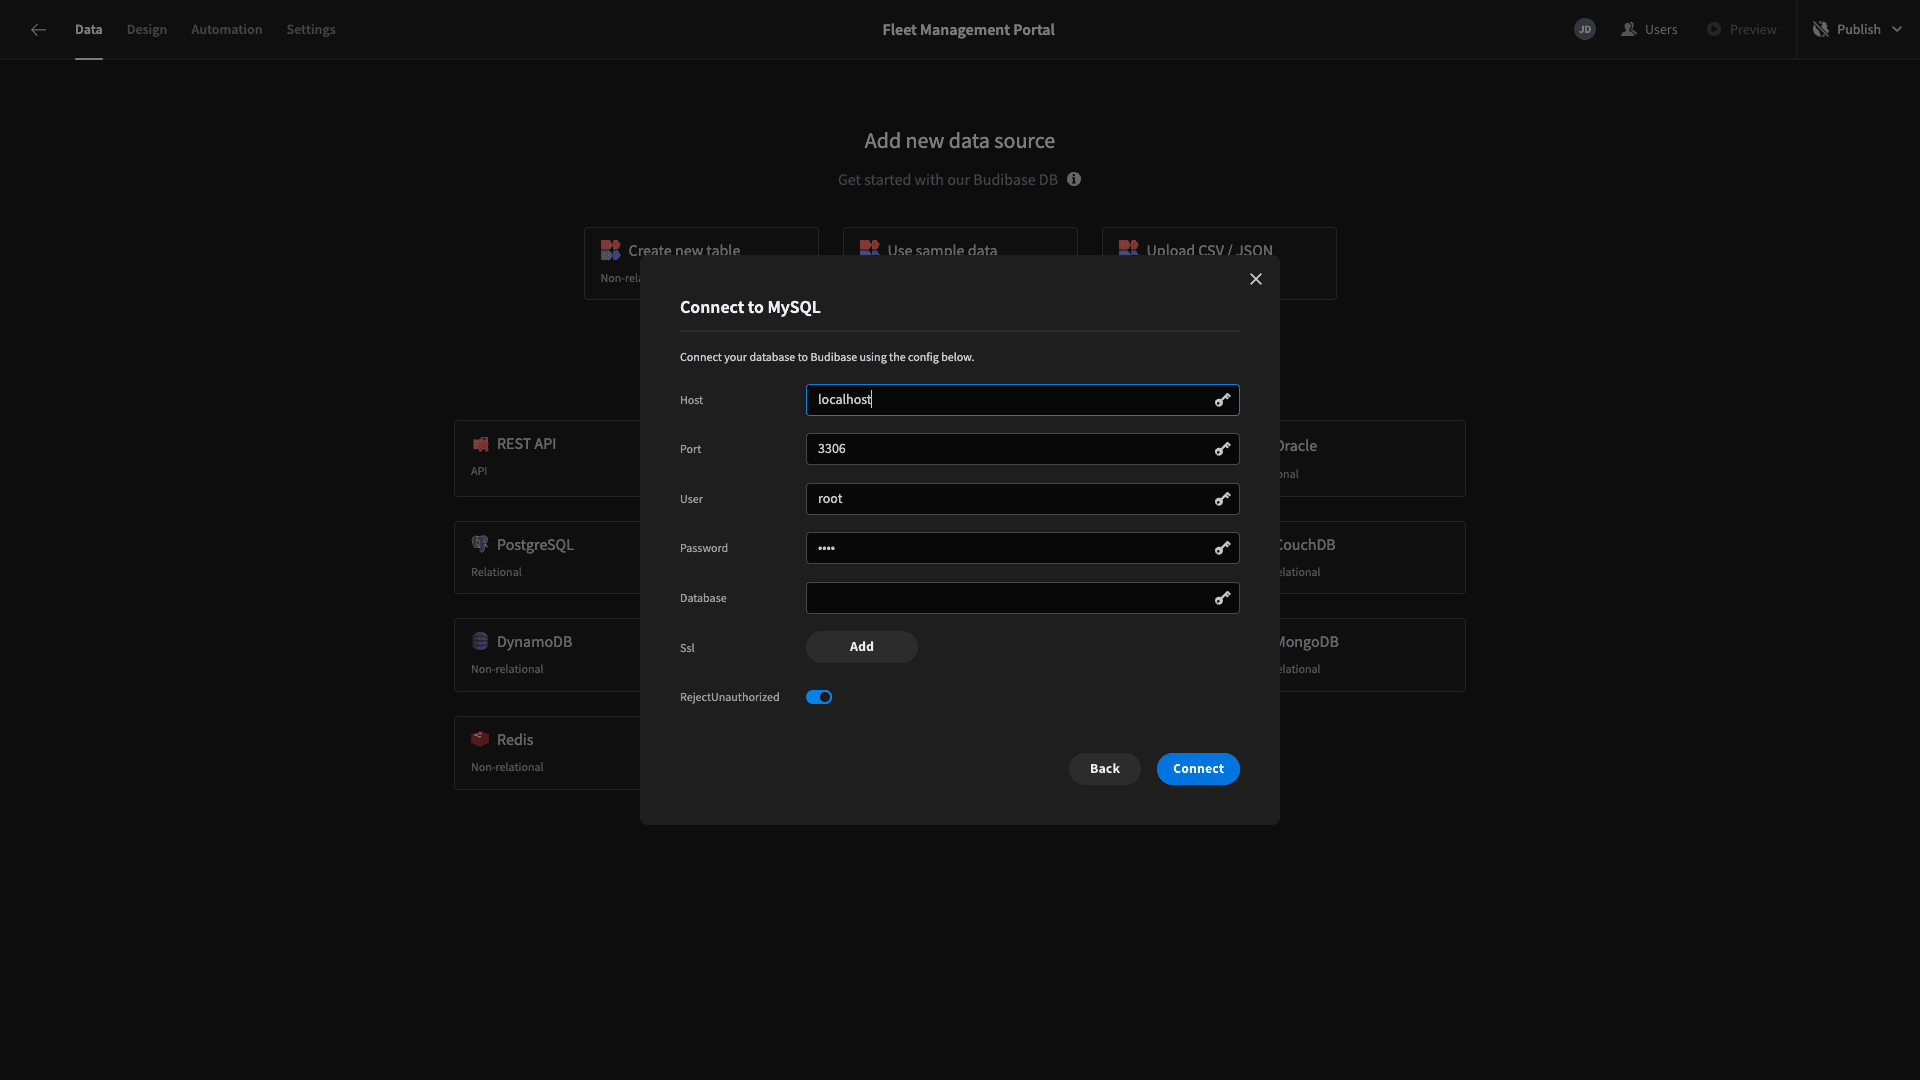
Then, we can choose which of the tables in our database we’d like to fetch, making them queryable within Budibase. Our database contains three tables:
- vehicles,
- check_ins,
- maintenance.
We’re fetching all three.

Now, we can manipulate the schema or stored values of any of our tables within Budibase’s Data section.
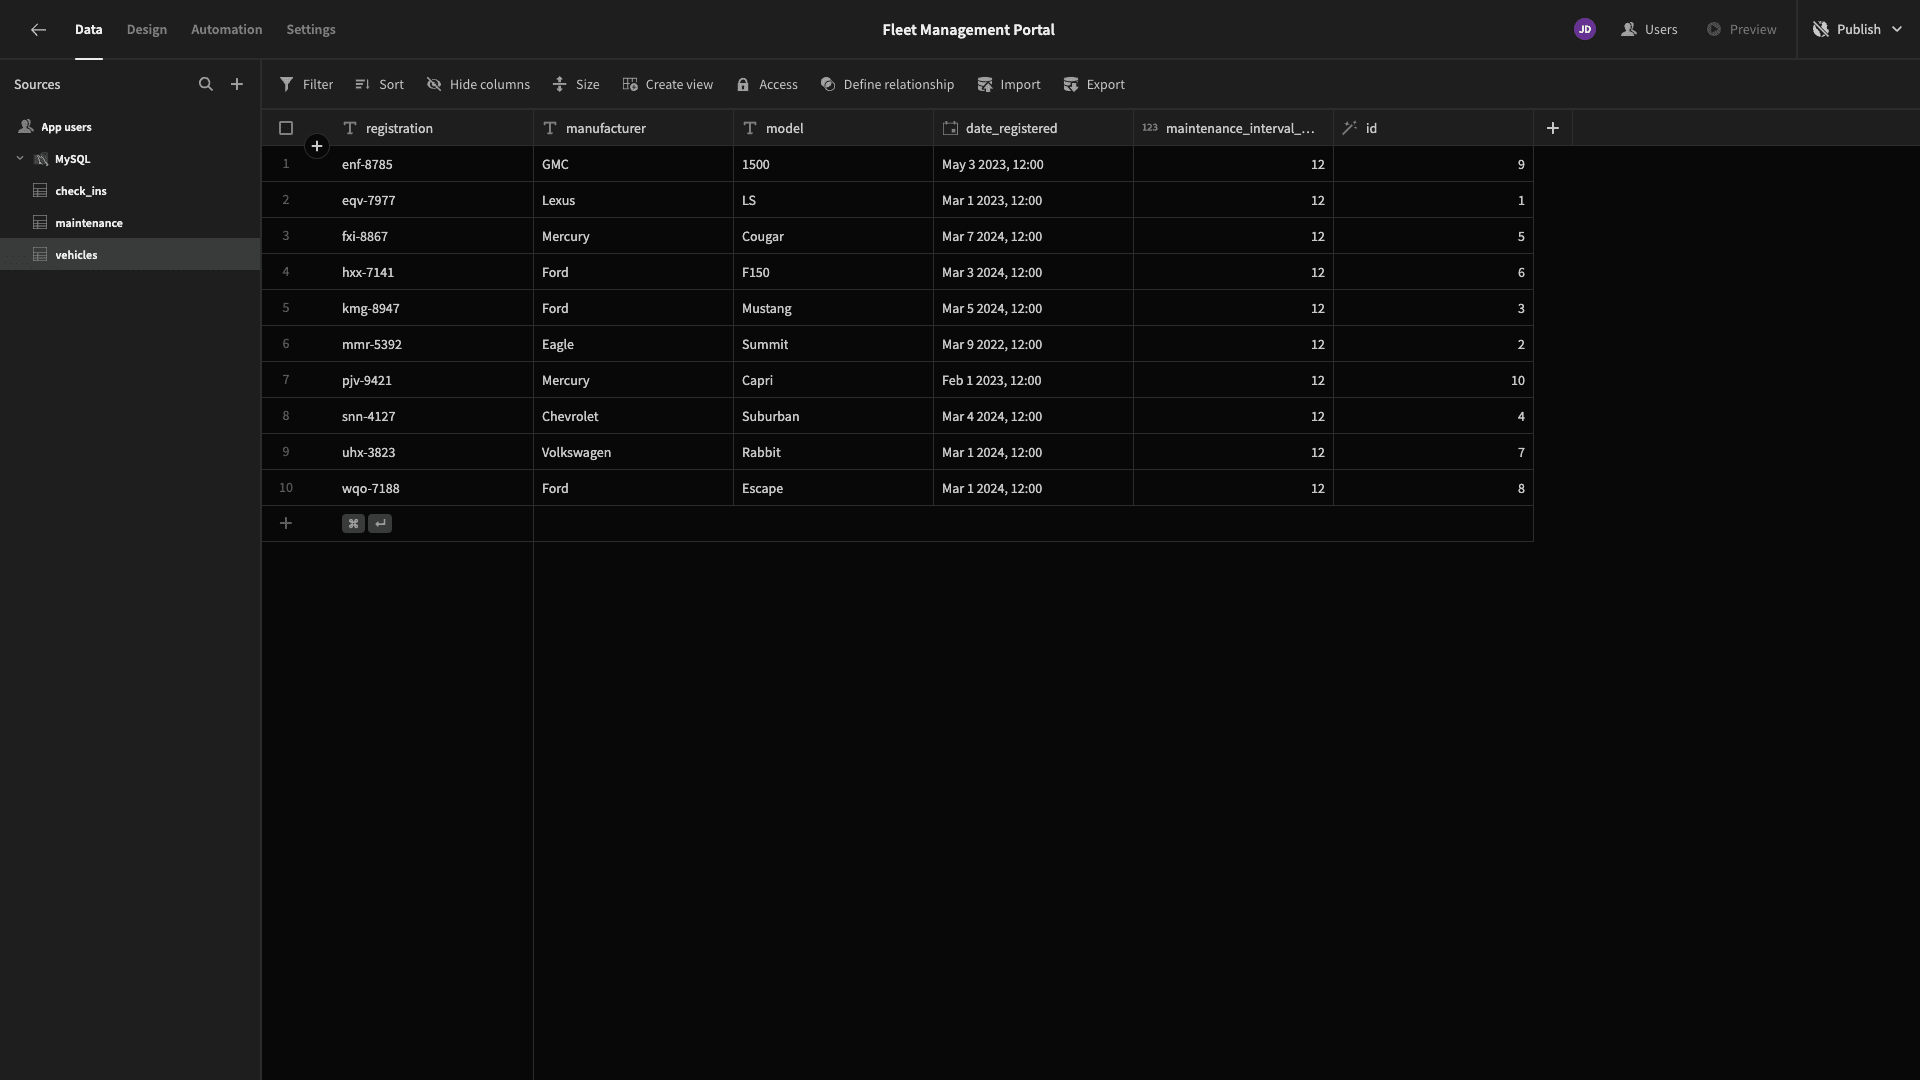
Before we go any further, let’s get familiar with our data model so far.
The vehicles table contains attributes called registration, manufacturer, model, date_registered, maintenance_interval_months, and a unique, autogenerated id.
If you want to build along with our tutorial, you can create it with this MySQL query.
 1CREATE TABLE IF NOT EXISTS vehicles (
 2
 3  id INT PRIMARY KEY,
 4
 5  registration VARCHAR(20),
 6
 7  manufacturer VARCHAR(50),
 8
 9  model VARCHAR(50),
10
11  date_registered DATETIME,
12
13  maintenance_interval_months INT
14
15);
16
17INSERT INTO vehicles (id, registration, manufacturer, model, date_registered, maintenance_interval_months)
18
19VALUES
20
21(1, 'eqv-7977', 'Lexus', 'LS', '2023-03-01 12:00:00', 12),
22
23(2, 'mmr-5392', 'Eagle', 'Summit', '2022-03-09 12:00:00', 12),
24
25(3, 'kmg-8947', 'Ford', 'Mustang', '2024-03-05 12:00:00', 12),
26
27(4, 'snn-4127', 'Chevrolet', 'Suburban', '2024-03-04 12:00:00', 12),
28
29(5, 'fxi-8867', 'Mercury', 'Cougar', '2024-03-07 12:00:00', 12),
30
31(6, 'hxx-7141', 'Ford', 'F150', '2024-03-03 12:00:00', 12),
32
33(7, 'uhx-3823', 'Volkswagen', 'Rabbit', '2024-03-01 12:00:00', 12),
34
35(8, 'wqo-7188', 'Ford', 'Escape', '2024-03-01 12:00:00', 12),
36
37(9, 'enf-8785', 'GMC', '1500', '2023-05-03 11:00:00', 12),
38
39(10, 'pjv-9421', 'Mercury', 'Capri', '2023-02-01 12:00:00', 12);
The check_ins table contains attributes called date, mileage, vehicle_registration, comments, latitude, and longitude - along with a unique id.
Here’s the query to create and populate it.
 1CREATE TABLE IF NOT EXISTS check_ins (
 2
 3  id INT PRIMARY KEY,
 4
 5  date DATETIME,
 6
 7  mileage INT,
 8
 9  vehicle_registration VARCHAR(20),
10
11  comments TEXT,
12
13  latitude DECIMAL(10, 6),
14
15  longitude DECIMAL(10, 6)
16
17);
18
19INSERT INTO checkin_ins (id, date, mileage, vehicle_registration, comments, latitude, longitude)
20
21VALUES
22
23(12, '2024-03-07 21:15:48', 132468, 'enf-8785', 'Curabitur at ipsum ac tellus semper interdum. Mauris ullamcorper purus sit amet nulla. Quisque arcu libero, rutrum ac, lobortis vel, dapibus at, diam. Nam tristique tortor eu pede.', 51.37, 3.99),
24
25(13, '2024-03-08 16:31:40', 179646, 'eqv-7977', 'Suspendisse ornare consequat lectus. In est risus, auctor sed, tristique in, tempus sit amet, sem. Fusce consequat. Nulla nisl. Nunc nisl. Duis bibendum, felis sed interdum venenatis, turpis enim blandit mi, in porttitor pede justo eu massa. Donec dapibus. Duis at velit eu est congue elementum. In hac habitasse platea dictumst.', 12.73, 2.74),
26
27(14, '2024-03-10 07:34:12', 94716, 'mmr-5392', 'Morbi vestibulum, velit id pretium iaculis, diam erat fermentum justo, nec condimentum neque sapien placerat ante. Nulla justo. Aliquam quis turpis eget elit sodales scelerisque. Mauris sit amet eros. Suspendisse accumsan tortor quis turpis. Sed ante.', 8.22, -8.68),
28
29(15, '2024-03-04 02:15:52', 82662, 'uhx-3823', 'Fusce lacus purus, aliquet at, feugiat non, pretium quis, lectus. Suspendisse potenti. In eleifend quam a odio.', 46.32, -34.54),
30
31(16, '2024-03-08 20:20:24', 154741, 'fxi-8867', 'Maecenas tristique, est et tempus semper, est quam pharetra magna, ac consequat metus sapien ut nunc. Vestibulum ante ipsum primis in faucibus orci luctus et ultrices posuere cubilia Curae; Mauris viverra diam vitae quam.', 46.84, 11.88),
32
33(17, '2024-03-03 01:31:03', 101426, 'wqo-7188', 'In quis justo.', -32.83, 32.3),
34
35(18, '2024-03-13 11:54:01', 88047, 'uhx-3823', 'Etiam vel augue. Vestibulum rutrum rutrum neque. Aenean auctor gravida sem. Praesent id massa id nisl venenatis lacinia. Aenean sit amet justo. Morbi ut odio. Cras mi pede, malesuada in, imperdiet et, commodo vulputate, justo. In blandit ultrices enim. Lorem ipsum dolor sit amet, consectetuer adipiscing elit. Proin interdum mauris non ligula pellentesque ultrices.', 16.59, 30.36),
36
37(19, '2024-03-13 08:11:37', 83977, 'snn-4127', 'Morbi sem mauris, laoreet ut, rhoncus aliquet, pulvinar sed, nisl. Nunc rhoncus dui vel sem. Sed sagittis. Nam congue, risus semper porta volutpat, quam pede lobortis ligula, sit amet eleifend pede libero quis orci. Nullam molestie nibh in lectus. Pellentesque at nulla. Suspendisse potenti. Cras in purus eu magna vulputate luctus. Cum sociis natoque penatibus et magnis dis parturient montes, nascetur ridiculus mus.', 35.22, 34.26);
Lastly, the maintenance table stores columns called vehicle_registration, date, and comments, plus a unique id.
 1CREATE TABLE IF NOT EXISTS maintenance (
 2
 3  id INT PRIMARY KEY AUTO_INCREMENT,
 4
 5  vehicle_registration VARCHAR(20),
 6
 7  date DATETIME,
 8
 9  comments TEXT
10
11);
12
13INSERT INTO maintenance (vehicle_registration, date, comments)
14
15VALUES
16
17('enf-8785', '2024-03-20 12:00:00', 'Lorem Ipsum'),
18
19('eqv-7977', '2024-03-20 12:00:00', 'Lorem Ipsum'),
20
21('mmr-5392', '2024-01-01 12:00:00', 'Lorem Ipsum'),
22
23('uhx-3823', '2024-03-25 12:00:00', 'Lorem Ipsum'),
24
25('fxi-8867', '2024-03-05 12:00:00', 'Lorem Ipsum'),
26
27('wqo-7188', '2024-03-11 12:00:00', 'Lorem Ipsum'),
28
29('uhx-3823', '2024-03-08 12:00:00', 'Lorem Ipsum'),
30
31('snn-4127', '2024-03-04 12:00:00', 'Lorem Ipsum'),
32
33('mmr-5392', '2024-03-11 12:00:00', 'Lorem Ipsum'),
34
35('pjv-9421', '2024-03-08 12:00:00', 'Lorem Ipsum'),
36
37('eqv-7977', '2024-03-05 12:00:00', 'Lorem Ipsum'),
38
39('eqv-7977', '2024-03-04 12:00:00', 'Lorem Ipsum'),
40
41('kmg-8947', '2024-03-01 12:00:00', 'Lorem Ipsum'),
42
43('snn-4127', '2024-03-01 12:00:00', 'Lorem Ipsum'),
44
45('wqo-7188', '2024-03-17 12:00:00', 'Lorem Ipsum'),
46
47('eqv-7977', '2024-03-20 12:00:00', 'Lorem Ipsum'),
48
49('pjv-9421', '2024-03-27 12:00:00', 'Lorem Ipsum'),
50
51('kmg-8947', '2024-03-23 12:00:00', 'Lorem Ipsum'),
52
53('hxx-7141', '2024-03-10 12:00:00', 'Lorem Ipsum'),
54
55('uhx-3823', '2024-03-10 12:00:00', 'Lorem Ipsum');
Now, before we carry on, we’re going to make a few minor changes to our tables in order to make life easier a little later.
First of all, both the check_ins and maintenance tables contain text attributes called columns. In Budibase, however, we can distinguish between Text and Long-Form Text data. So, we’ll update the type of each of these so that appropriate fields are provided when we autogenerate UIs.

On the check_ins table, we’re also going to add a column called submitted_by and set its type for the user. This is a special attribute that allows us to assign a relationship to a row in our internal Users table.

Lastly, each of our tables has a column that stores the registration number of the relevant vehicle. We want to create relationships using these, so that we can relevant information across tables later.
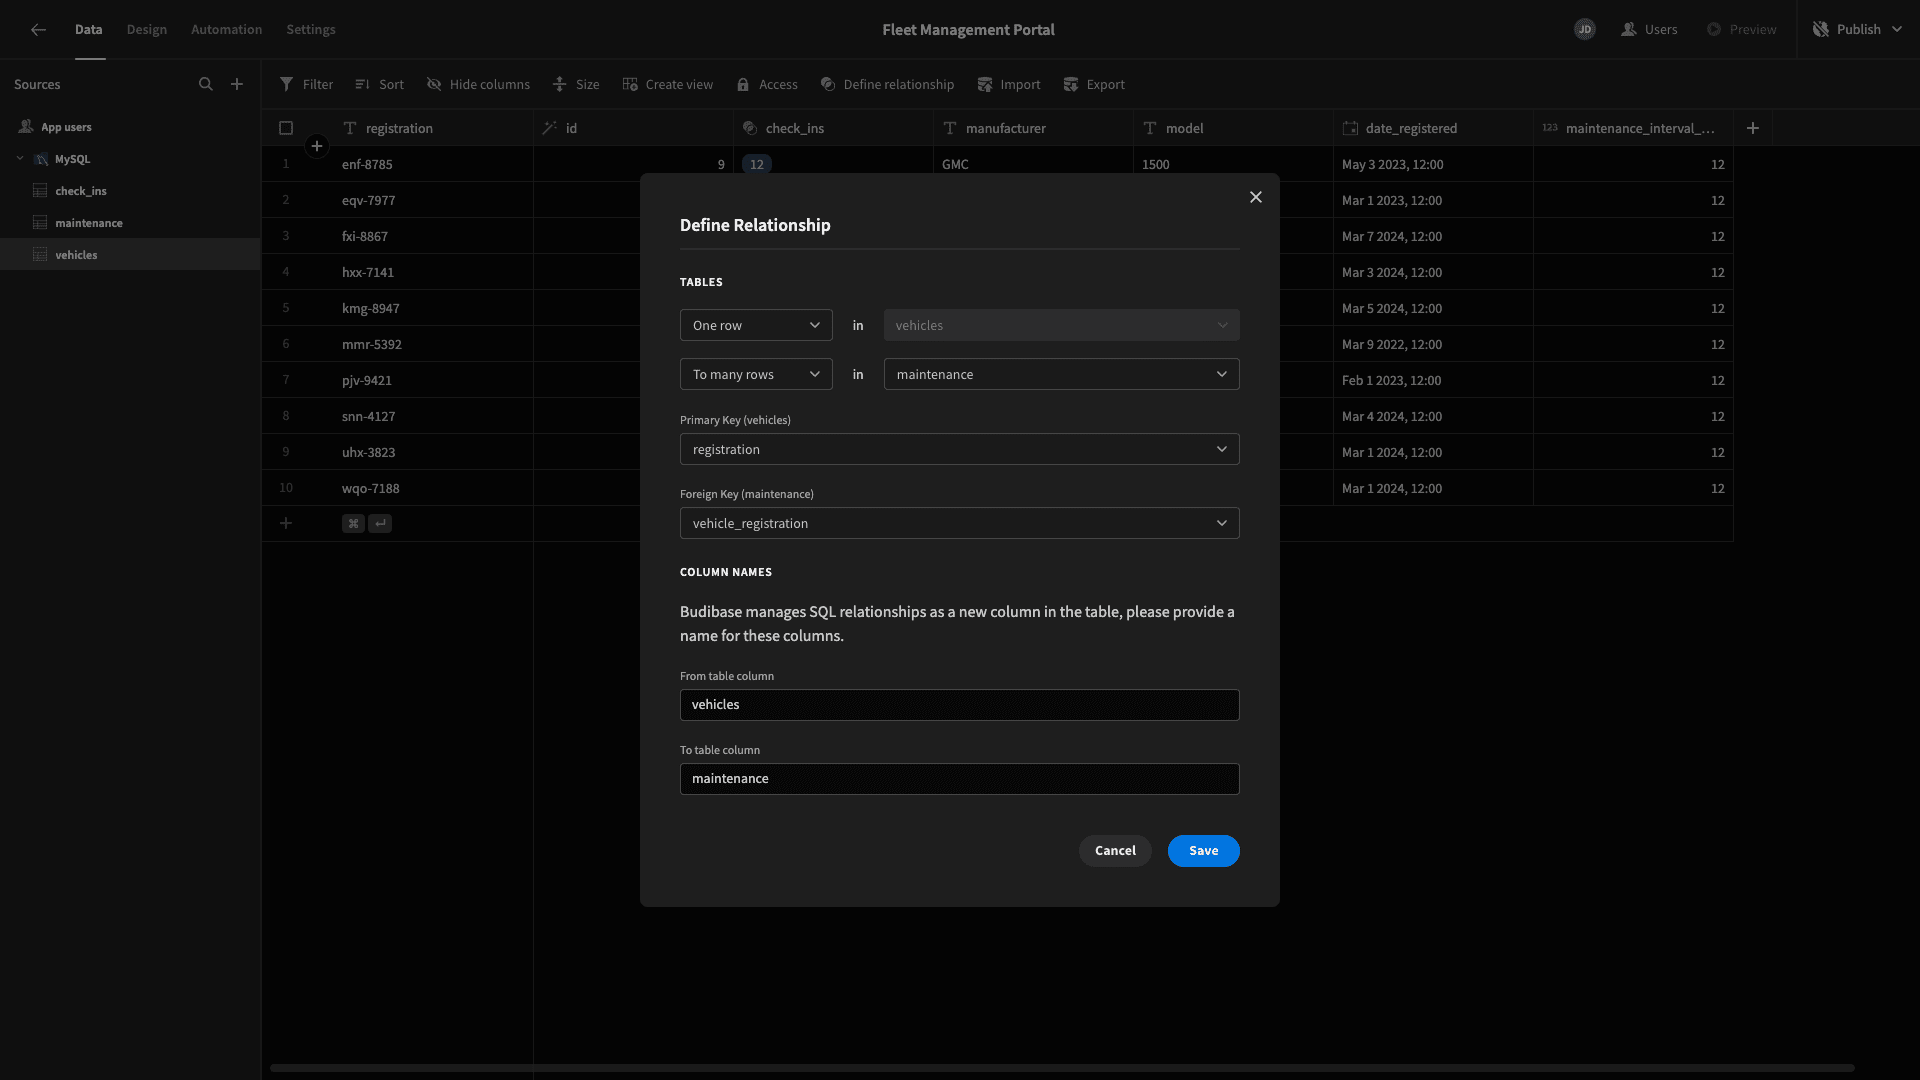
We’ll start by hitting Define Relationship within the vehicles table.

Then, we want to link one row in our vehicles table to many rows in our check_in table, using registration as our primary key and vehicle_registration as our foreign key.
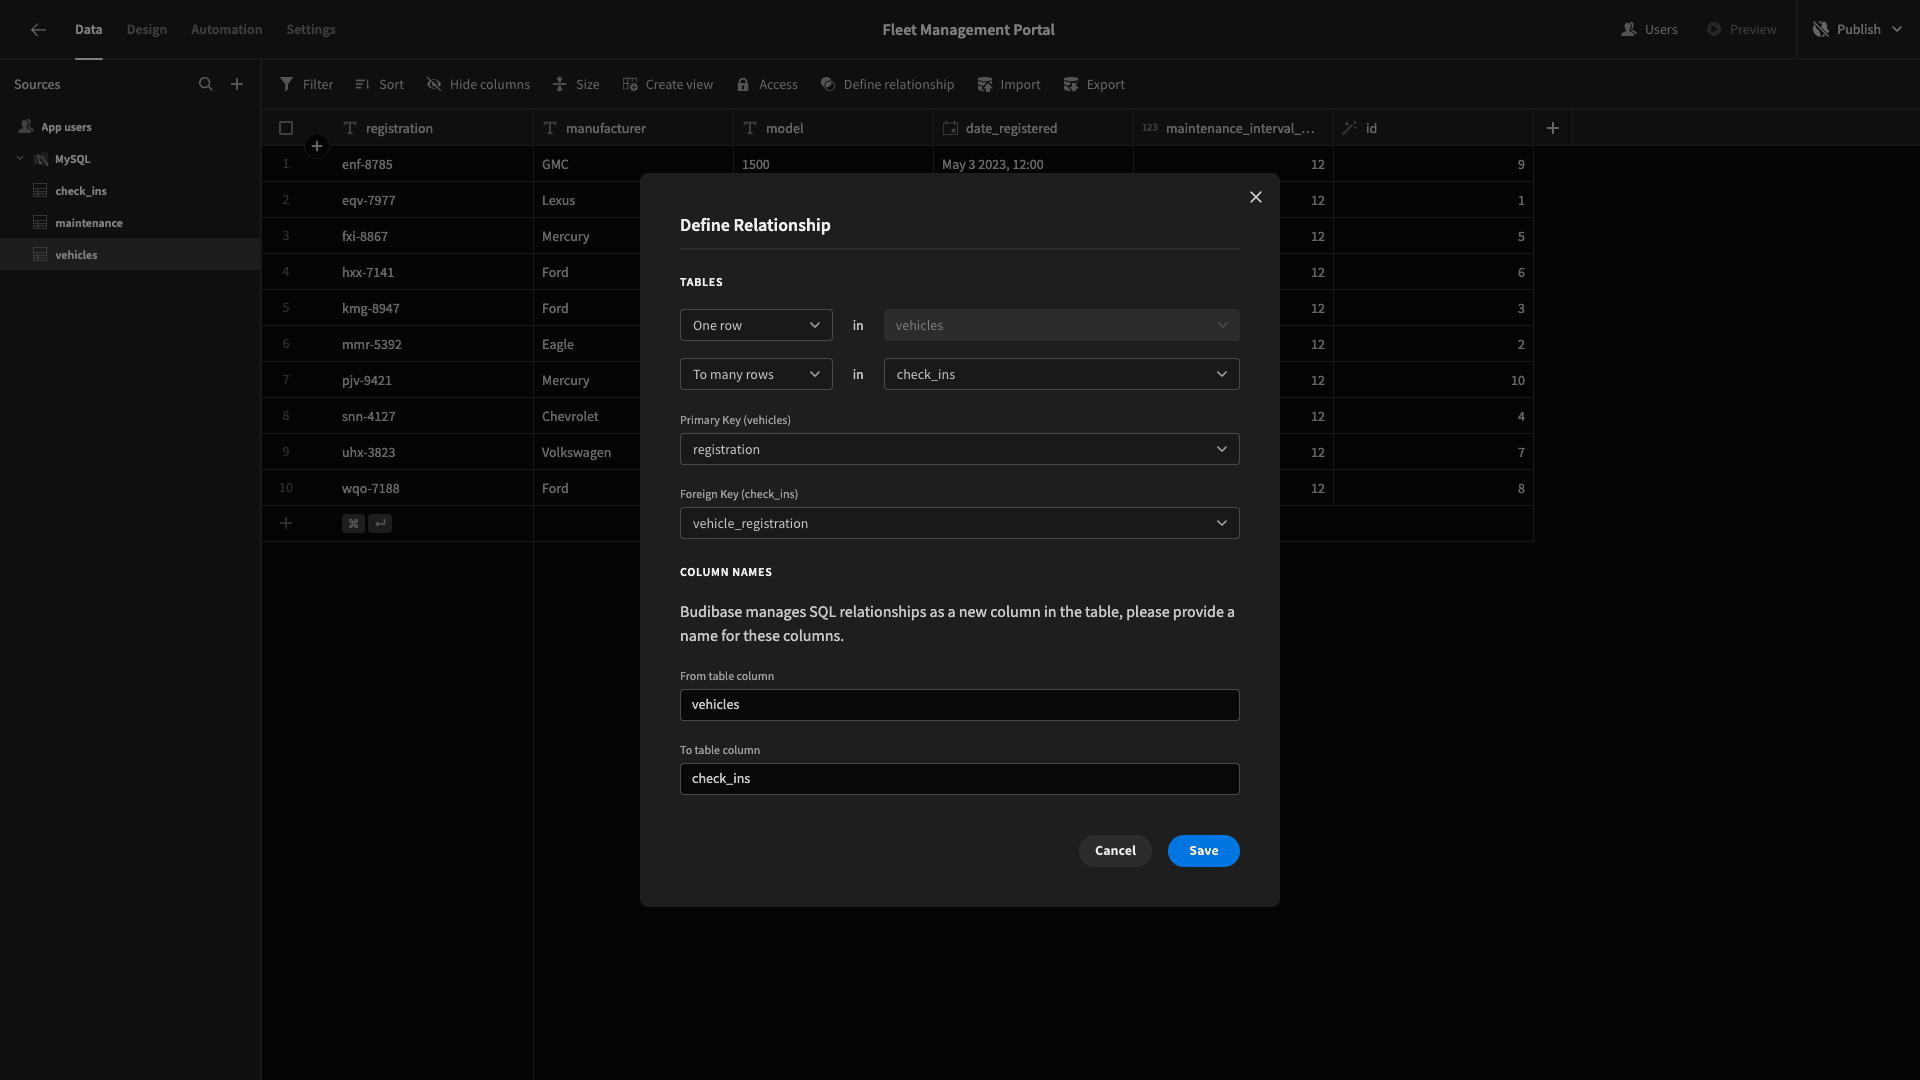
We’ll repeat the same process to relate the vehicles table to the maintenance table.
Now, we can see the related rows from our other tables within the vehicles table.
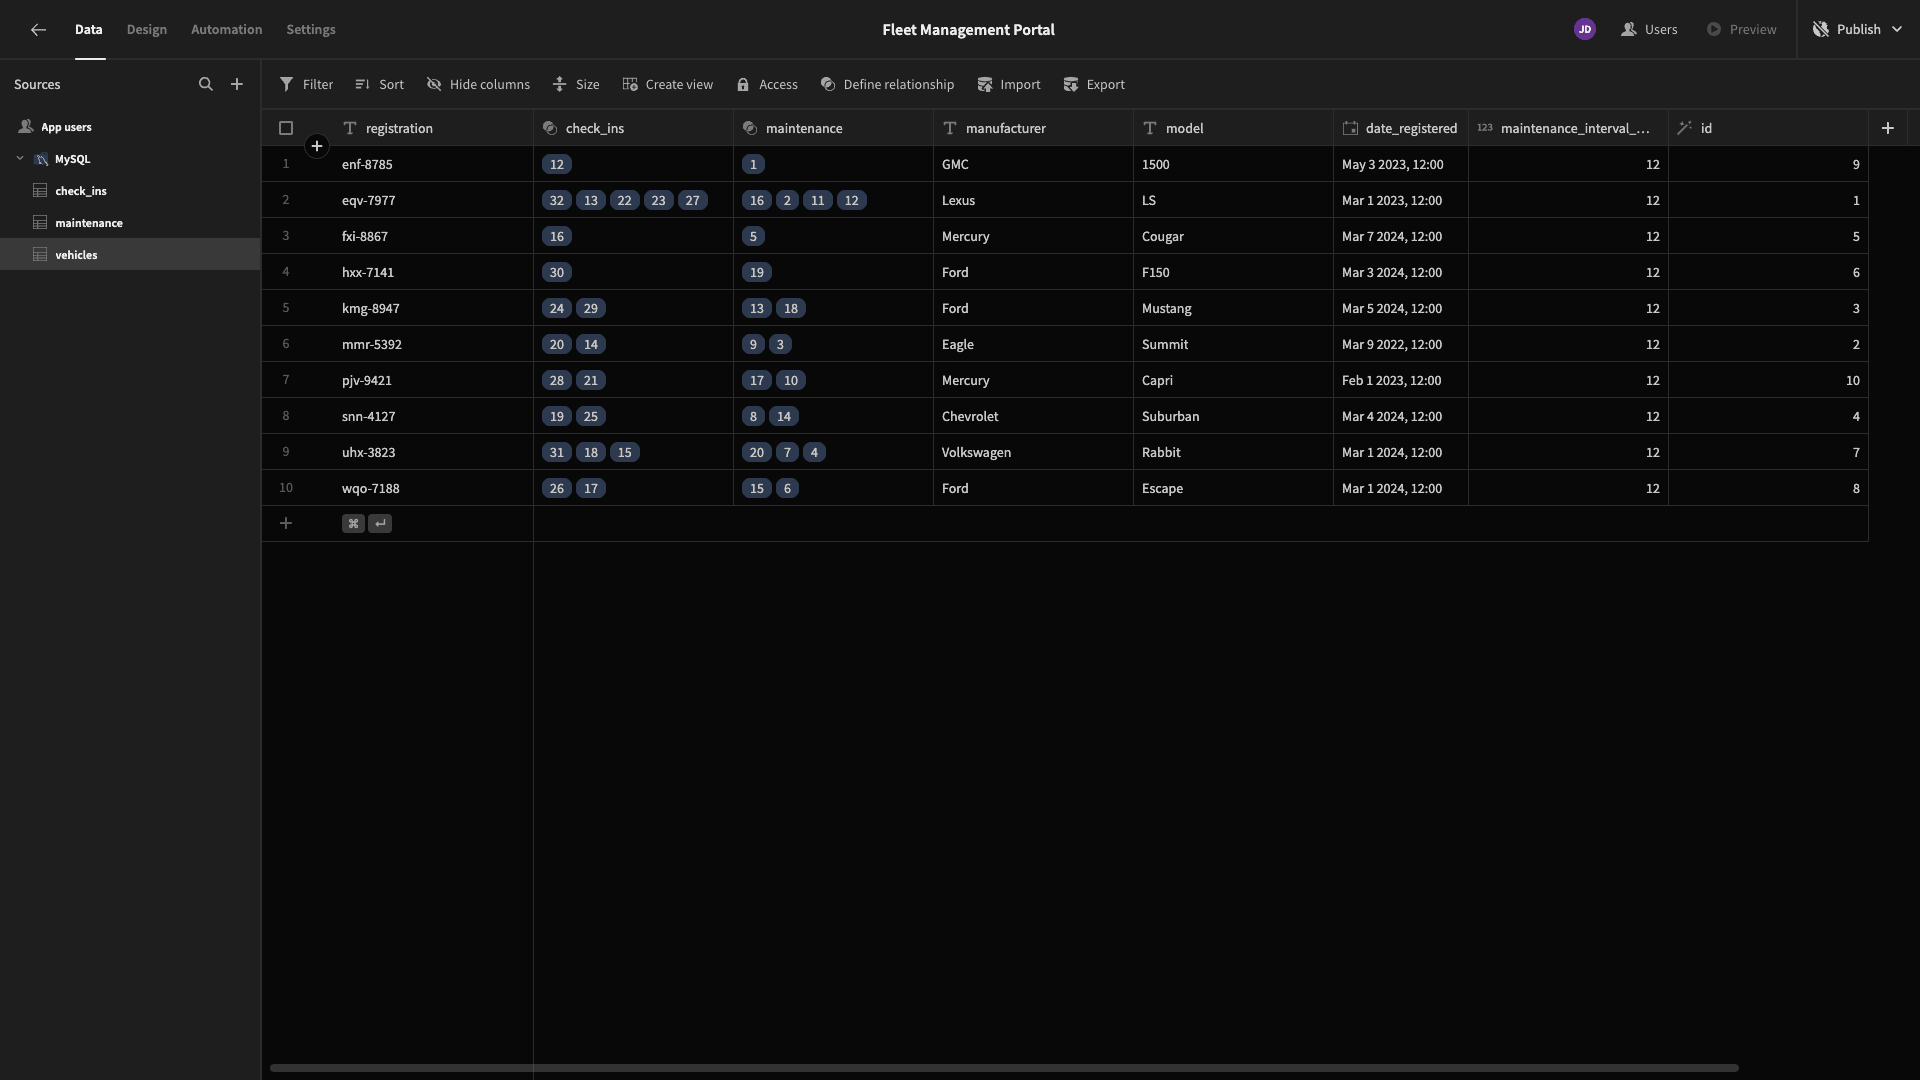
We’ll also be able to use stored values from across each of our tables as formula variables in the vehicles table, but we’ll return to this later.
For now, it’s time to start building our fleet management portal’s UIs.
2. Creating our fleet map
Start by heading over to the Design tab.
Here, we’re offered several choices for how we want to create our first screen, including using one of Budibase’s autogenerated layouts.
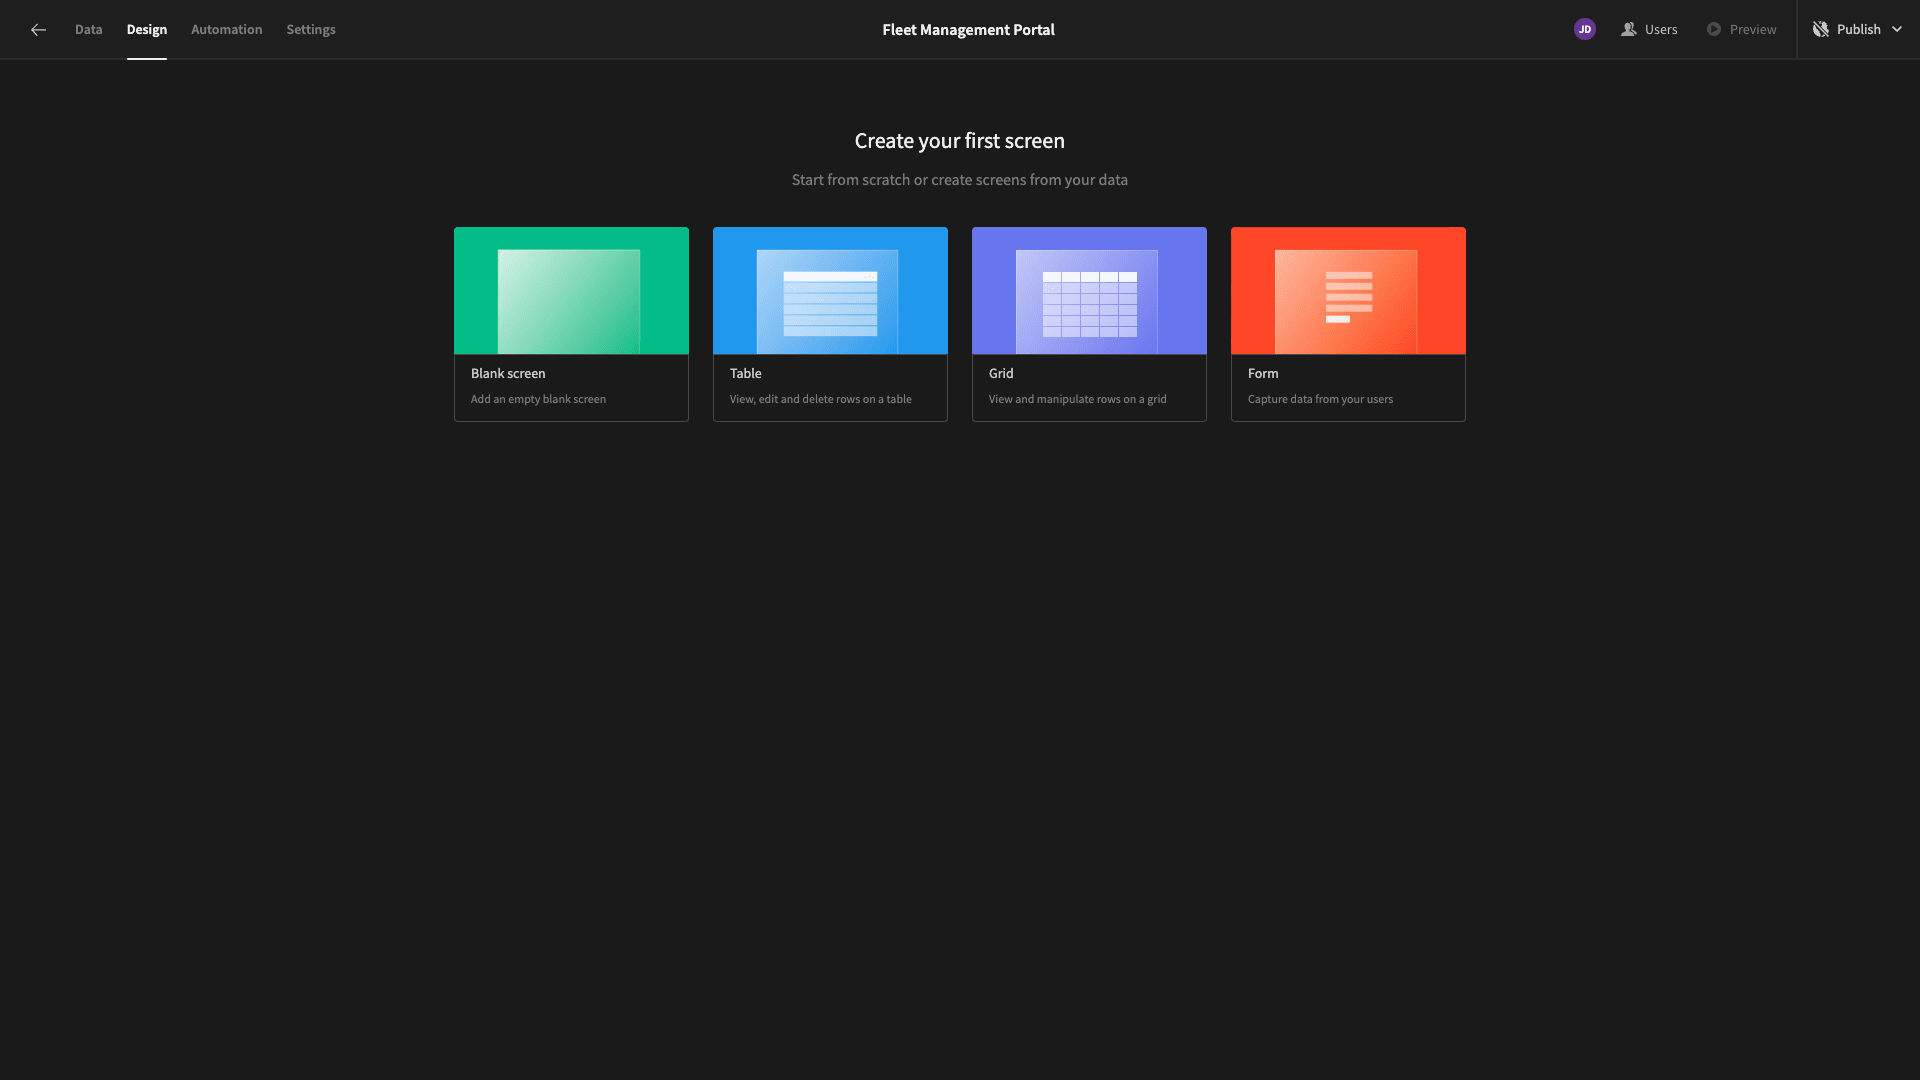
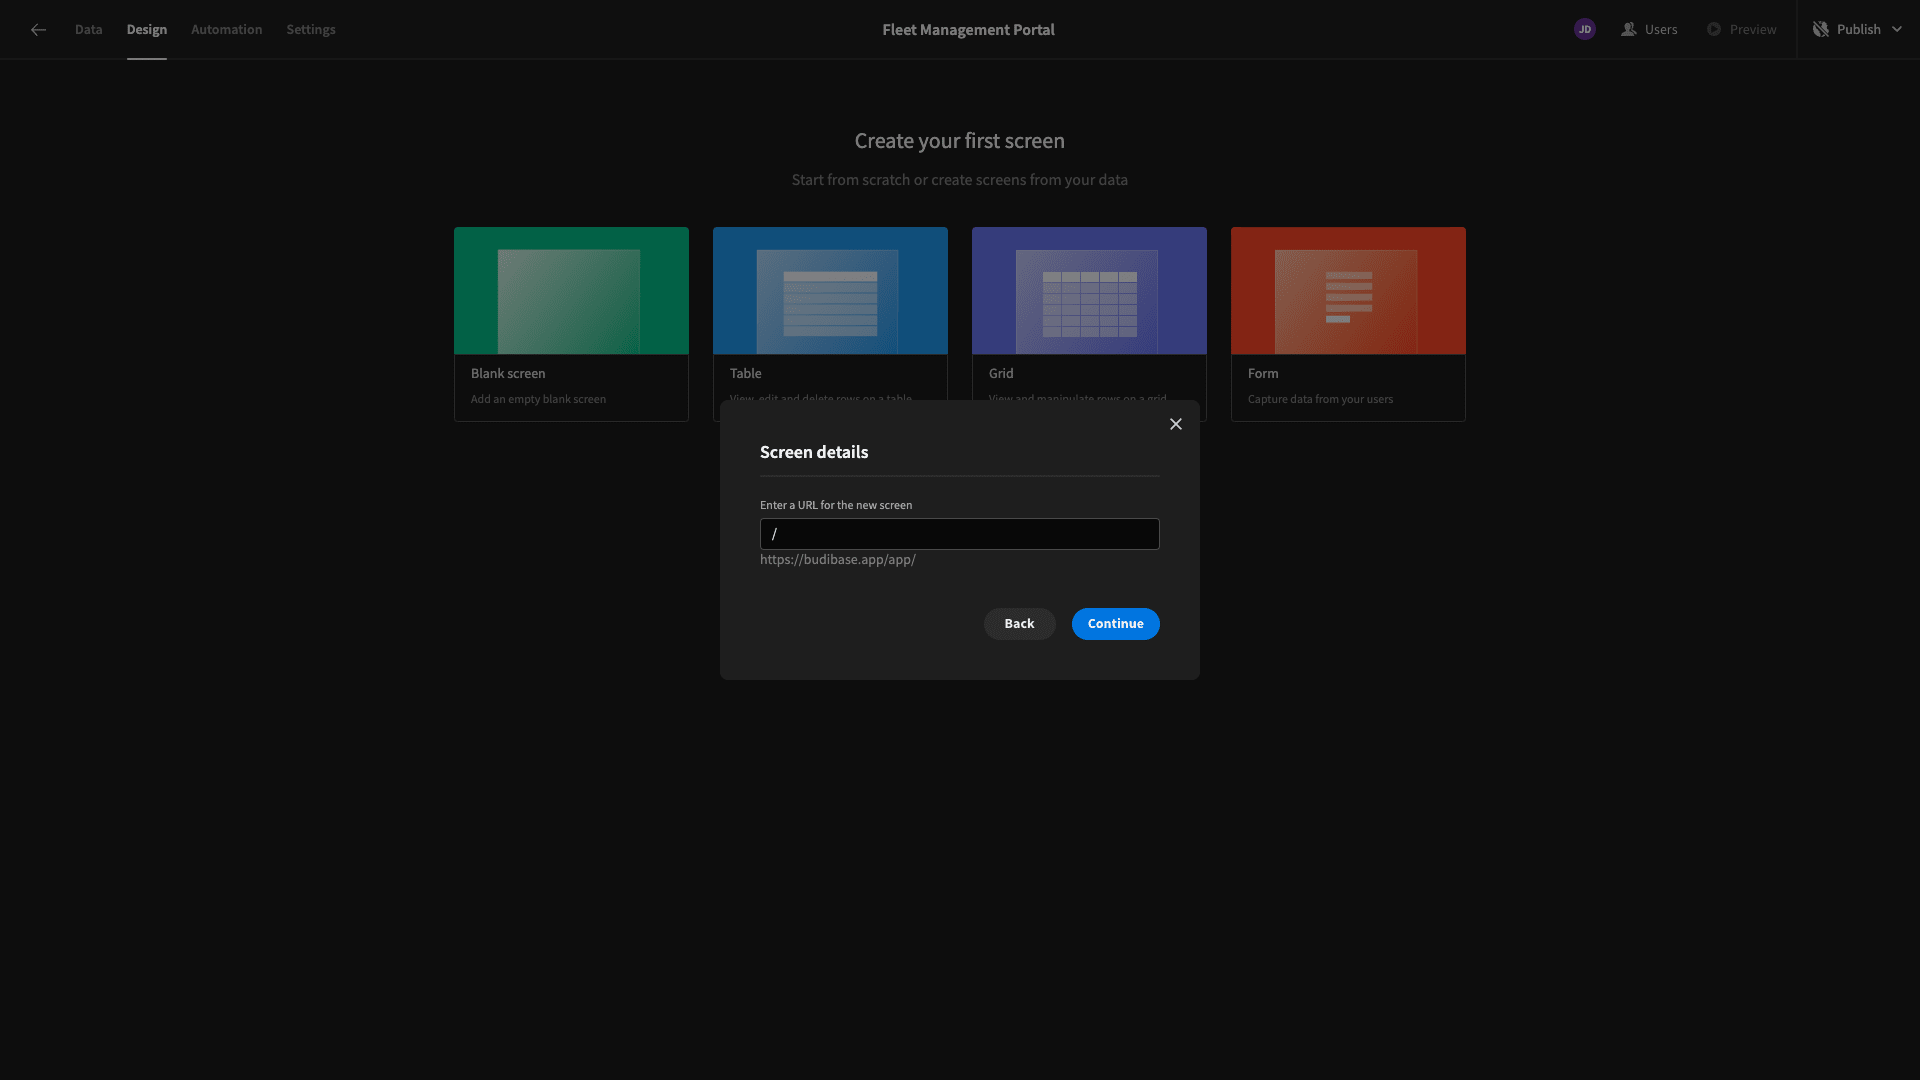
This time, though, we’re opting for a blank screen. When we choose this, we’re prompted to input a URL extension. We’ll use a single trailing slash.
We then need to choose a minimum access role that’s required to view our screen. Budibase has four roles, called Public, Basic, Power, and Admin. We only want users with the highest access role to access our screen, so we’re setting this to Admin.

Here’s how our blank screen will look.

We can use the plus icon on the left-hand side to start adding components.
We’re adding a component called Embedded Map.
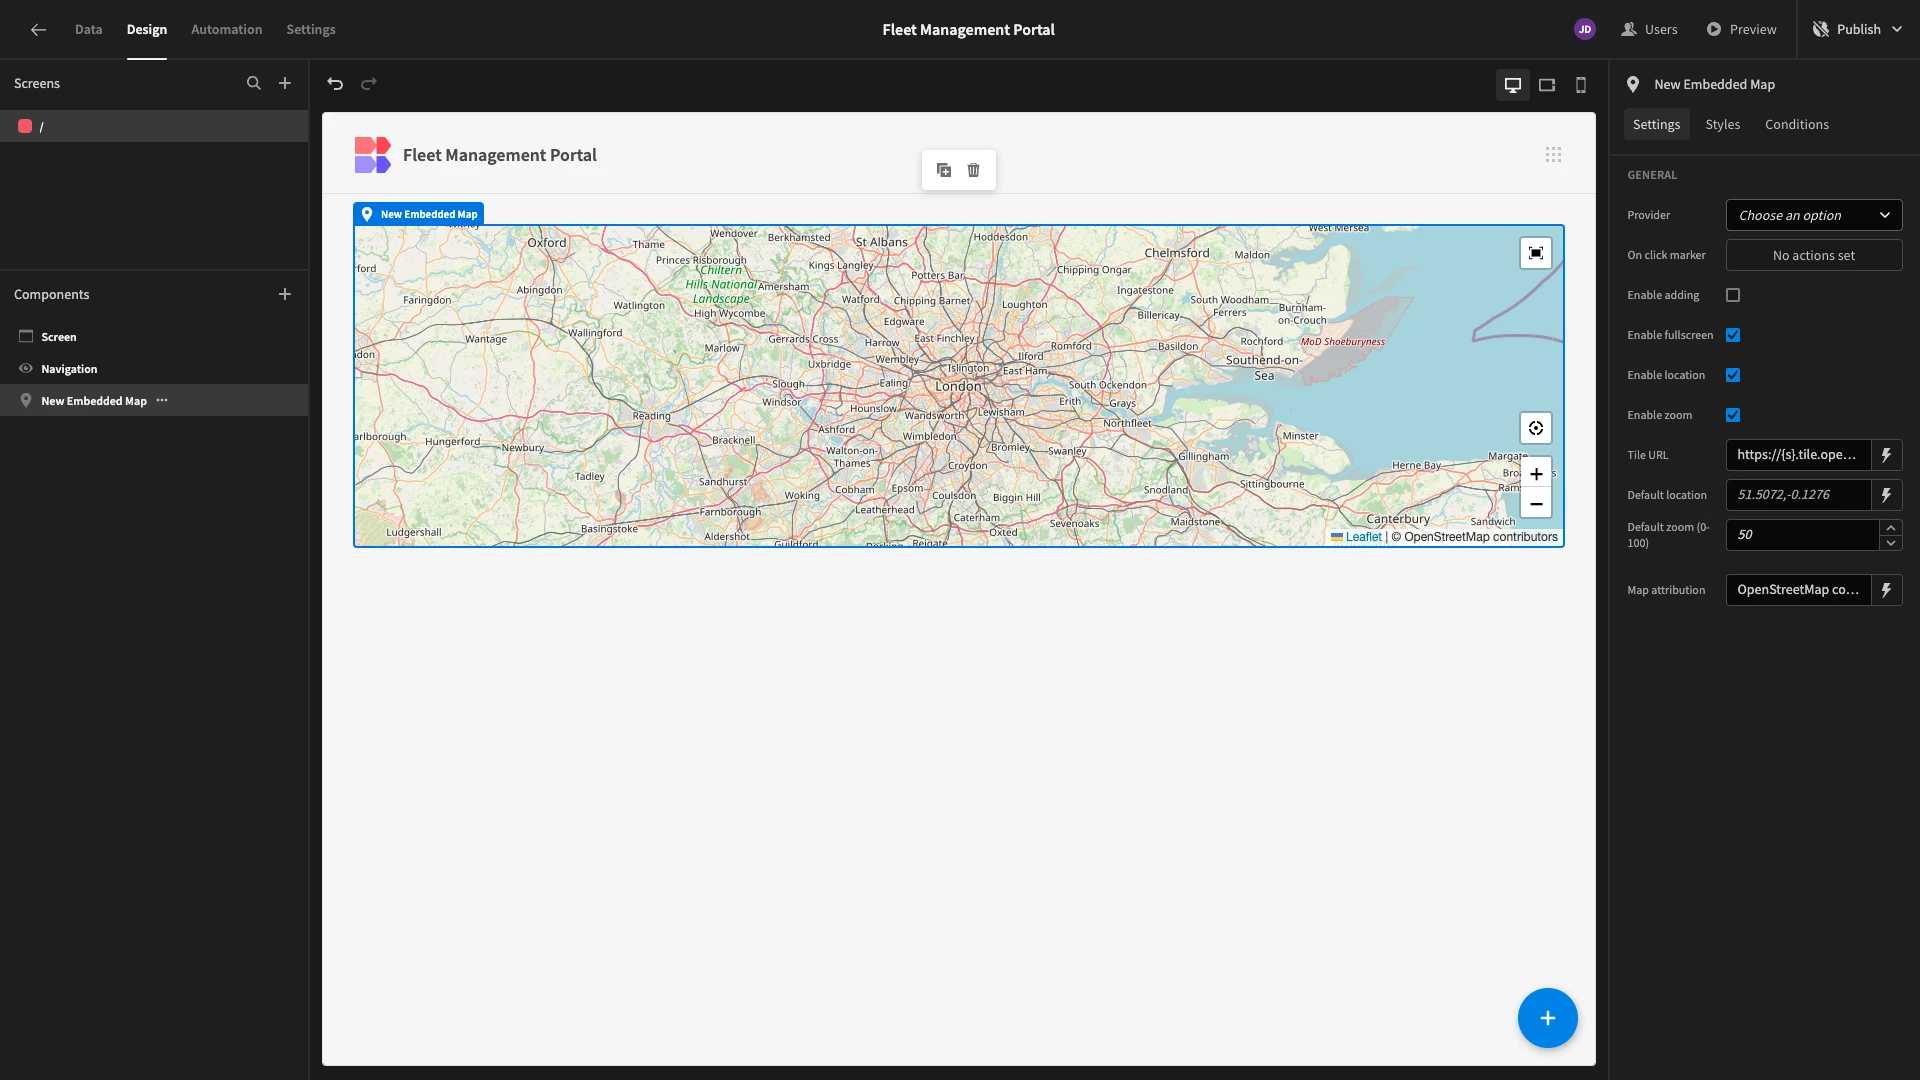
This creates an interactive map that we can plot points on by connecting it to a data source that contains numerical values representing latitudes and longitudes.
As we know, these are currently stored in our check_ins table. However, we don’t want to display every single check-in row.
Rather, we only want to display the most recent location of each vehicle.
For this, we’ll need a custom query that returns all the latitude and longitude values from the rows with the most recent date attributes for each unique vehicle_registration.
Custom query
Head back to the Data section, and under our MySQL connection, we’ll hit Create New Query.
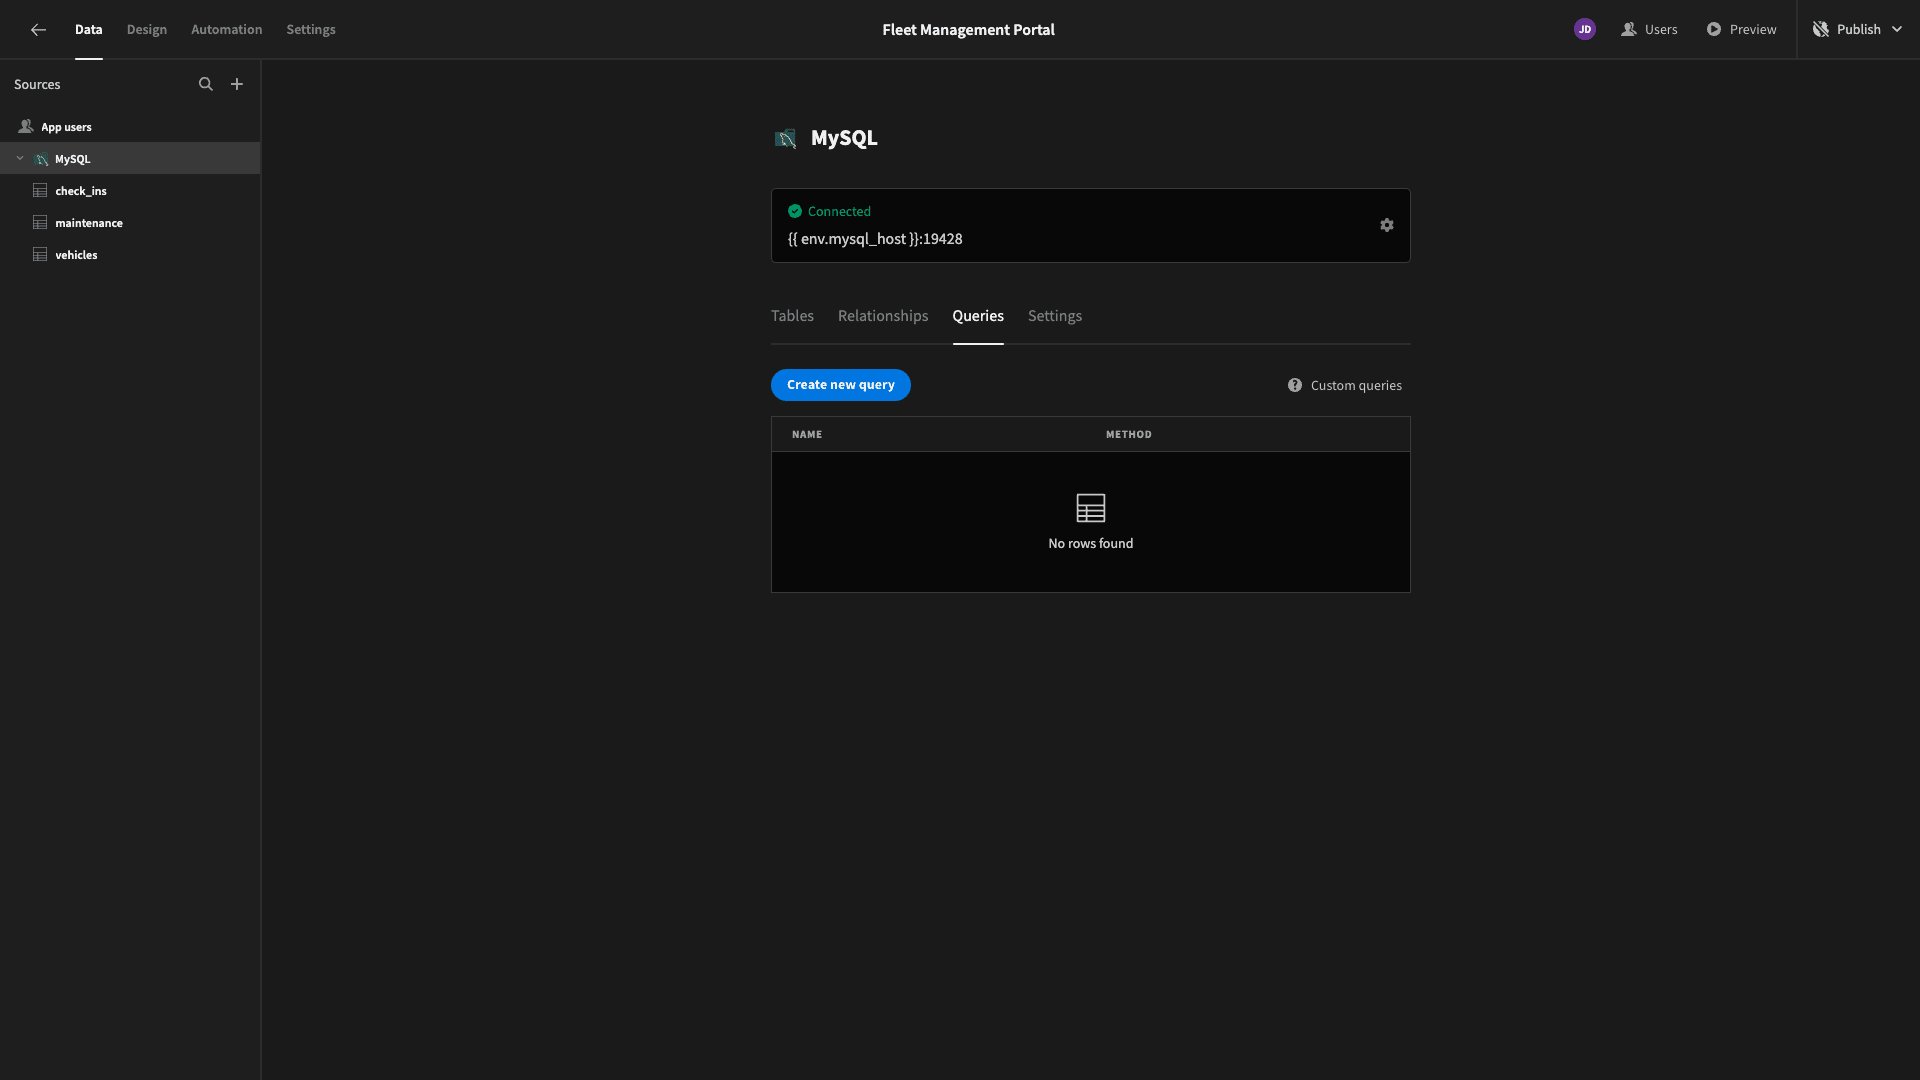
Here, we can give our query a name, select a function, and input our SQL statements.
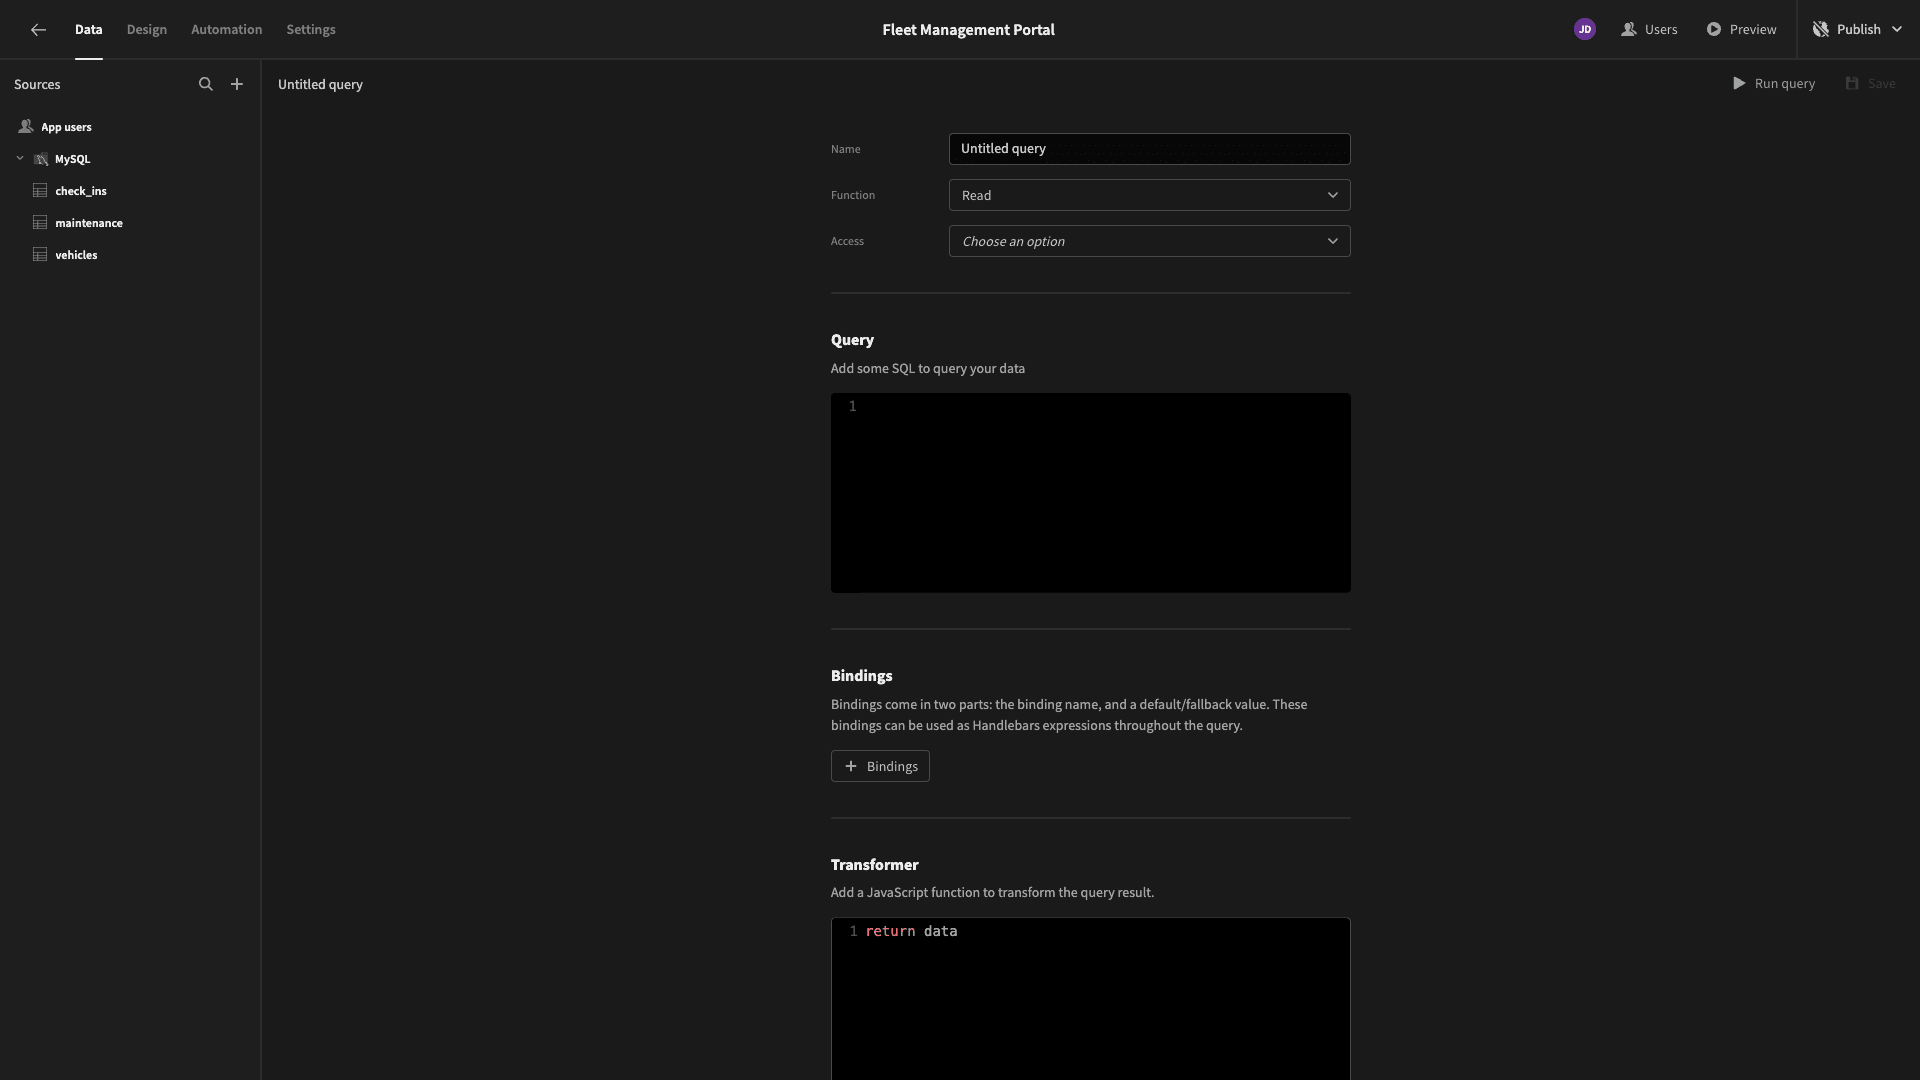
We’re going to call ours GetCurrentLocation and use the following query.
 1SELECT c.vehicle_registration, c.latitude, c.longitude
 2
 3FROM check_ins c
 4
 5JOIN (
 6
 7  SELECT vehicle_registration, MAX(date) AS max_date
 8
 9  FROM check_ins
10
11  GROUP BY vehicle_registration
12
13) AS latest
14
15ON c.vehicle_registration = latest.vehicle_registration AND c.date = latest.max_date;
This calculates the highest date for each unique vehicle_registration in our table and then retrieves the latitude and longitudes for the relevant rows.

Hit Save and head back to the Design tab.
Populating our map
We’ll start by adding a component called a Data Provider and nesting our Embedded Map inside of this.
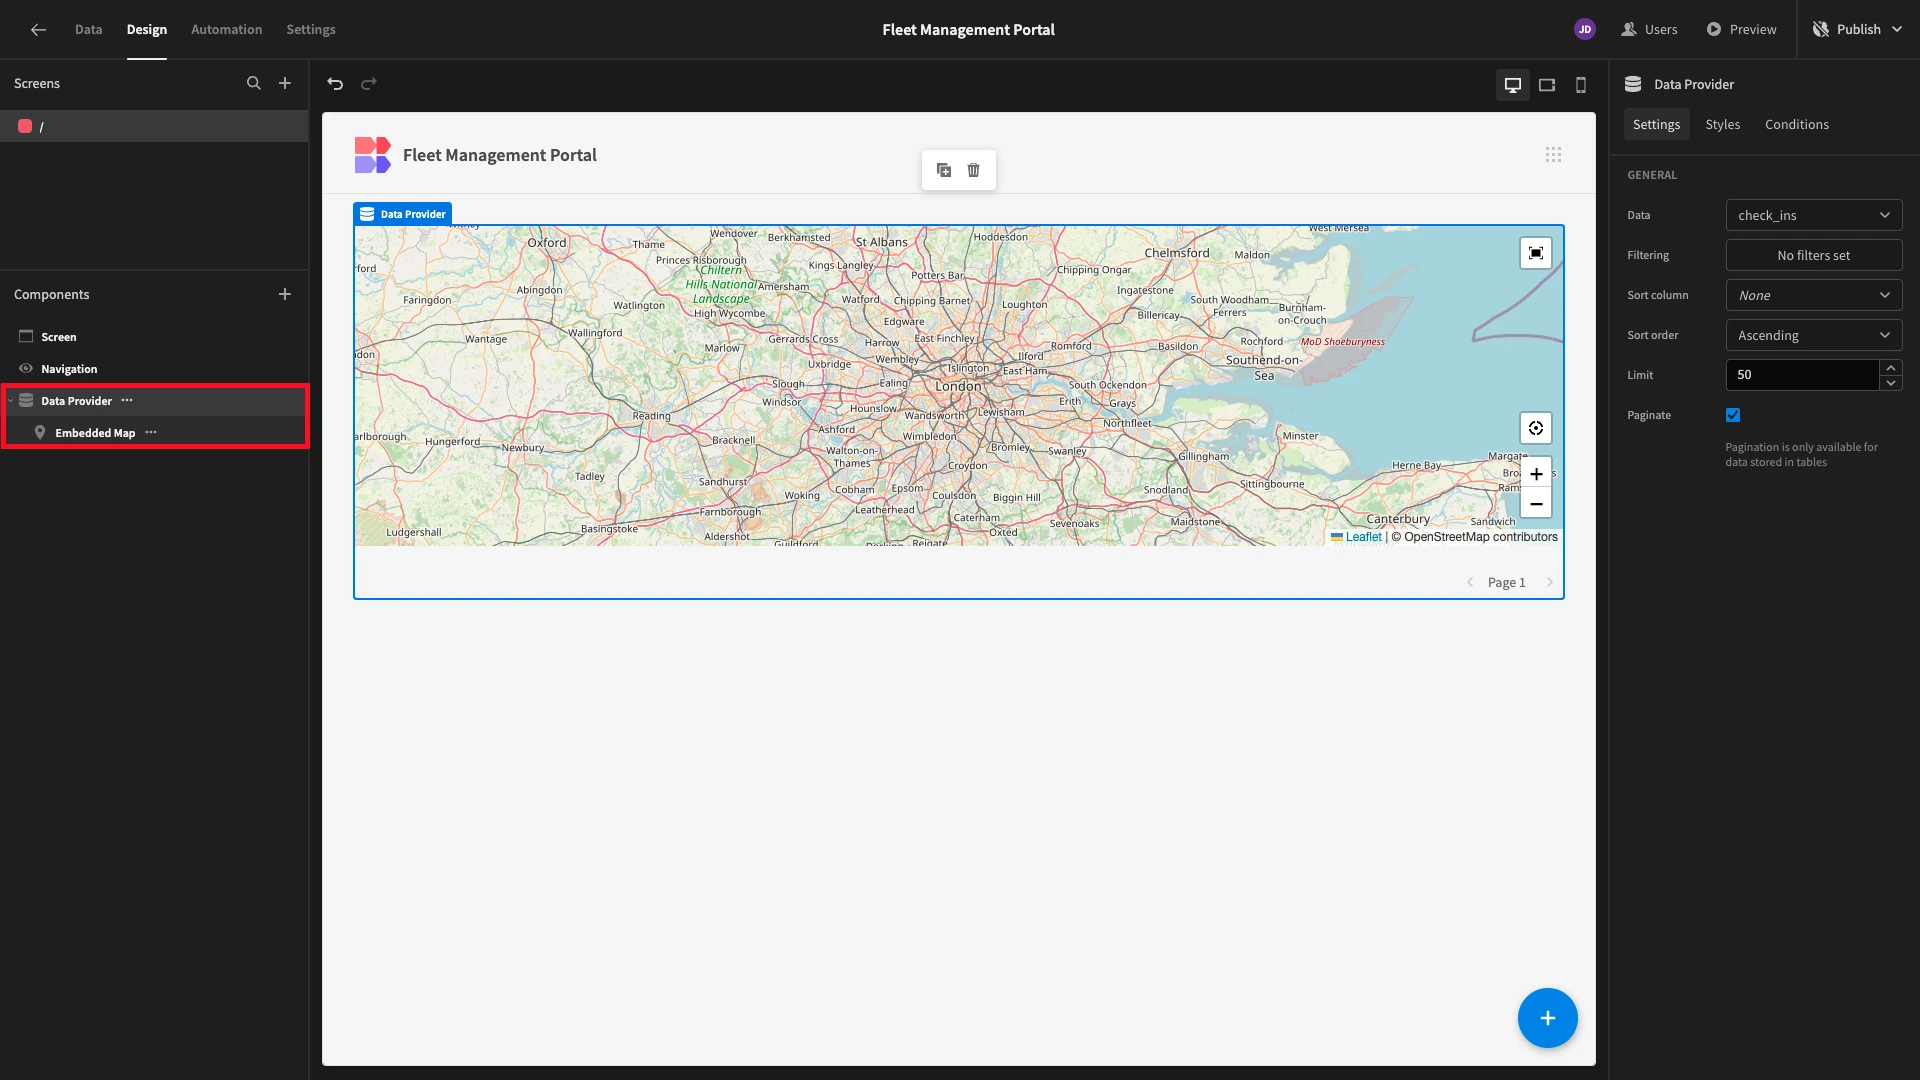
Then, we’ll set the Data for our Data Provider to our new query.
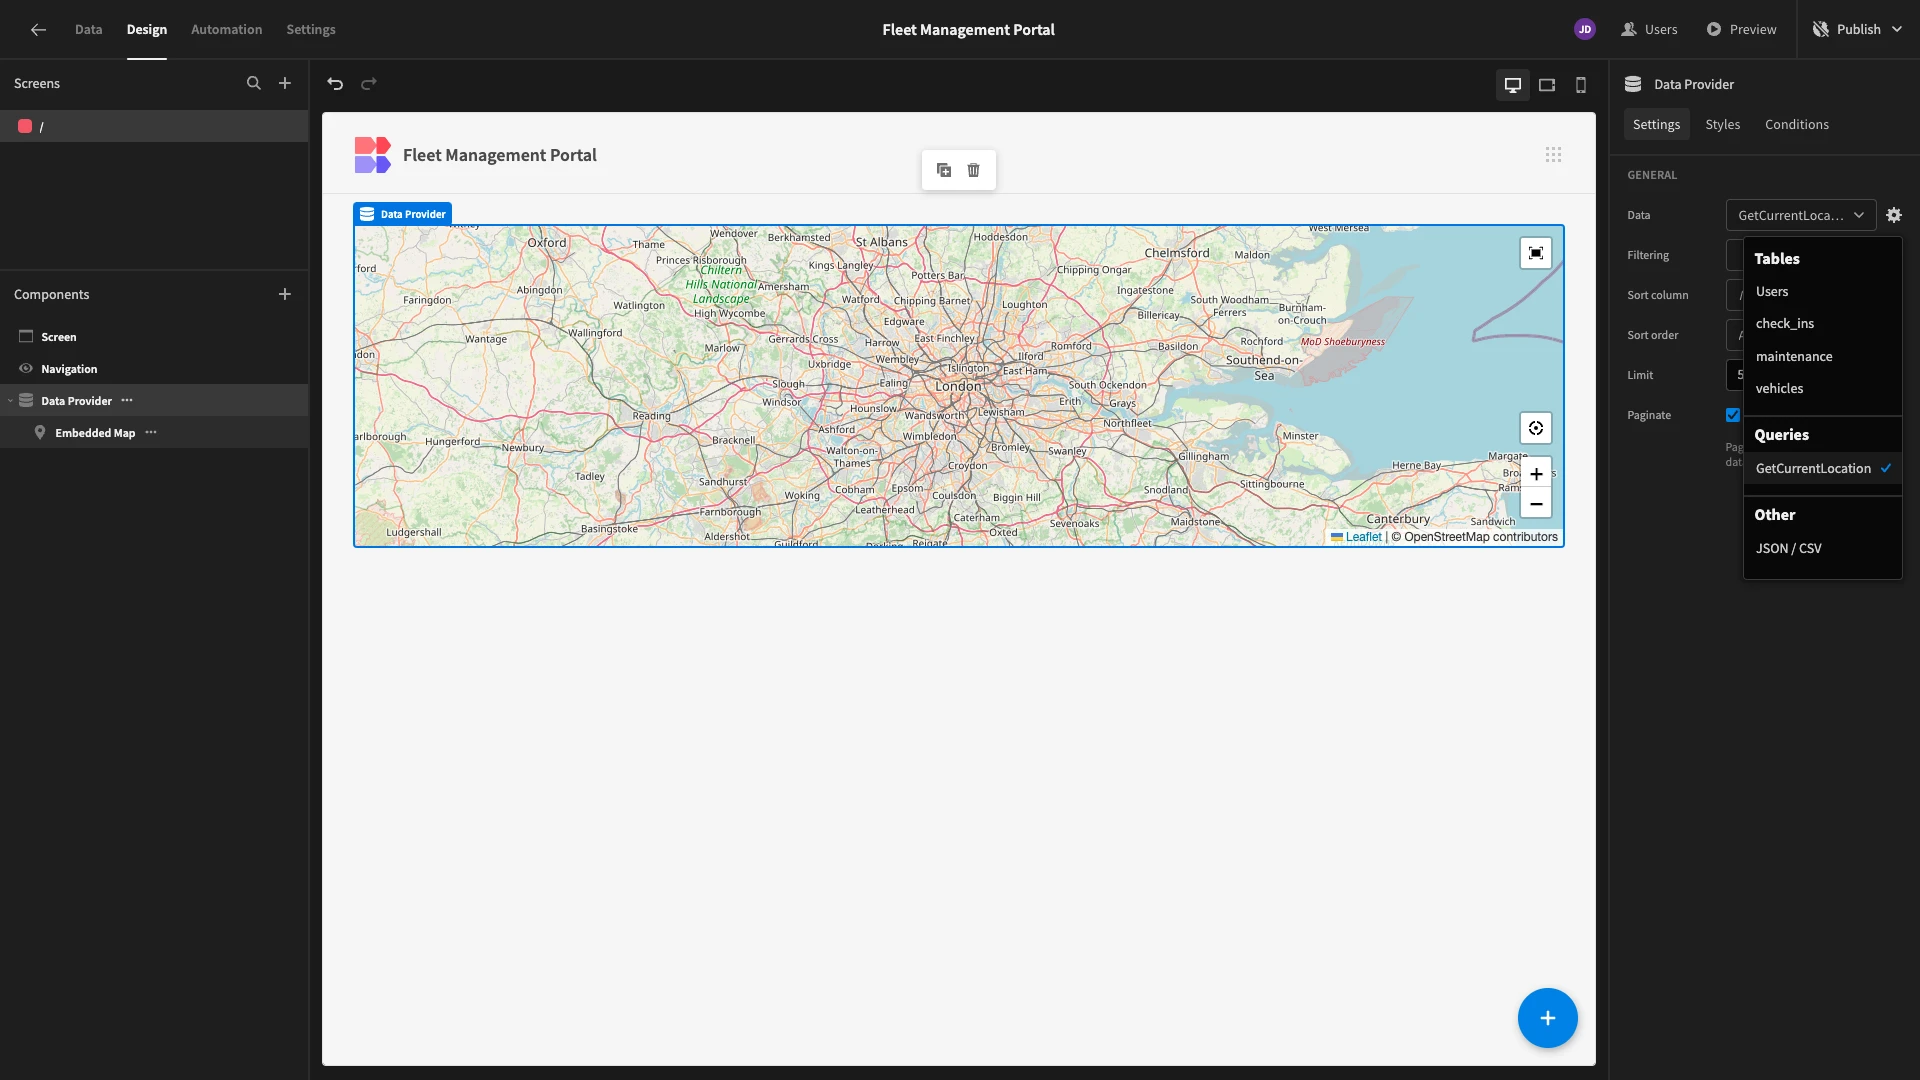
Now, our map is exposed to all of the data that is returned by our query.
We’ll set the latitude key to our latitude attribute, the longitude key to longitude, and the title key to vehicle_registration.
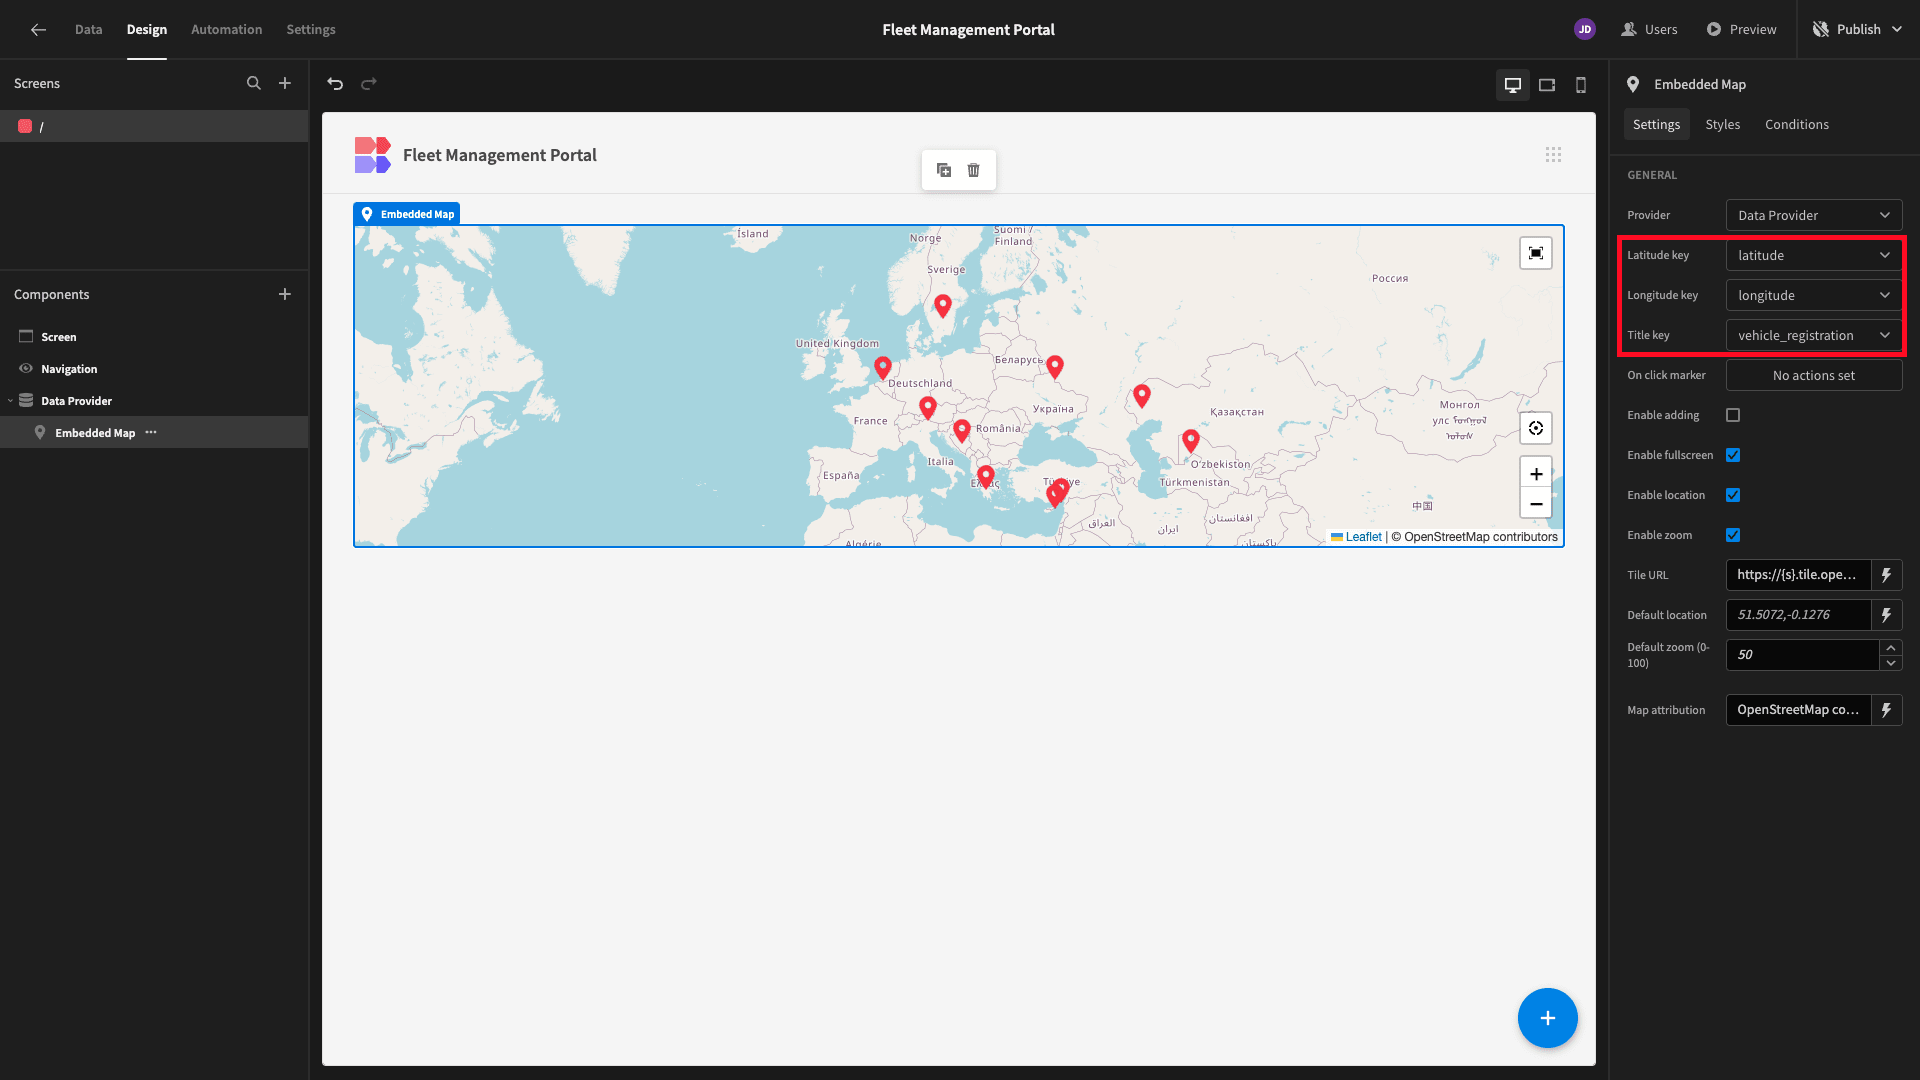
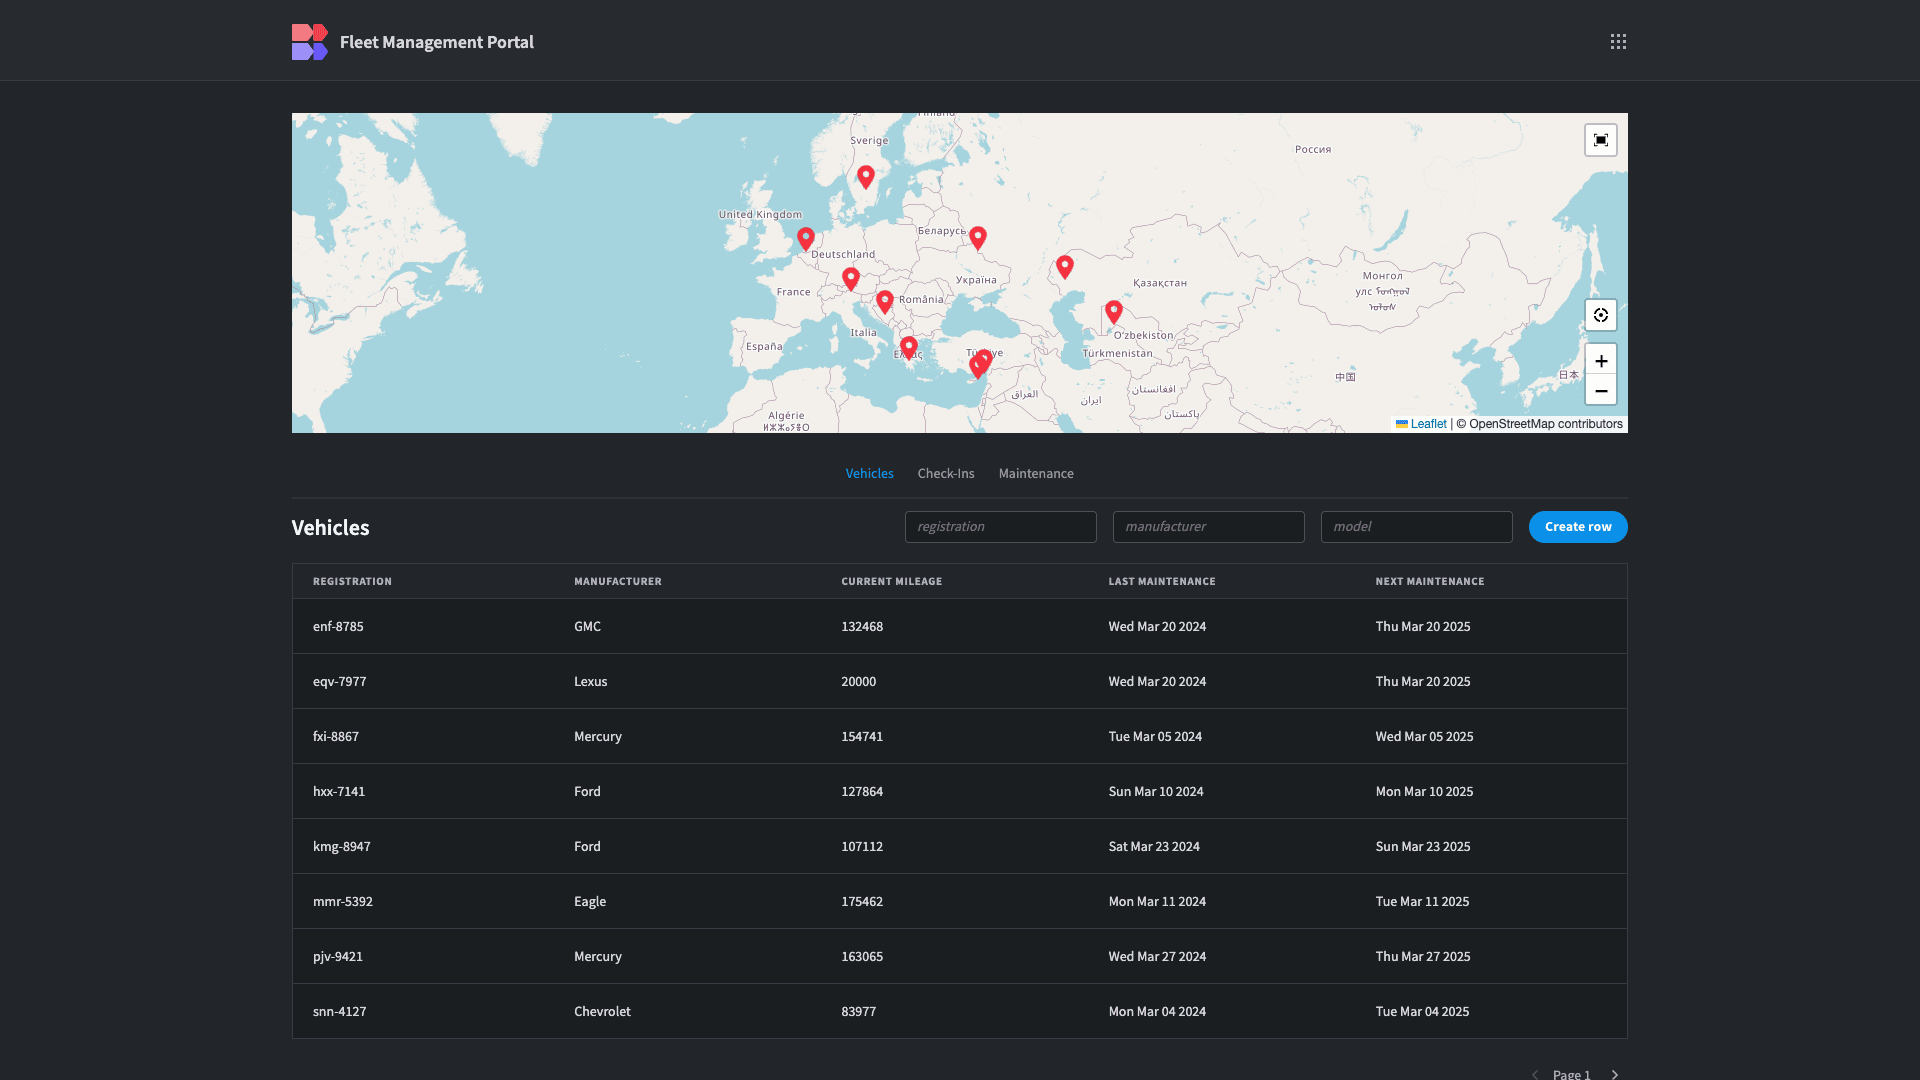
Now, we can see where each of our vehicles last checked in plotted on our map.
3. Adding our admin functions
Next, we want to add a section below our map where our admins can search and view information or carry our CRUD actions across each of our three connected tables.
However, things would look a little bit cluttered if we presented all of this simultaneously.
So, we’re going to create a tabbing UI that allows our users to flick between different categories of information.
We could build this from scratch, but today, we’re going to use a community-contributed component called Super Tabs .
You can check out our plug-ins documentation to learn how to add this to your Budibase tenant in just a few clicks.
We’ll start by adding our Super Tabs component and enabling its Centred and Emphasized options.
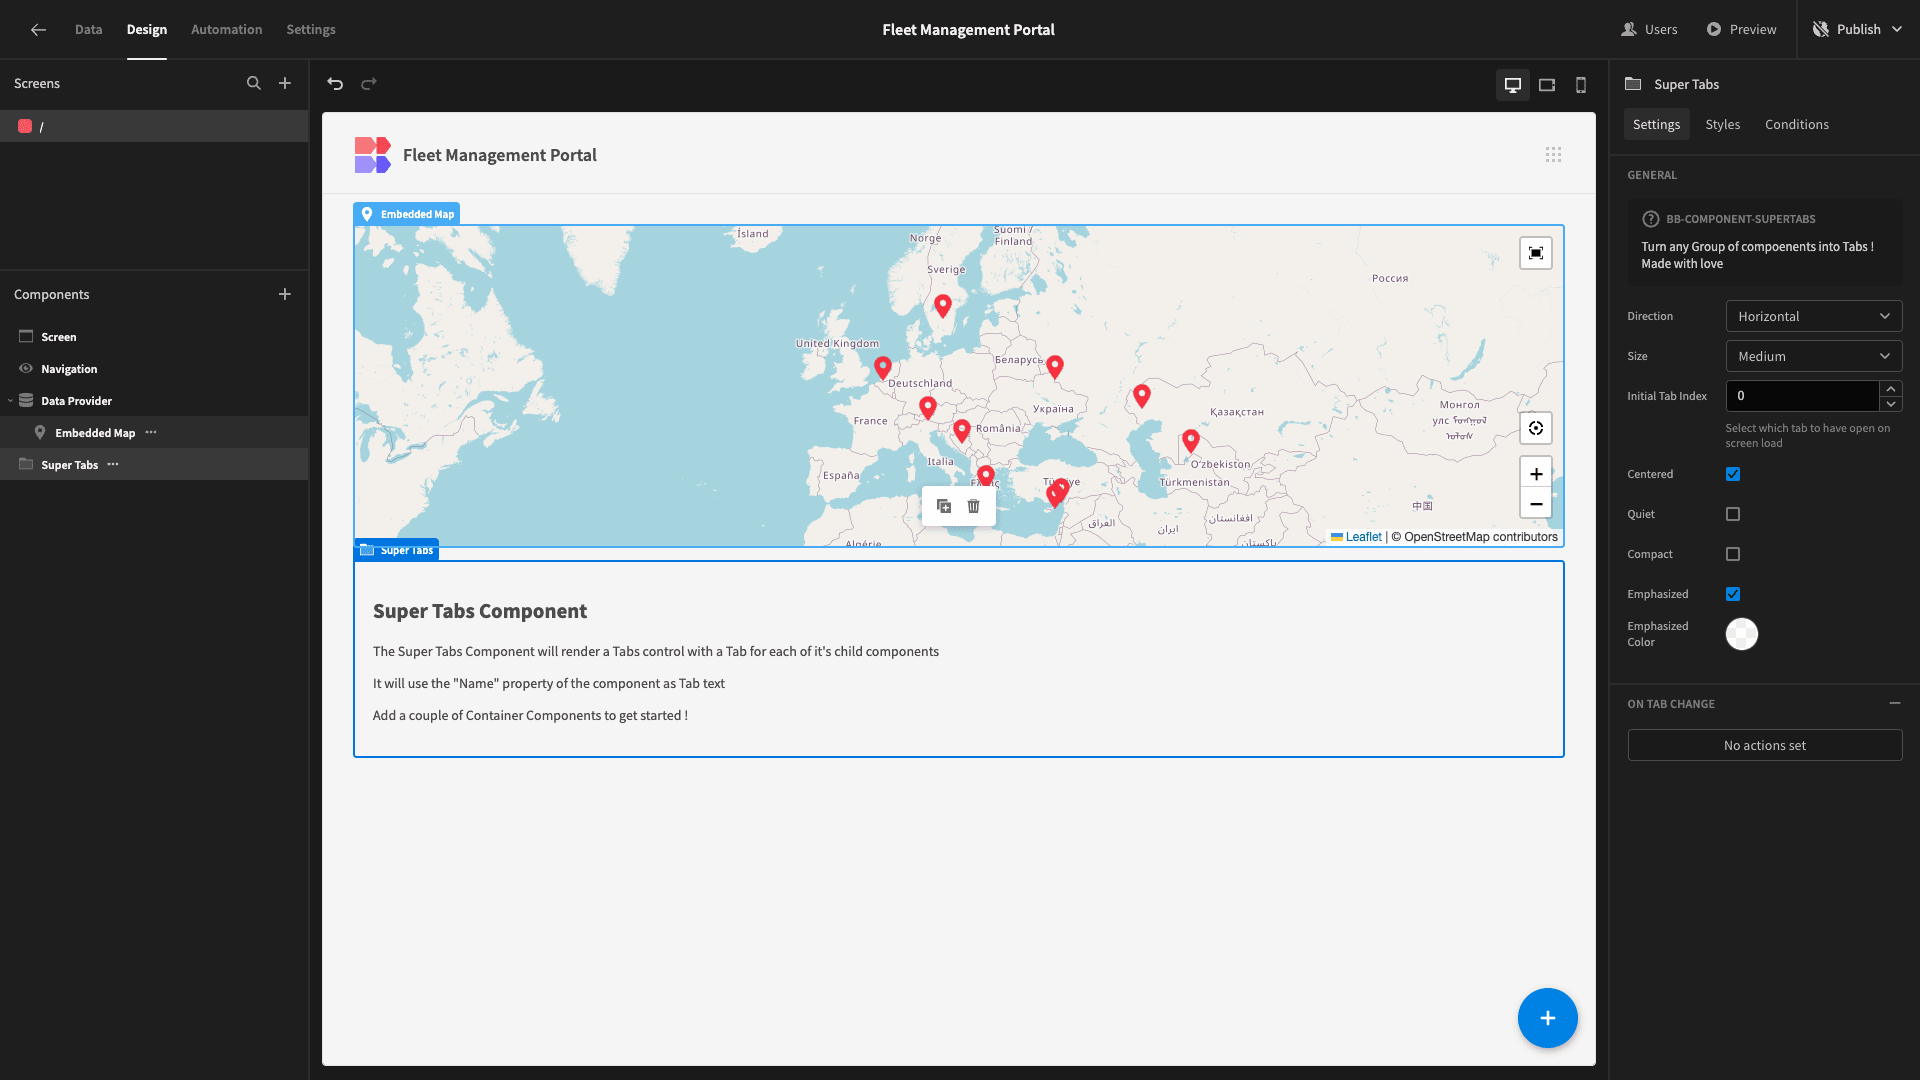
When we’re done, this will display the names of each component we embed directly within it as clickable links to display the relevant UI elements.
Generating CRUD UIs
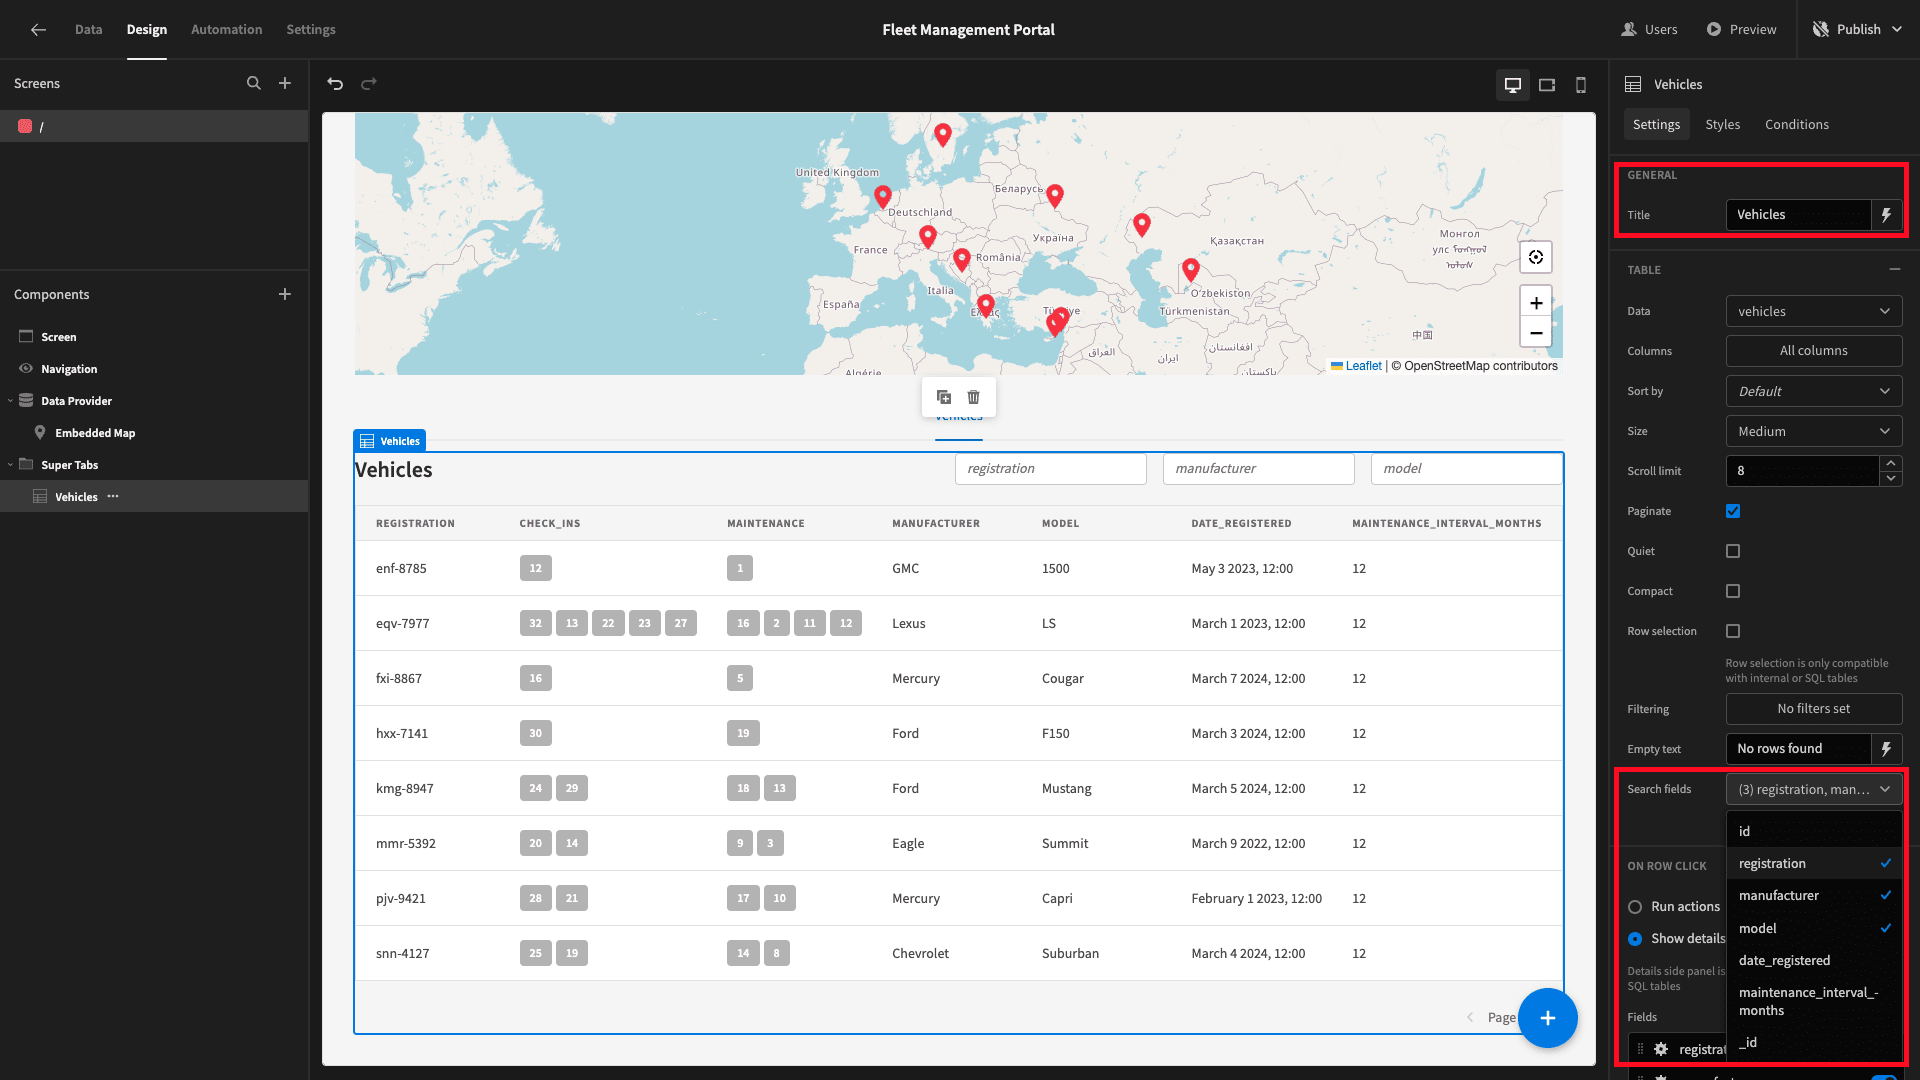
Now, we can start adding our CRUD UIs. We’ll start by adding a component called a Table Block, and setting its Data to our vehicles table. We’ll also rename this Vehicles.
This creates an interactive table where we can access an update form by clicking on any row.
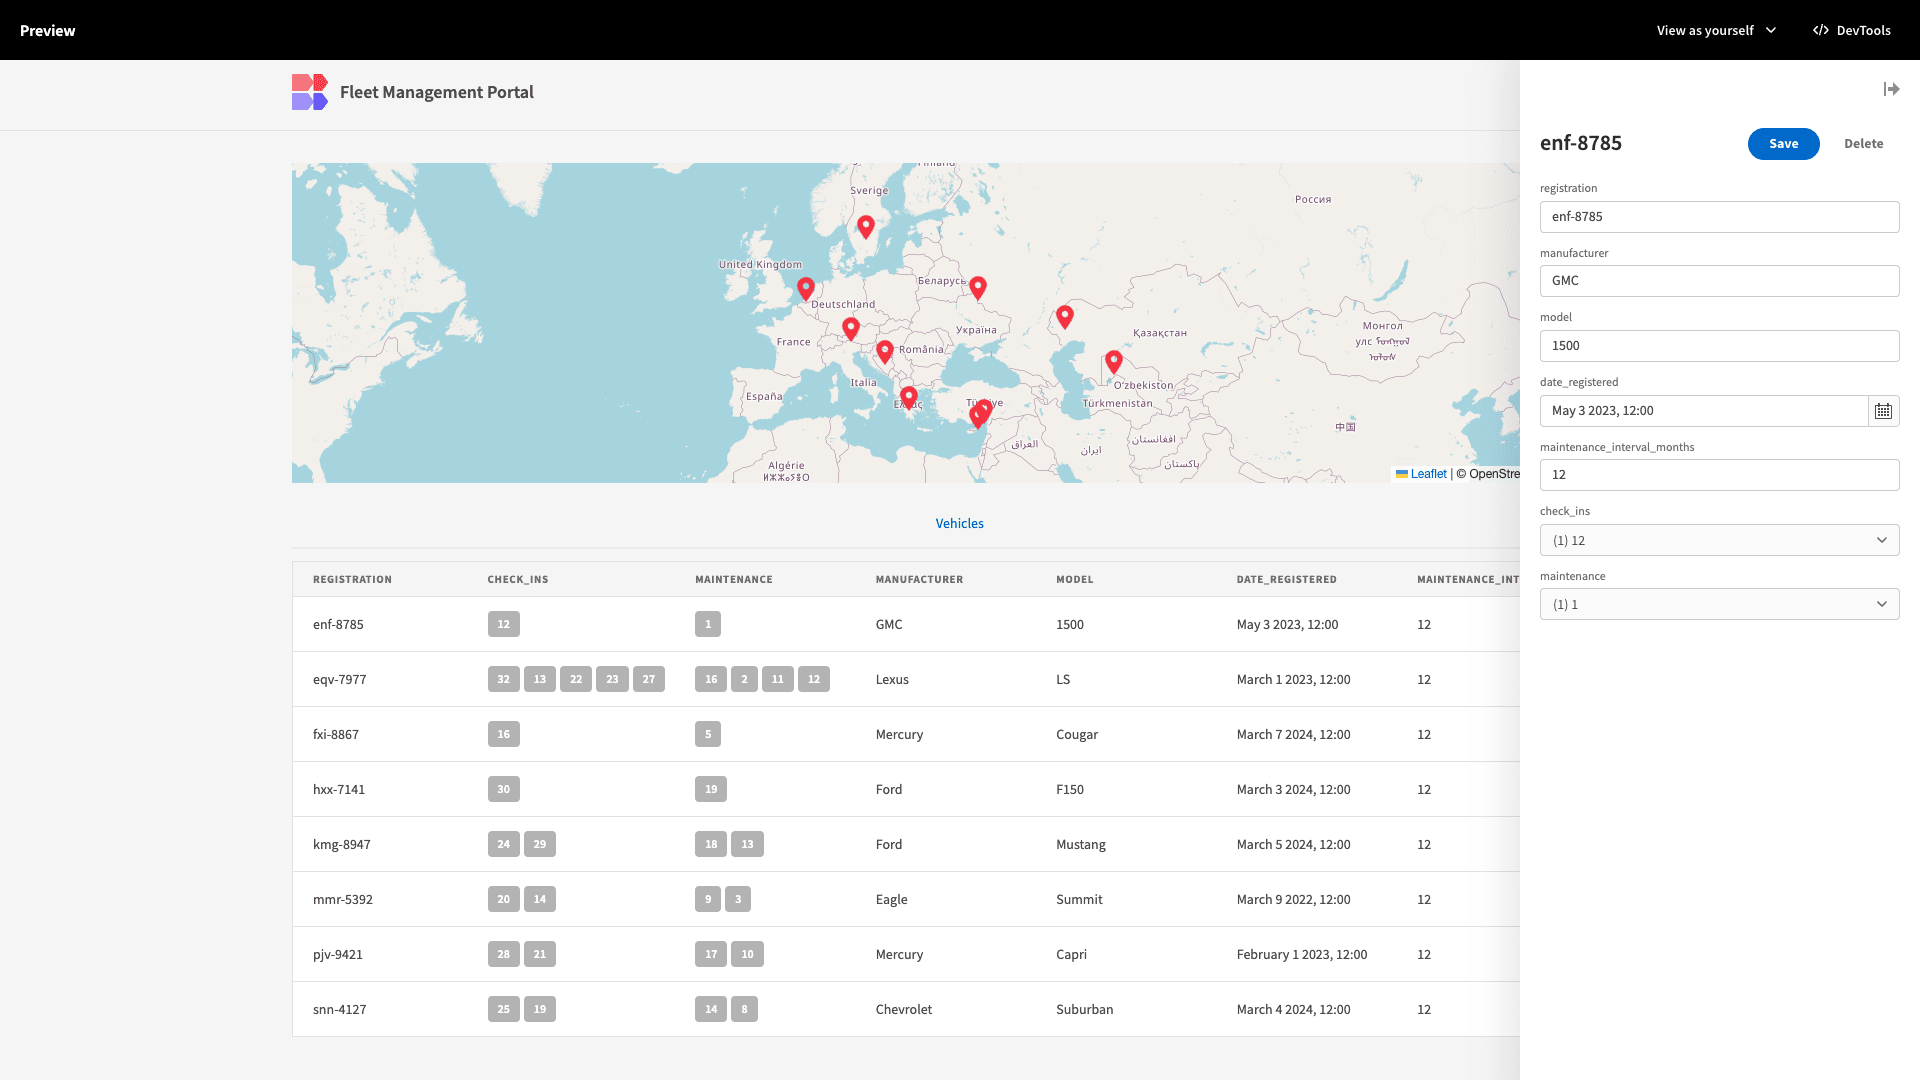
We’ll also add a Title and set registration, manufacturer, and model as searchable fields.
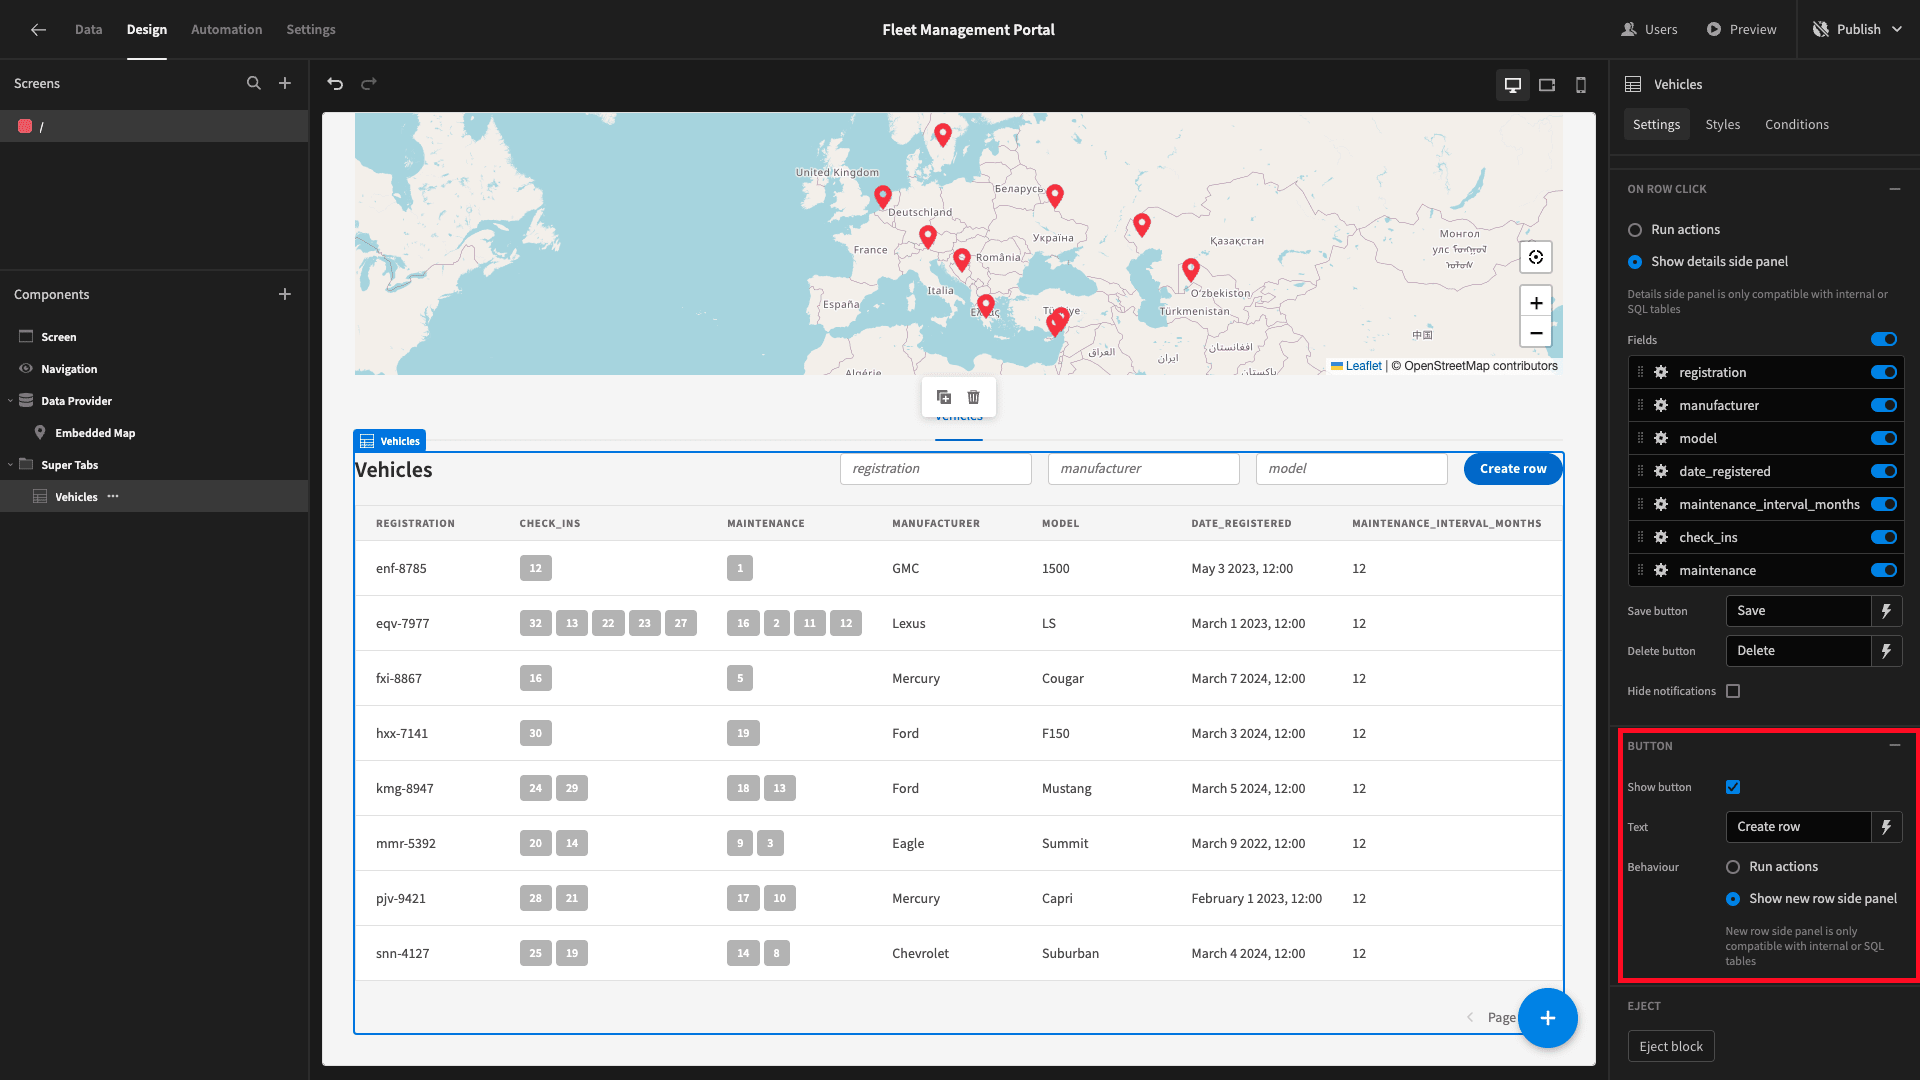
Lastly, we’ll enable the Show Button option so that admins can also open a side-panel form to create new rows.
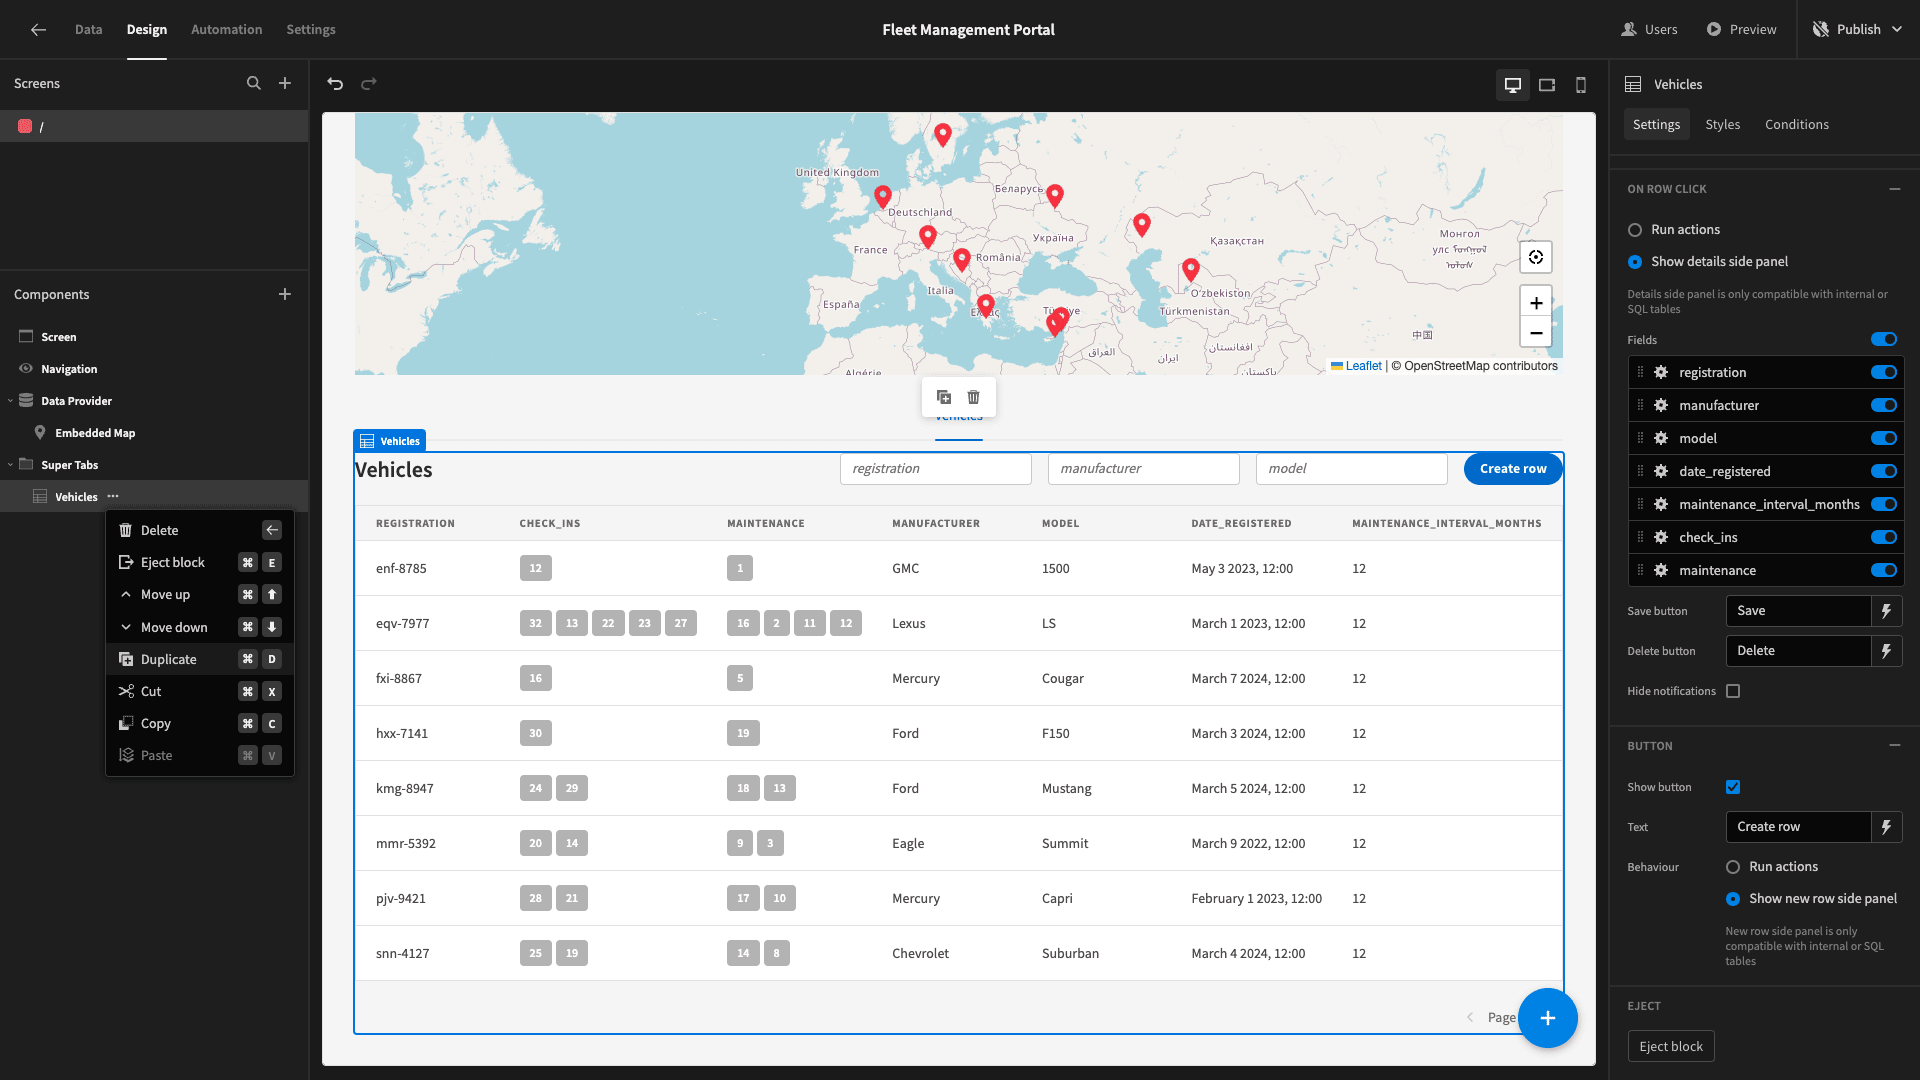
Next, we want to duplicate our Table Block.
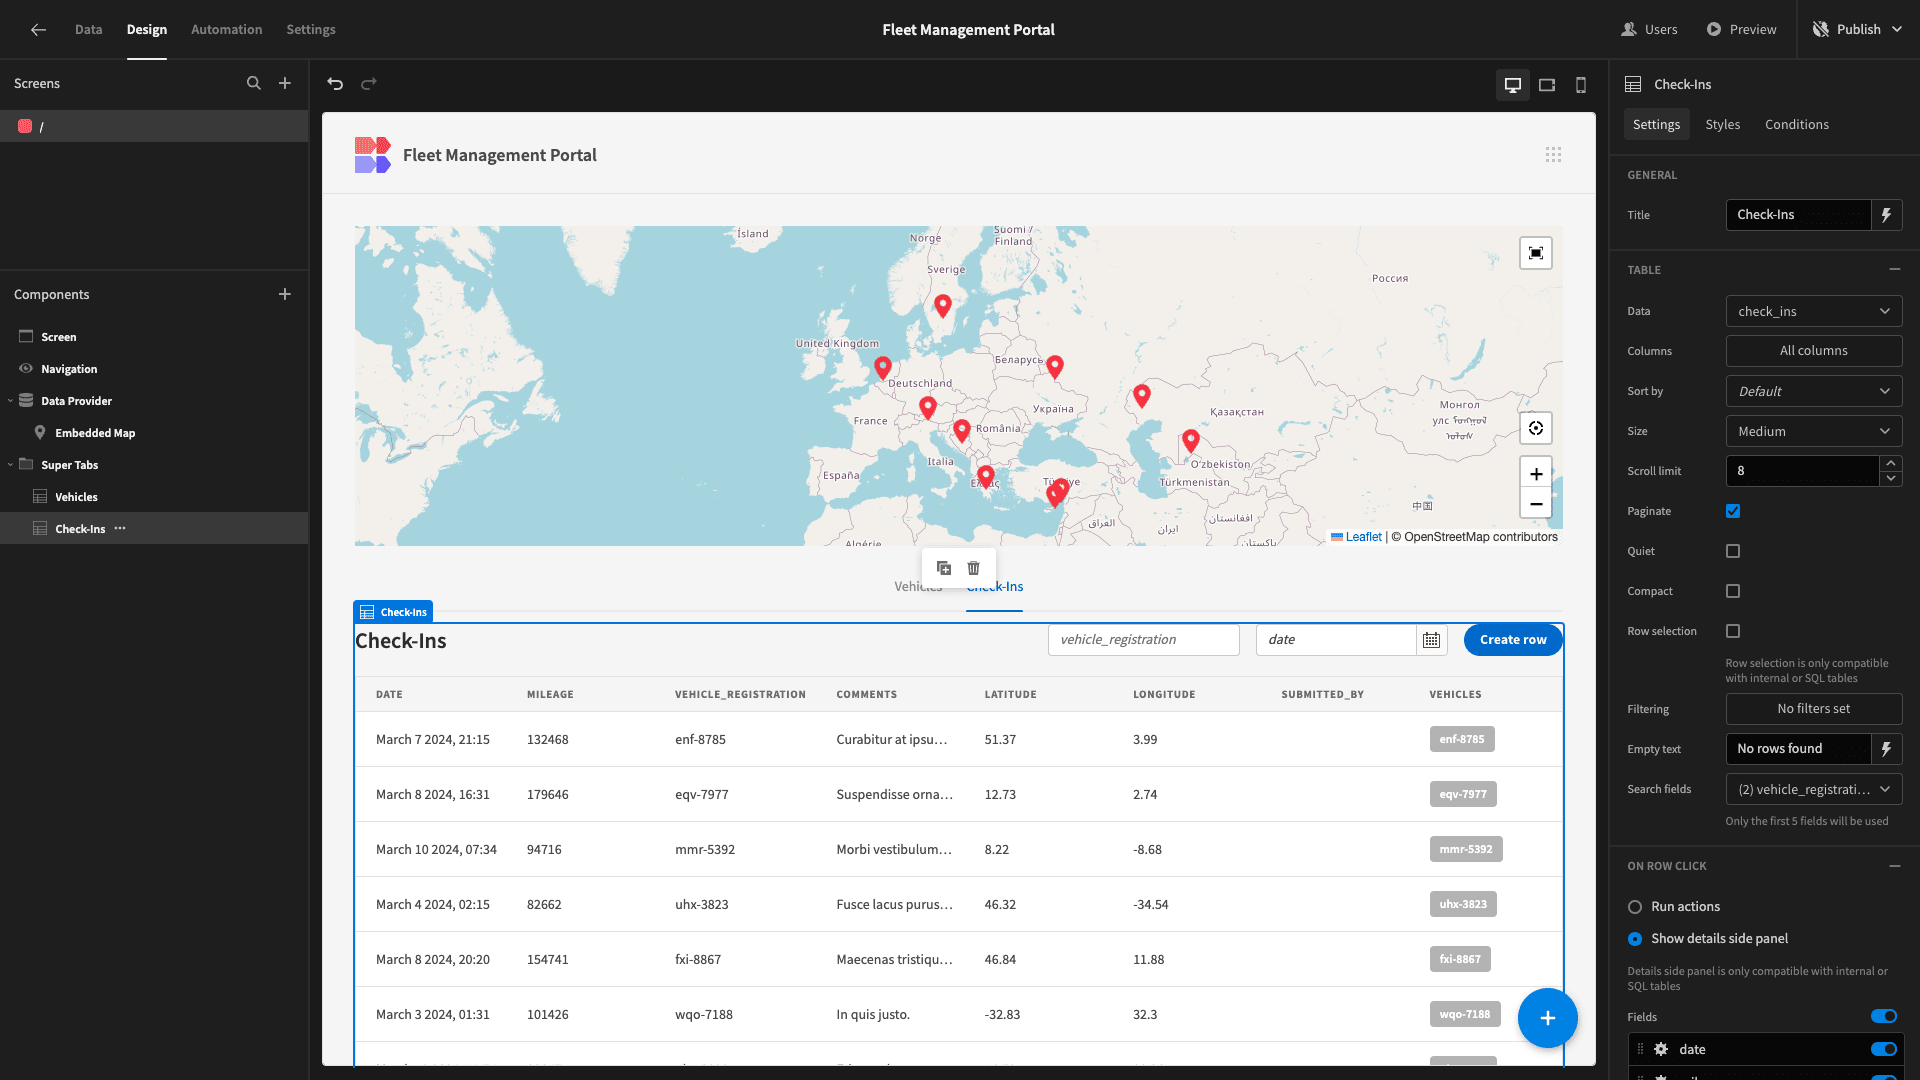
And we’ll update the display texts and search fields on this new one for our check_ins table.
We’re using vehicle_registration and date as searchable fields.
Then, finally, we’ll repeat this process for our maintenance table.
Here’s how this looks.

This is great, but there are a few pieces of information that we’d like to display on our Vehicles table that we can’t currently display because they’re stored across different tables in our database.
For this, we’ll need to create a few formula variables to gather relevant data from across our tables.
Formula variables
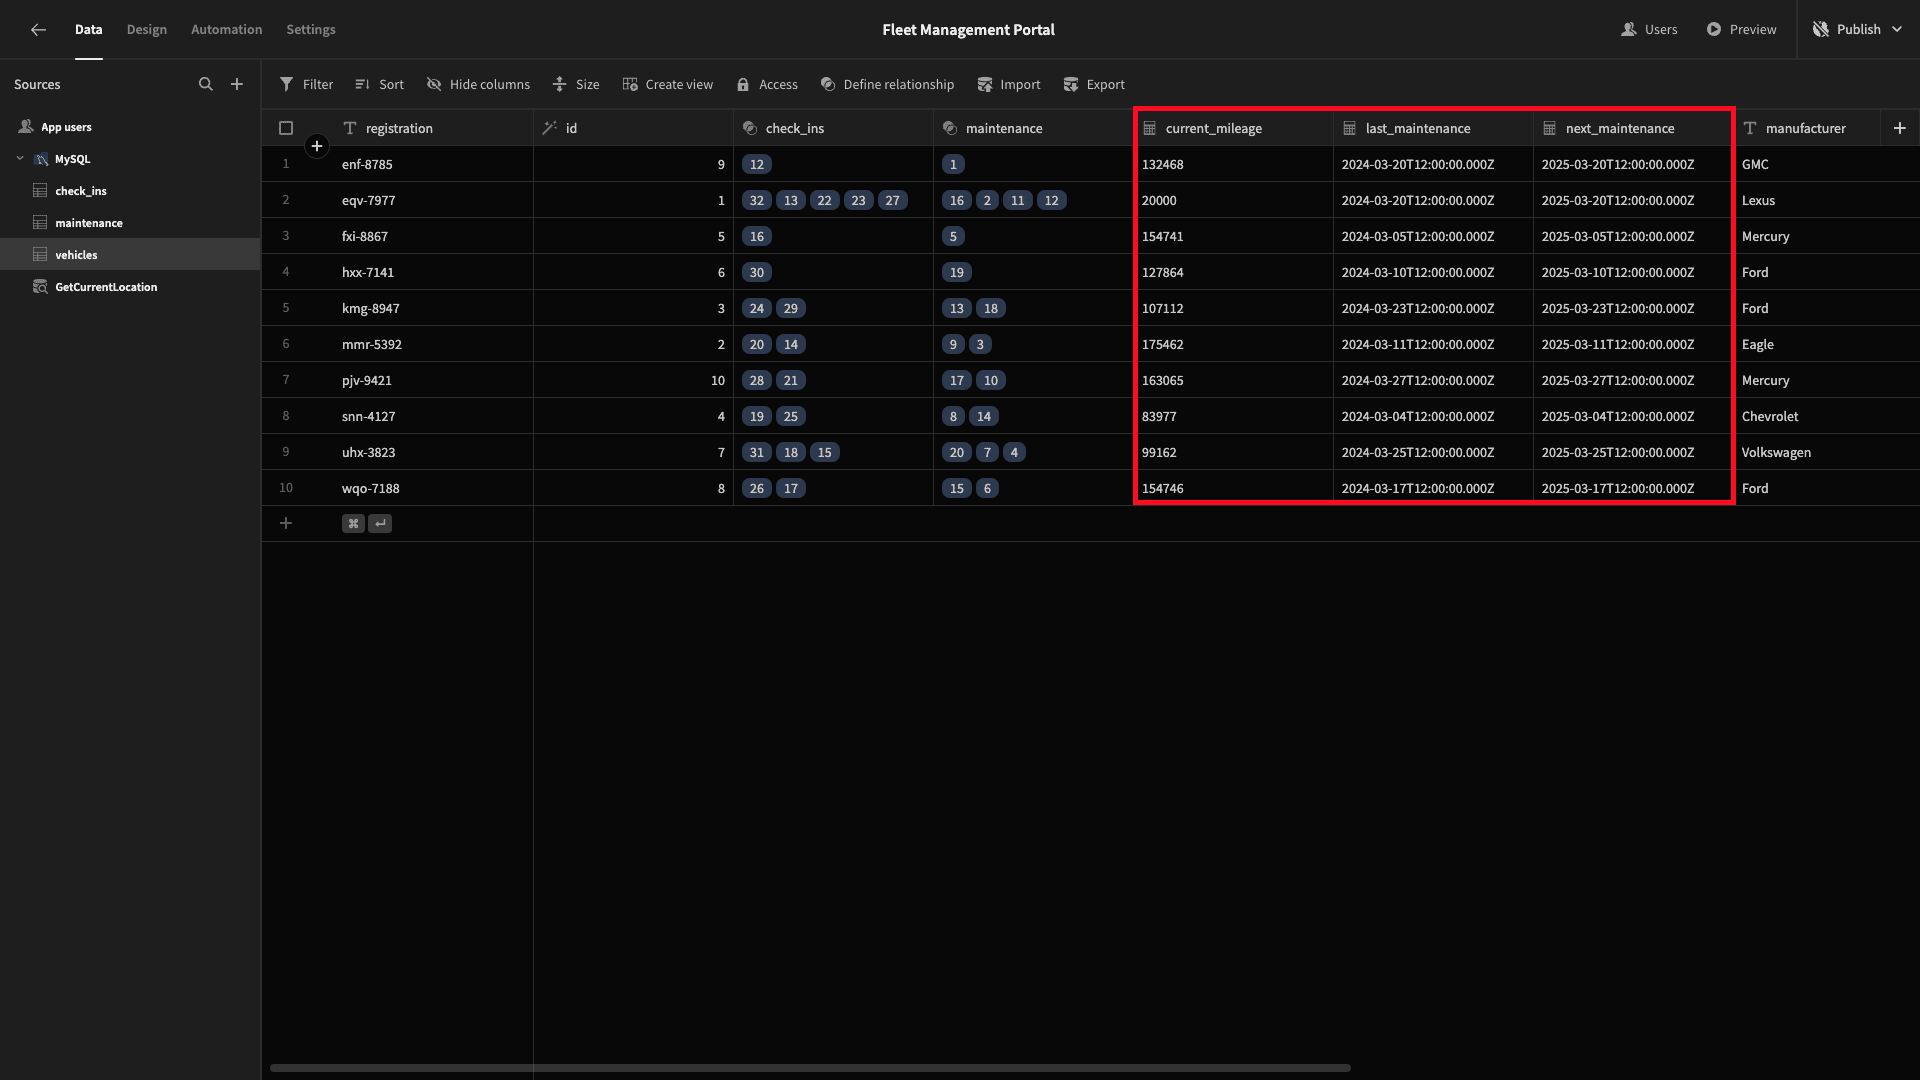
Specifically, for each vehicle in our fleet, we want to display the current mileage, last maintenance date, and next maintenance date.
We’ll do this using a little bit of custom JavaScript. Don’t worry. We’ll provide all the code you need.
Head back to the Data section and select the vehicles table.
Here, we’ll add a formula column and call it current_mileage. We’ll then hit the lightning bolt icon to open up our JavaScript editor.

Remember, each row in our vehicles table is related to several rows in the check_ins table containing mileage data.
Our formula will iterate over each of the related check_ins for each row, determining which one has the most recent date, and then return the mileage figure from this.
The code we can use to do this is:
 1var checkInCount = $("check_ins").length;
 2
 3var lastCheckIn = new Date($("check_ins.0.date"));
 4
 5var mileage = $("check_ins.0.mileage")
 6
 7for (i = 0; i < checkInCount; i++){
 8
 9 var iterationDate = new Date($("check_ins." + i + ".date"))
10
11 if (iterationDate > lastCheckIn){
12
13  mileage = $("check_ins." + i + ".mileage")
14
15 }
16
17}
18
19return mileage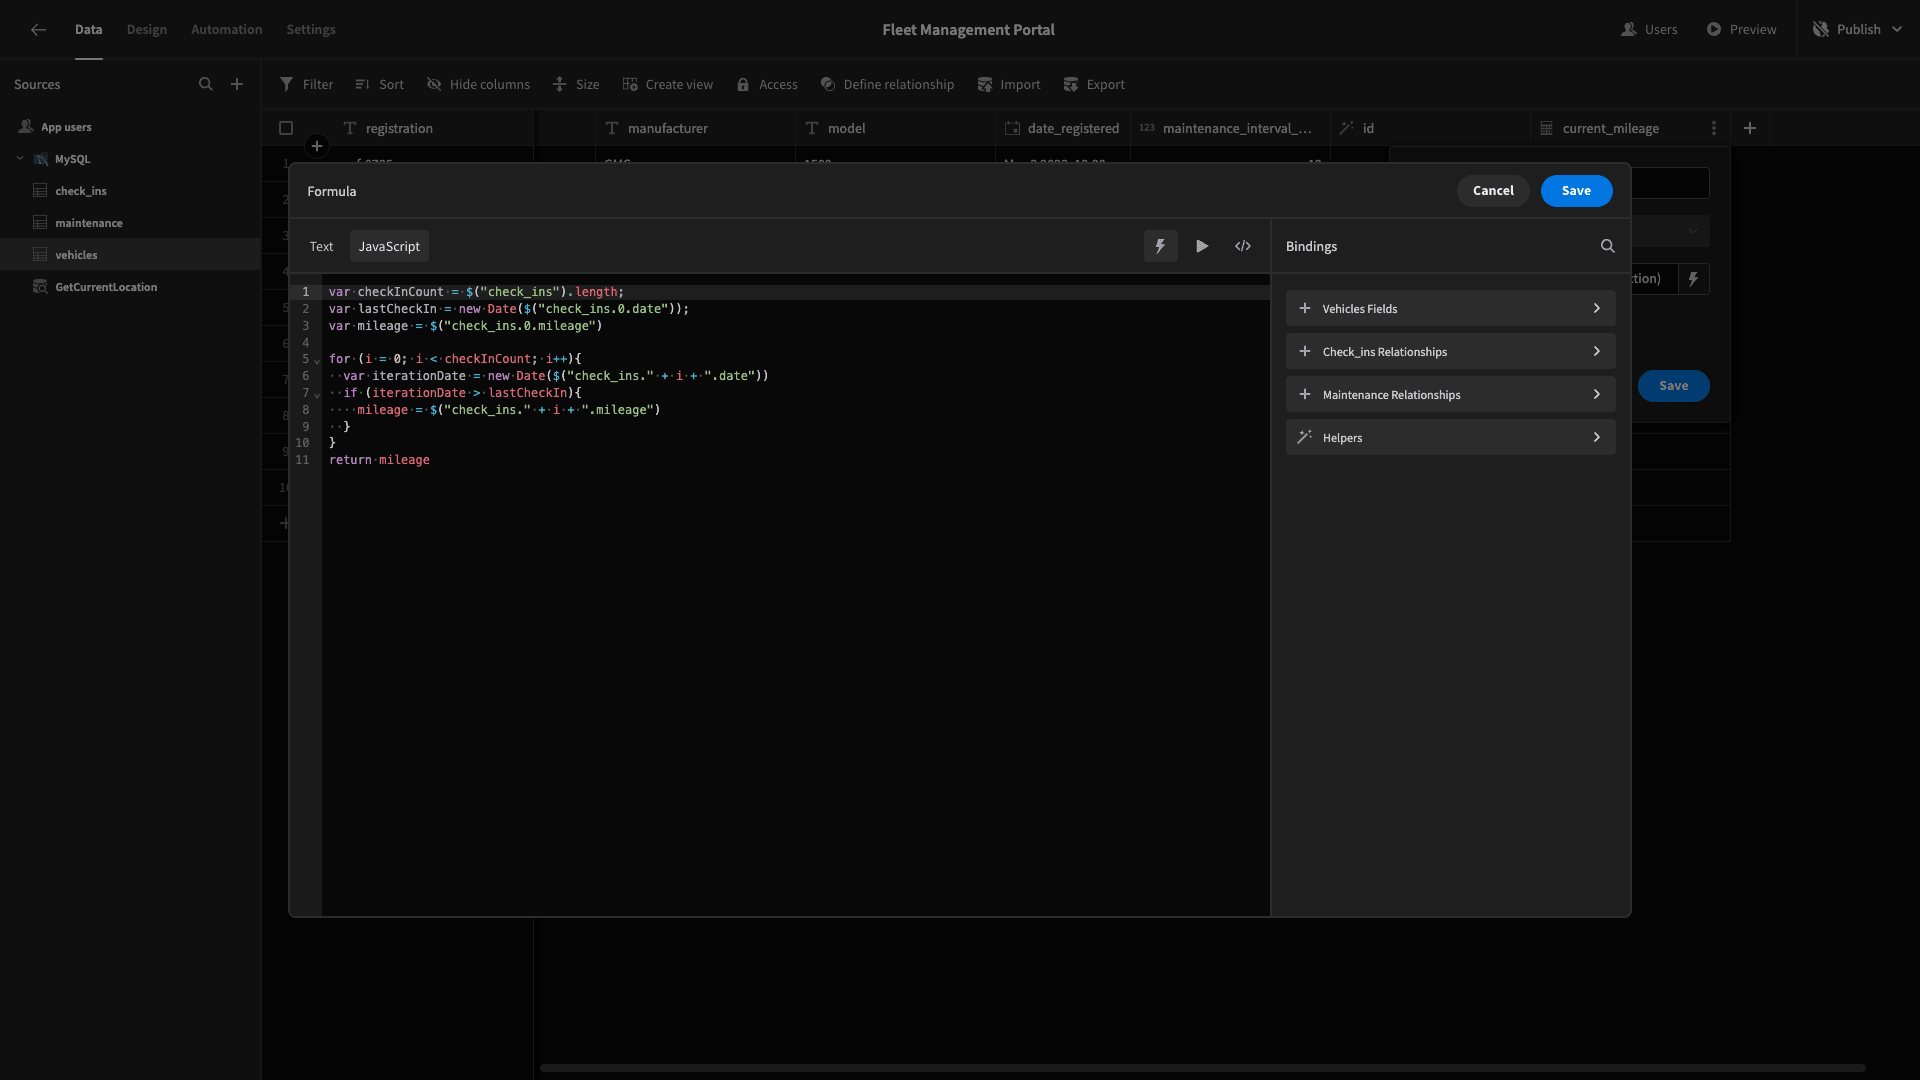
We can use the same principle to retrieve the most recent maintenance date from our maintenance table. We’ll call this last_maintenance.
This time, the code is:
 1var maintenanceCount = $("maintenance").length;
 2
 3var lastMaintenance = new Date($("maintenance.0.date"));
 4
 5for (i = 0; i < maintenanceCount; i++){
 6
 7 var iterationDate = new Date($("maintenance." + i + ".date"))
 8
 9 if (iterationDate > lastMaintenance){
10
11  lastMaintenance = iterationDate
12
13 }
14
15}
16
17return lastMaintenance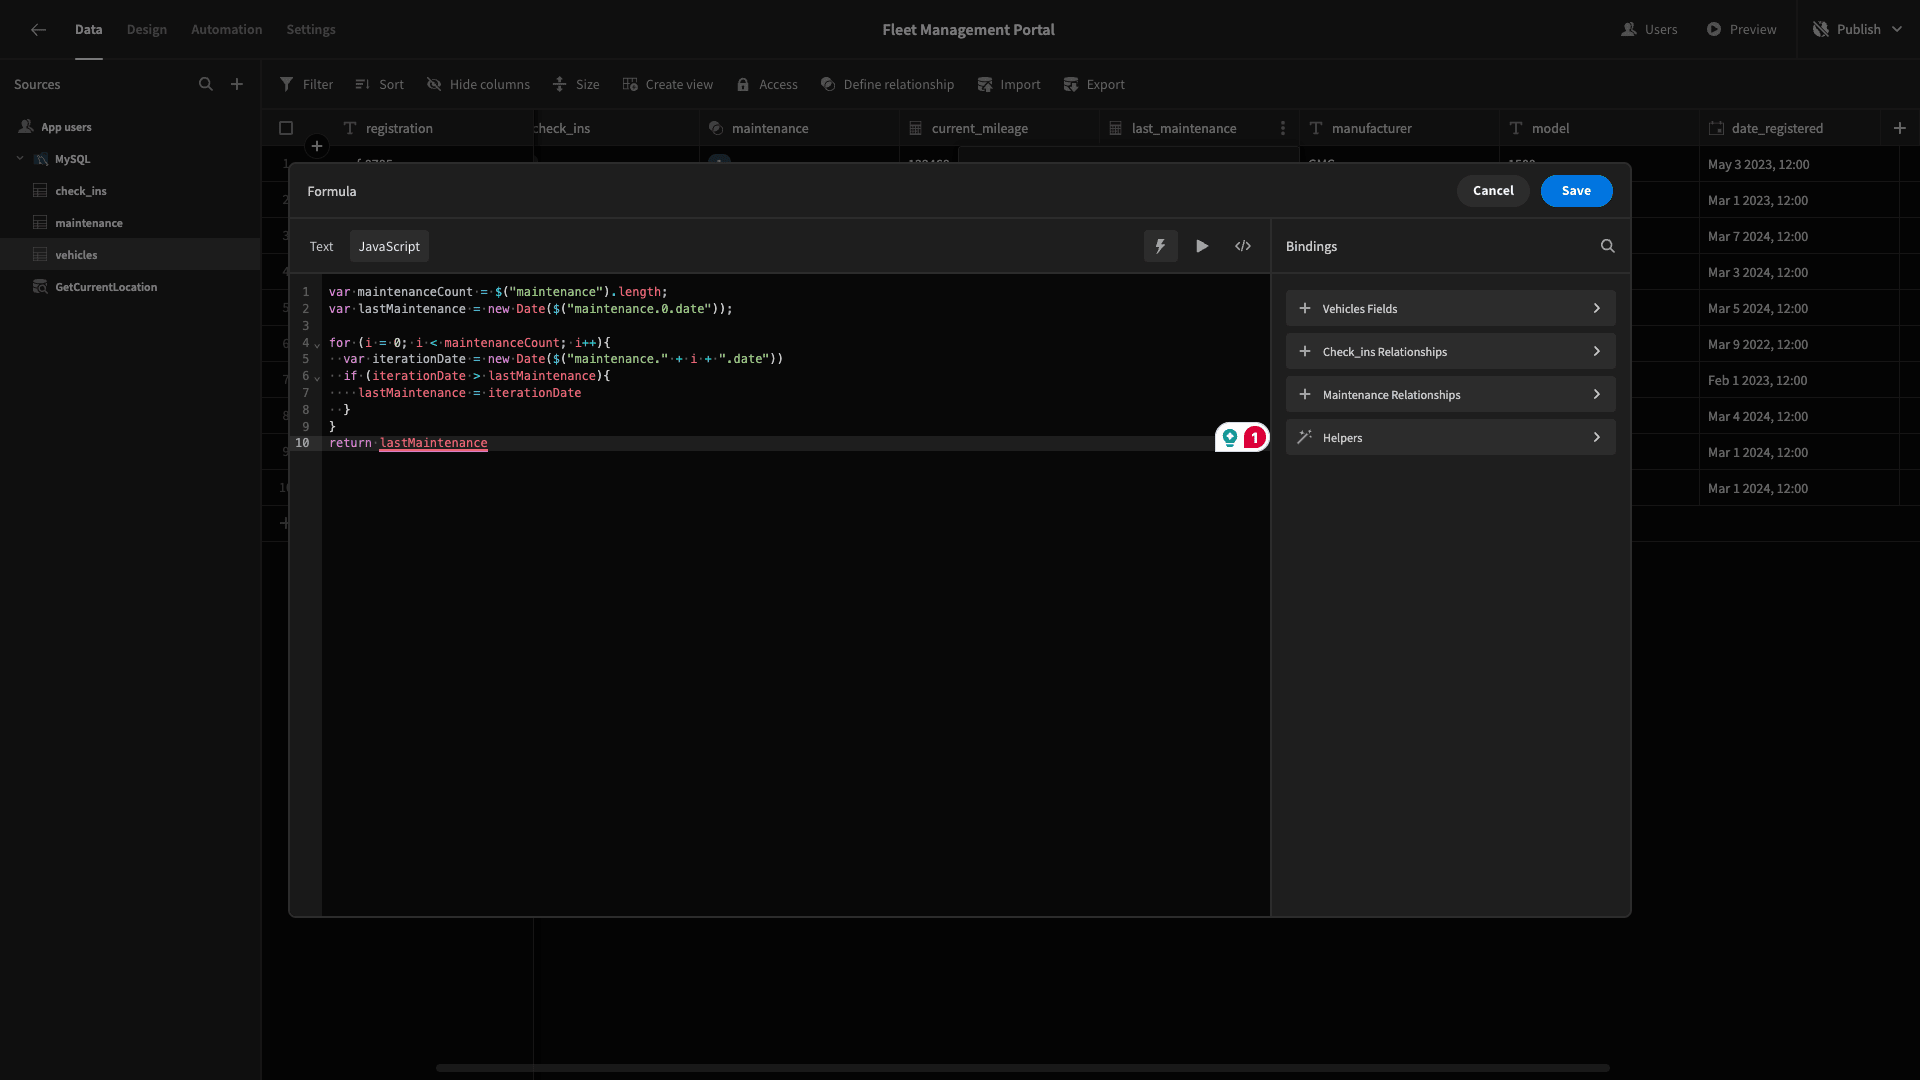
Our third formula variable will be called next_maintenance. Our vehicles table contains an attribute called maintenance_interval_months, representing the number of months each vehicle in our fleet should go between maintenance sessions.
We’ll use a similar piece of code to our previous formula, this time adding on our maintenance interval to the returned date, using JavaScript’s getMonth() and setMonth() methods.
 1var maintenanceCount = $("maintenance").length;
 2
 3var lastMaintenance = new Date($("maintenance.0.date"));
 4
 5for (i = 0; i < maintenanceCount; i++){
 6
 7 var iterationDate = new Date($("maintenance." + i + ".date"))
 8
 9 if (iterationDate > lastMaintenance){
10
11  lastMaintenance = iterationDate
12
13 }
14
15}
16
17var nextMaintenance = new Date(lastMaintenance.setMonth(lastMaintenance.getMonth() + $("maintenance_interval_months")))
18
19return nextMaintenance;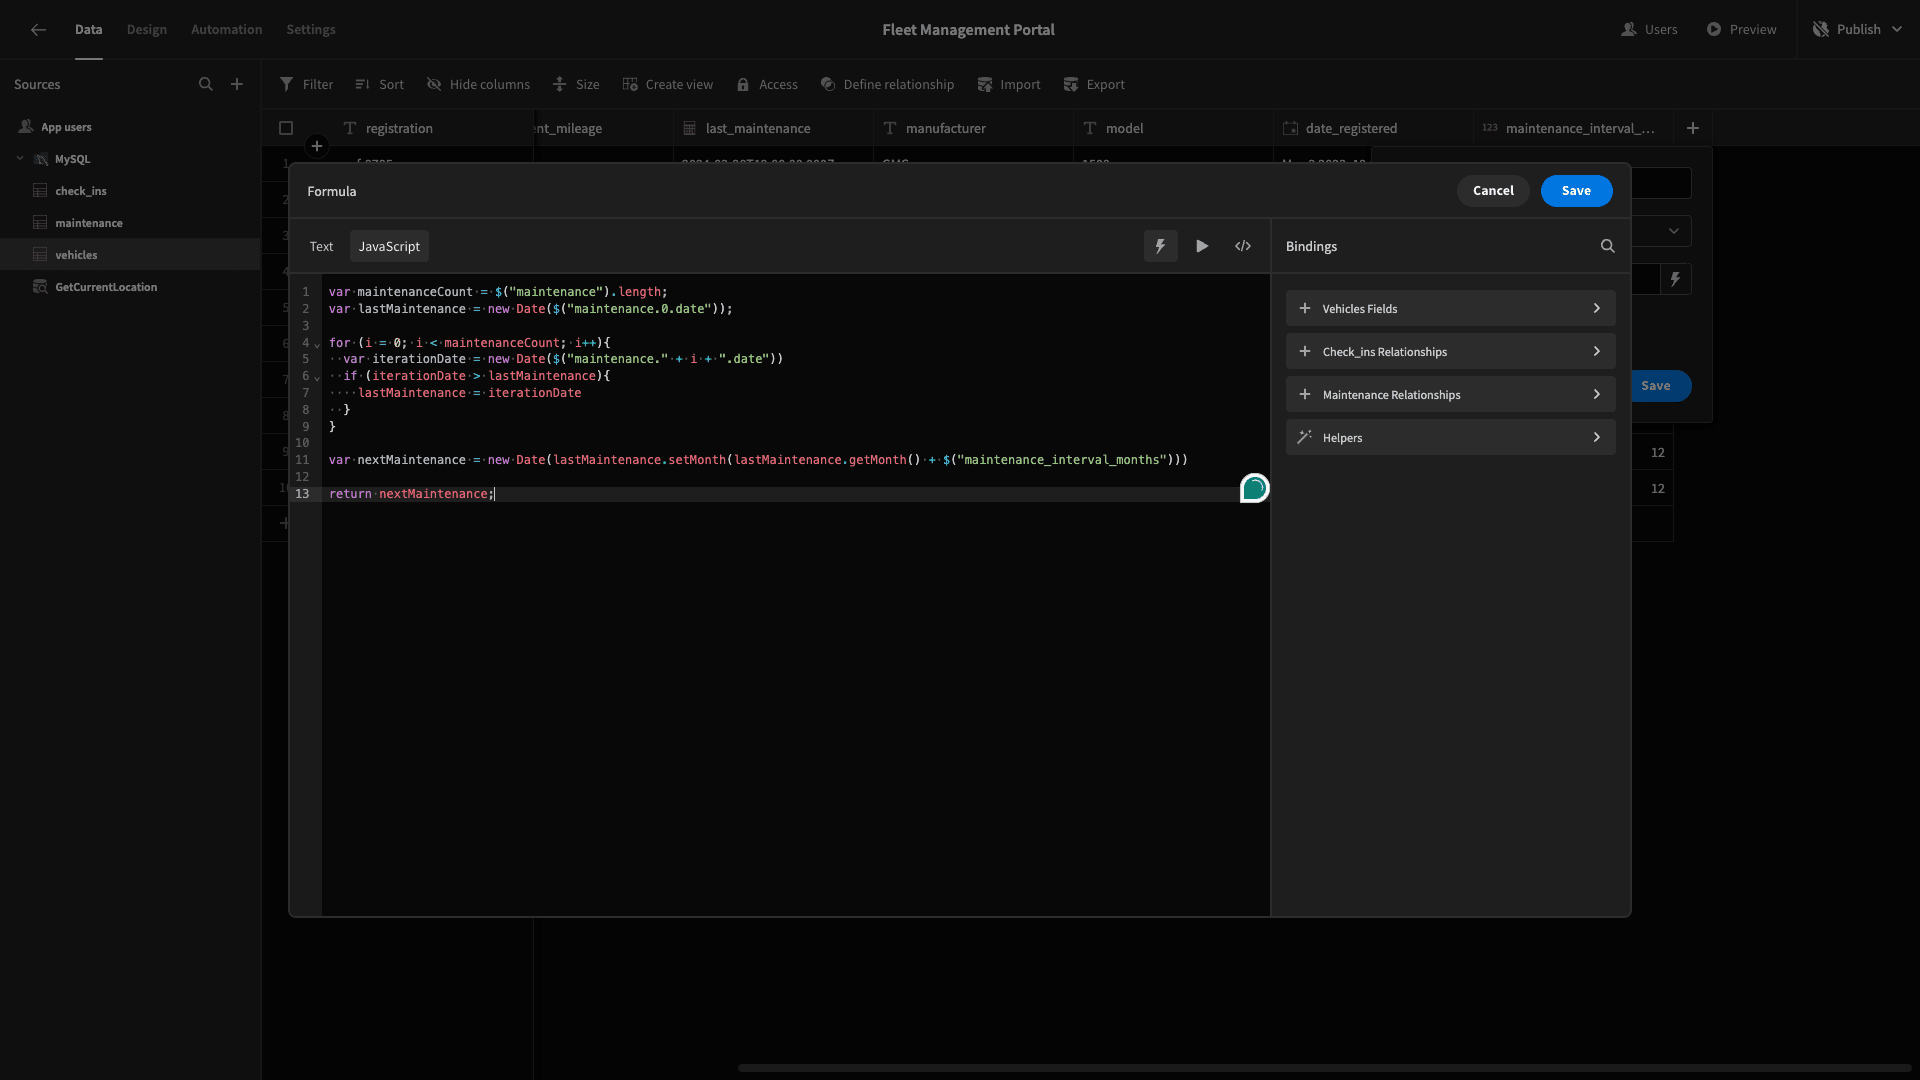
Here are our three formula variables as they appear in the Data section of Budibase.
Tidying up our tables
Having done this, we can head back to the Design section and declutter each of our tables, so they only display the most important attributes.
On the vehicles table, we’ll open the columns drawer and hit Add All Columns.
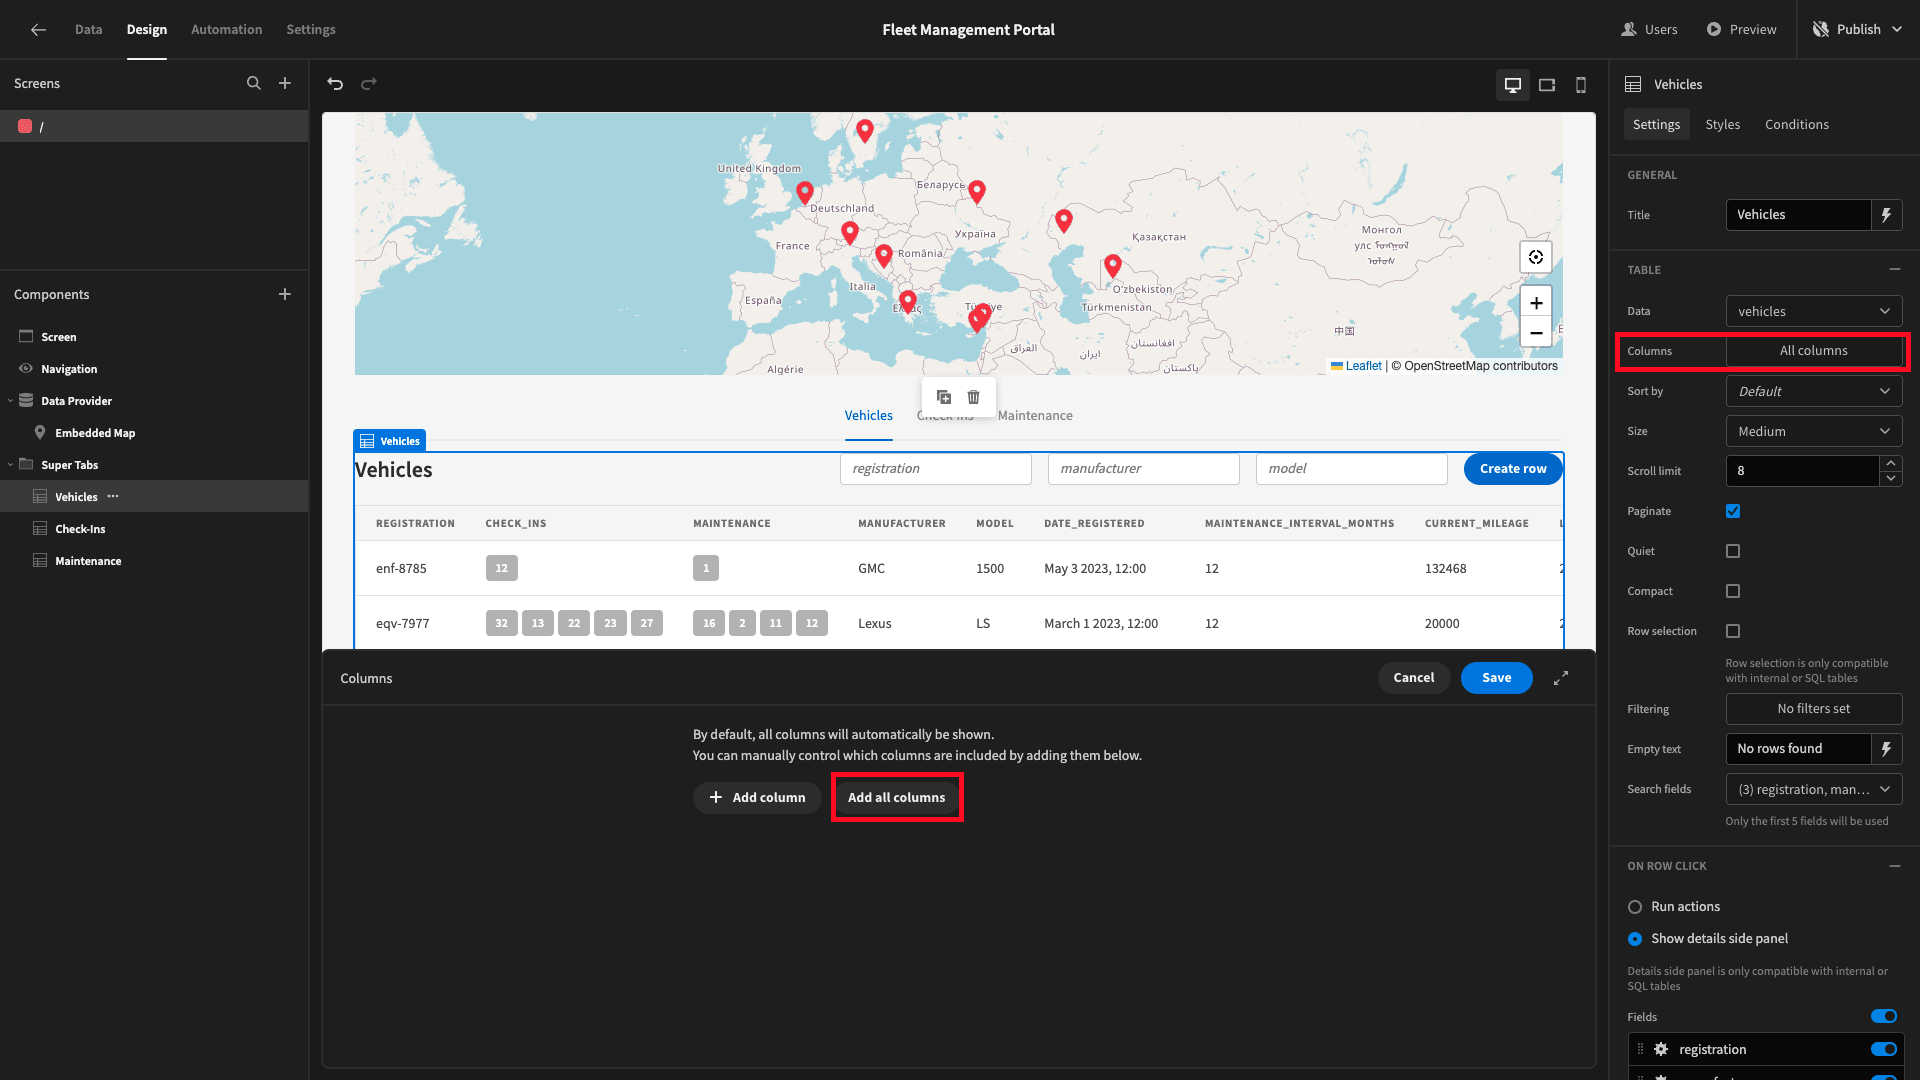
Then, we’ll use the X icons to remove everything except registration, manufacturer, current_mileage, last_maintenance, and next_maintenance.
While we’re here, we’ll also update the display texts for our column headers to more human-readable copy.
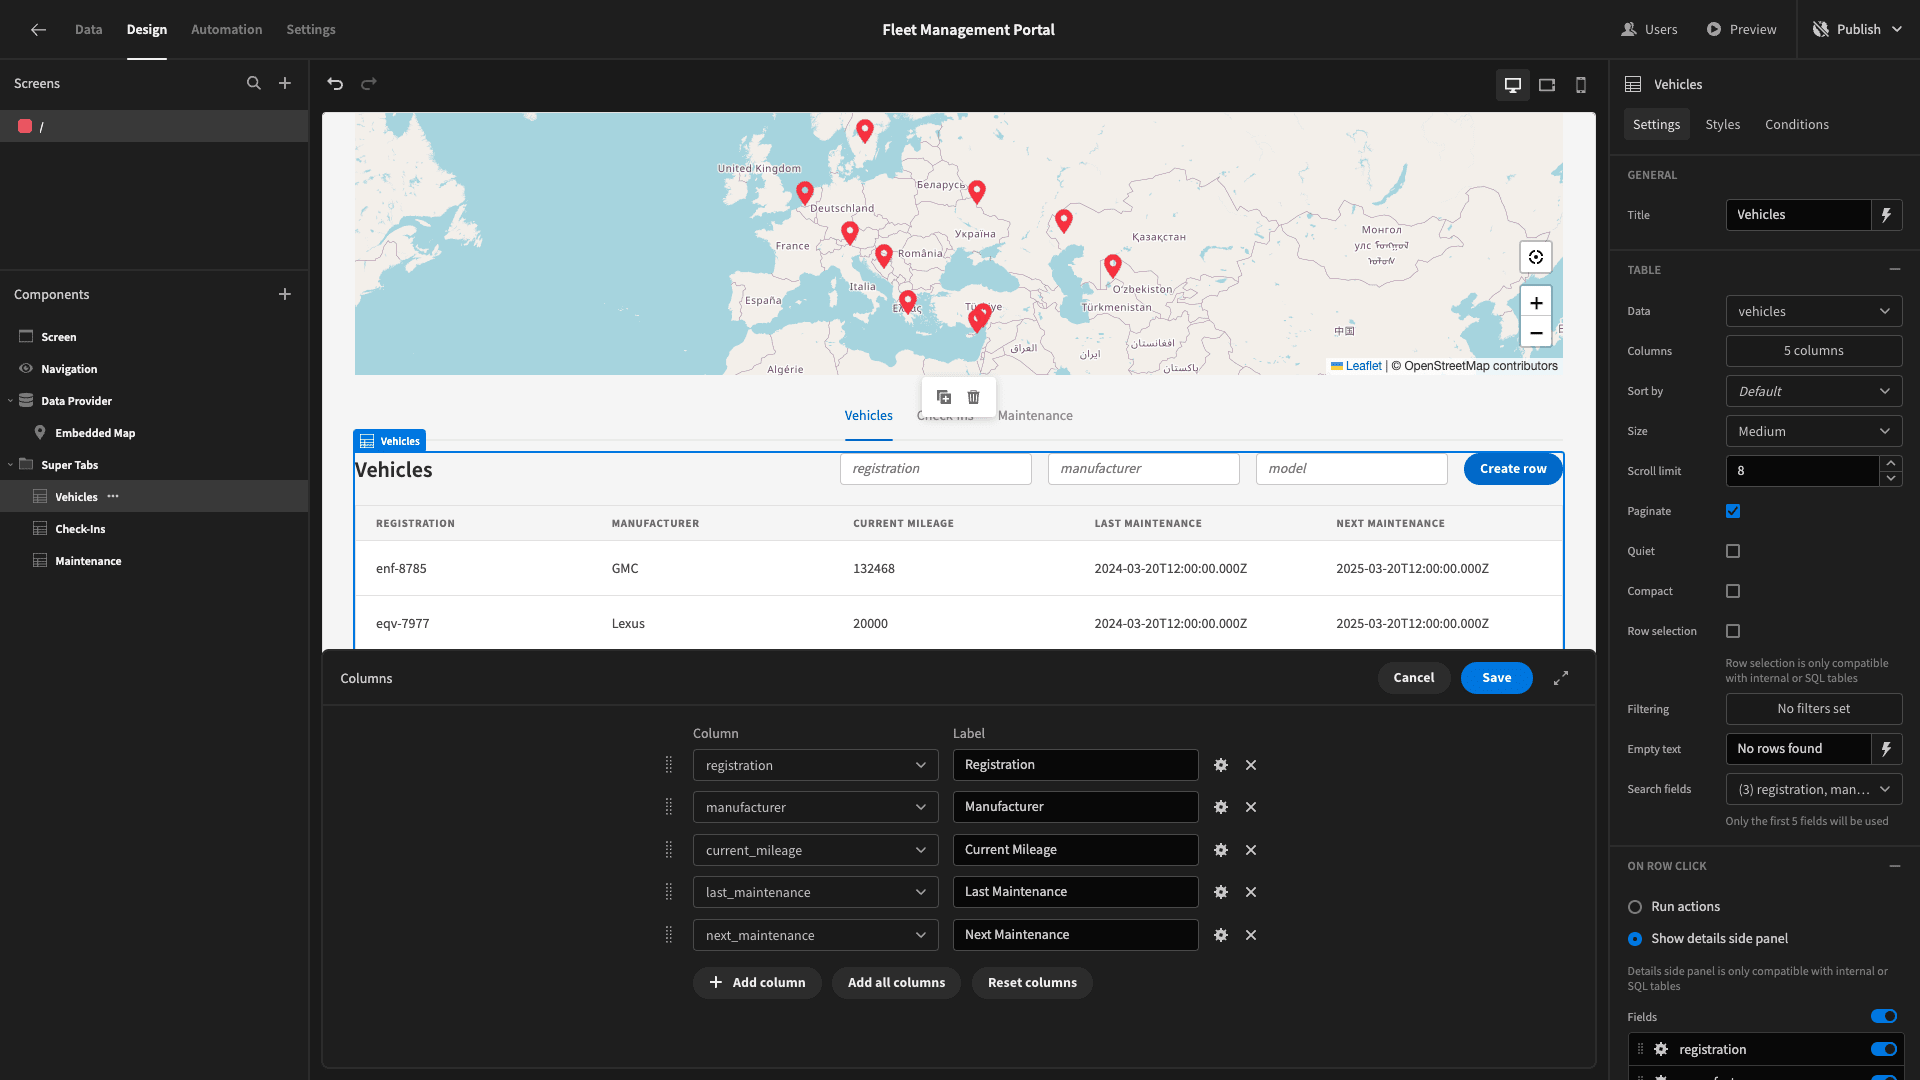
We can also use the cogs beside each of our date variables to transform their displayed values to something more readable.
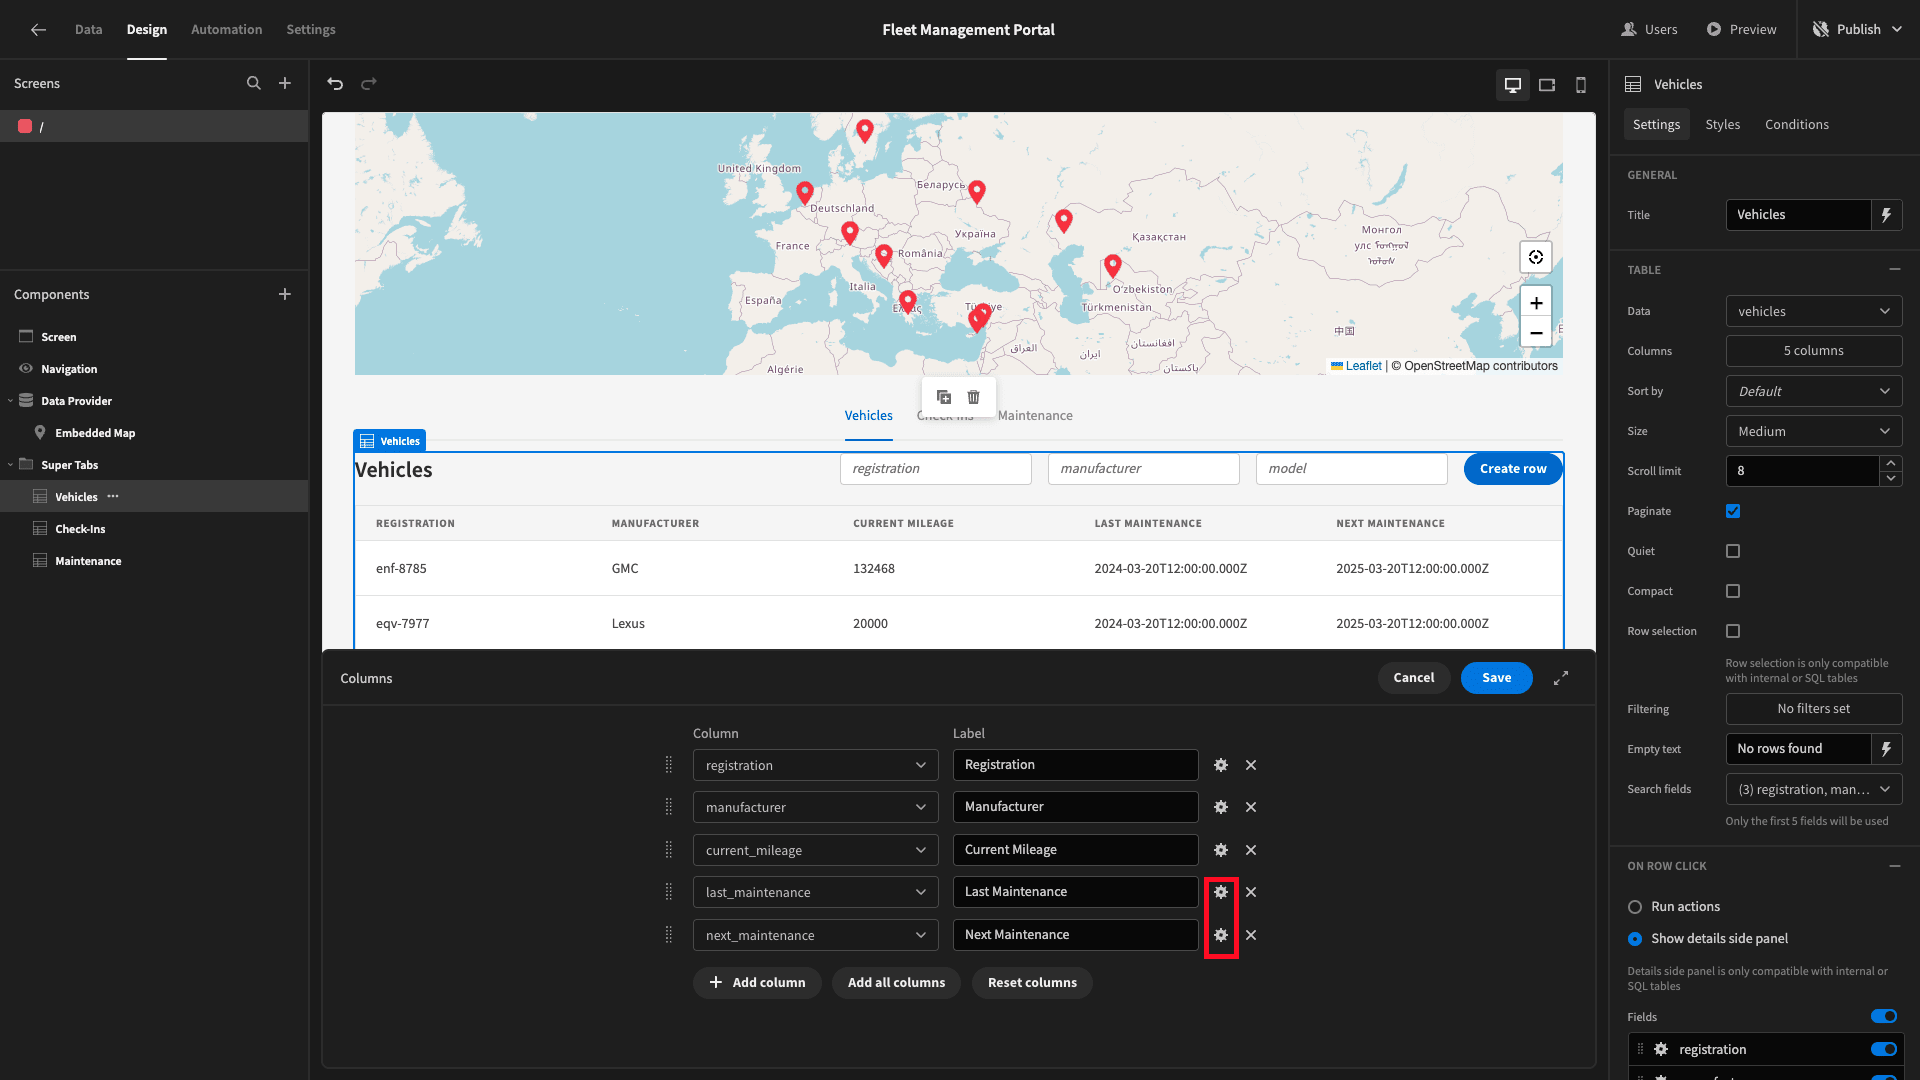
Again, we can use the lightning bolt to access Budibase’s JavaScript editor.

Here, we’ll use the following code for both column’s values.
1var d = new Date($("Value"))
2
3return d.toDateString();
Here’s what our table will look like when we’re done.

Then, we can repeat the exact same process for our two other tables, each time only displaying the most important columns.
Once we’ve done this, the primary screen for our fleet management portal is essentially done, although we’ll make a few additional tweaks as we go along.
Next, we’re going to create two custom form UIs for our different kinds of field agents - one for our drivers to submit check-ins and another for our maintenance team to record their work.
4. Building a check-in form
We’ll start with our check-in form. This will be the only screen that basic users can access, but Admin users will be a ble to open it in a modal from our existing screen.
We can begin by adding a new screen.
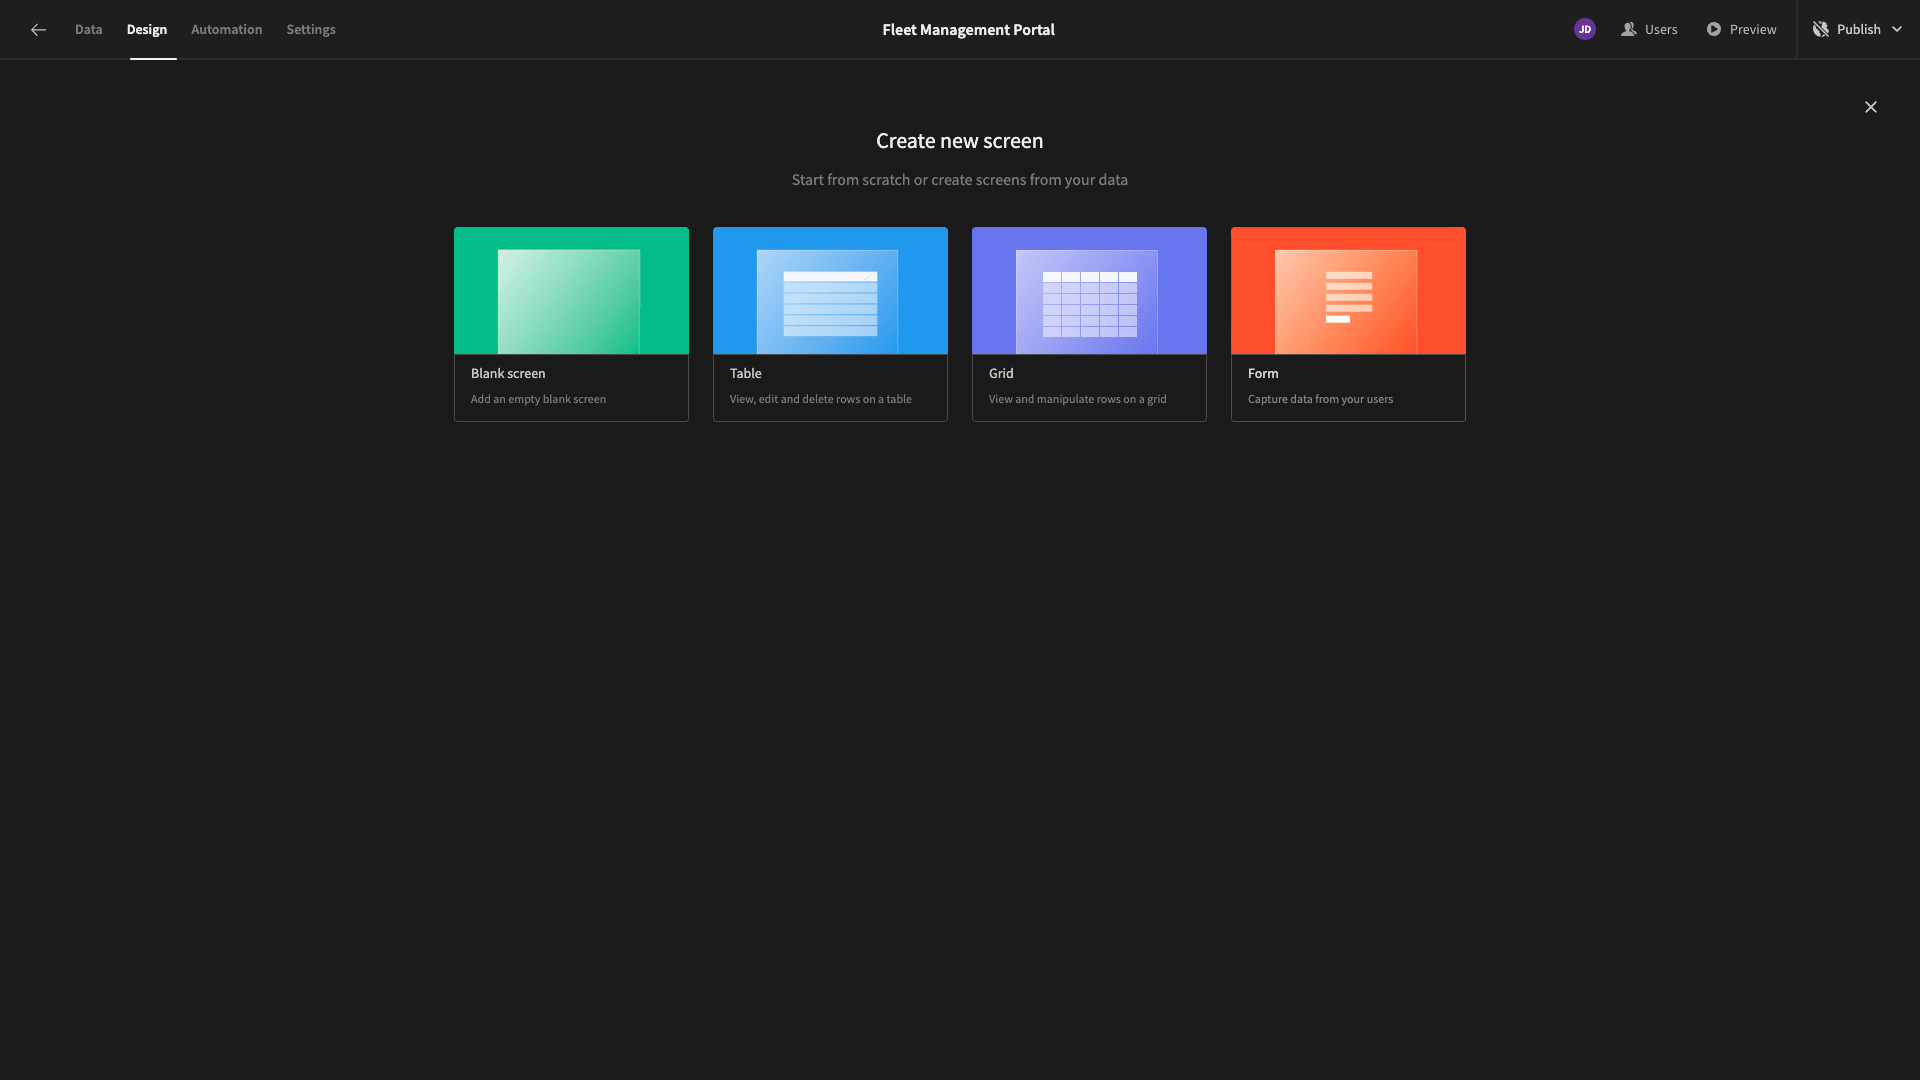
As before, we have several options for how we want to do this. This time, we’re choosing Budibase autogenerated form layout.
This will output a working form UI based on whichever data table we point it at.
So, when prompted, we’re selecting our check_ins table.

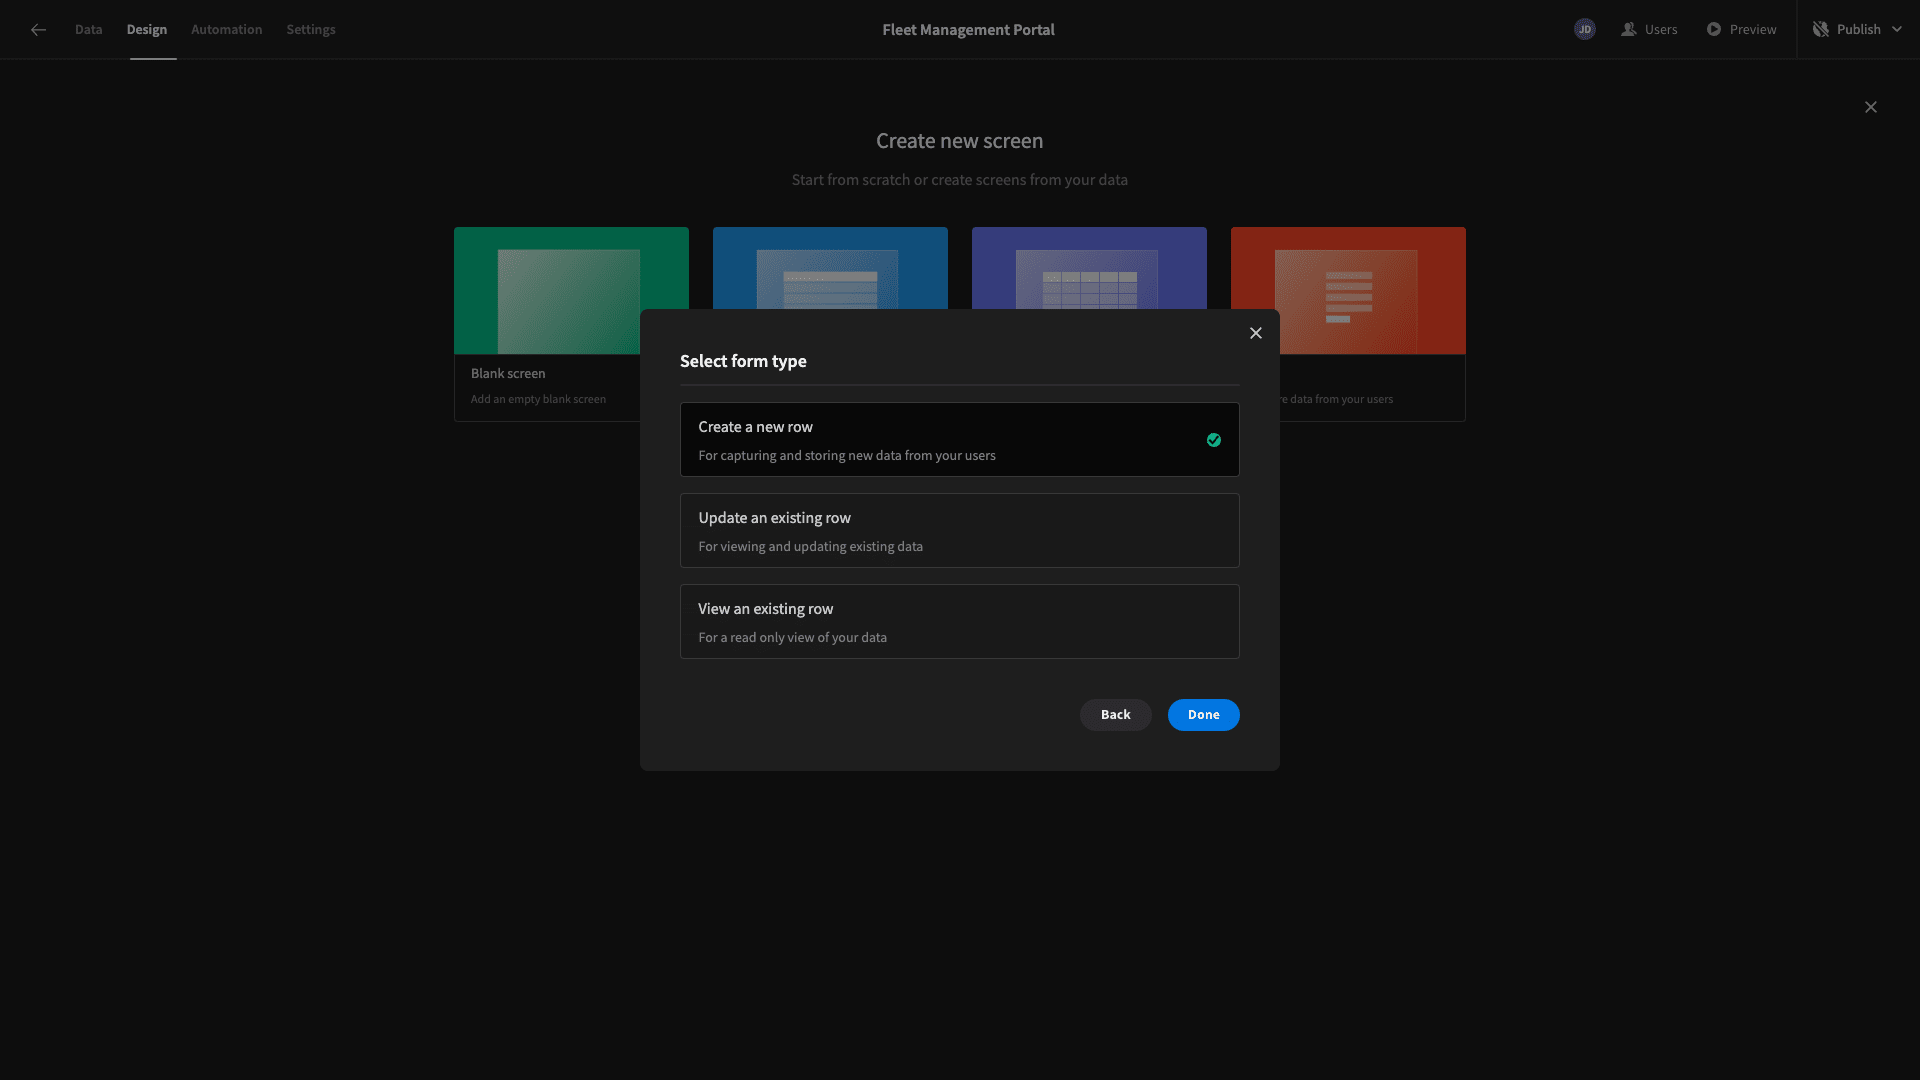
Then we’re asked which type of form we want - we’re choosing Create New Row.
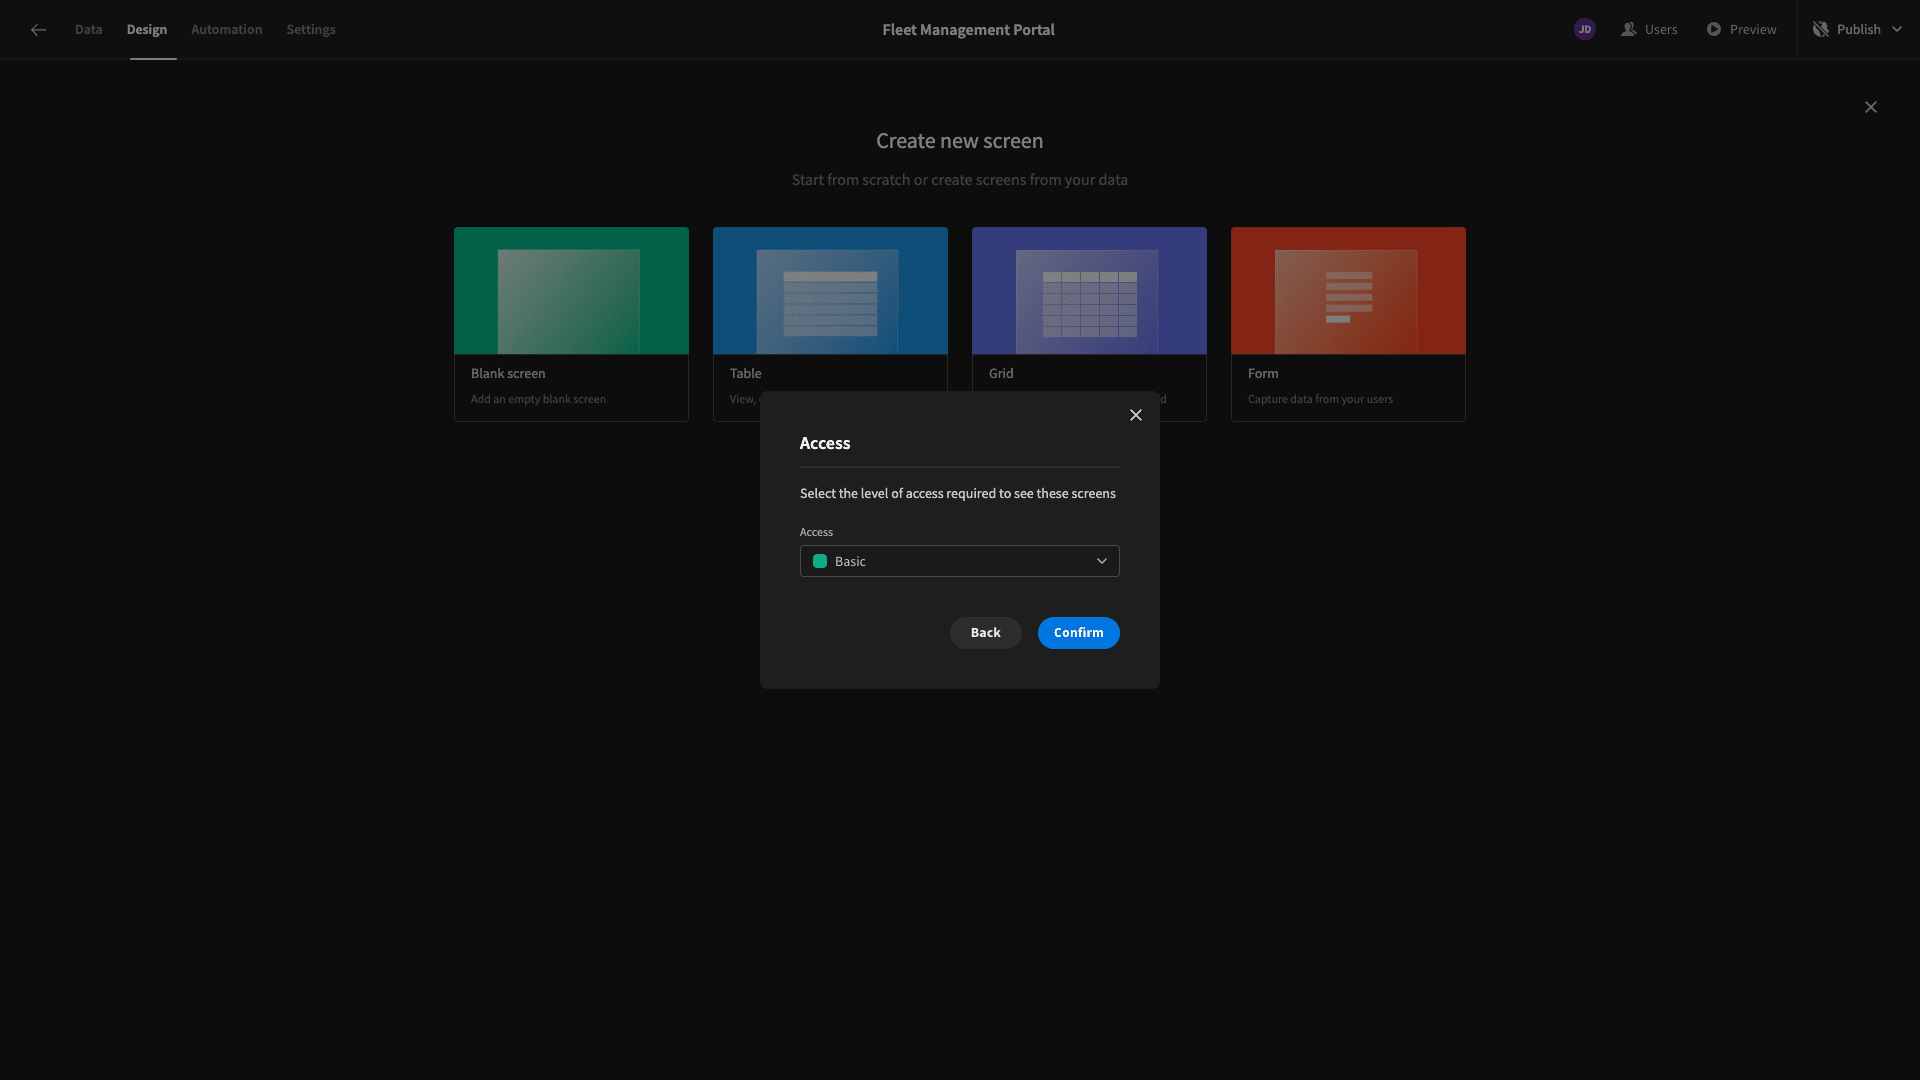
And lastly, we’re setting our access role to Basic.
Here’s what our form will look like out of the box.
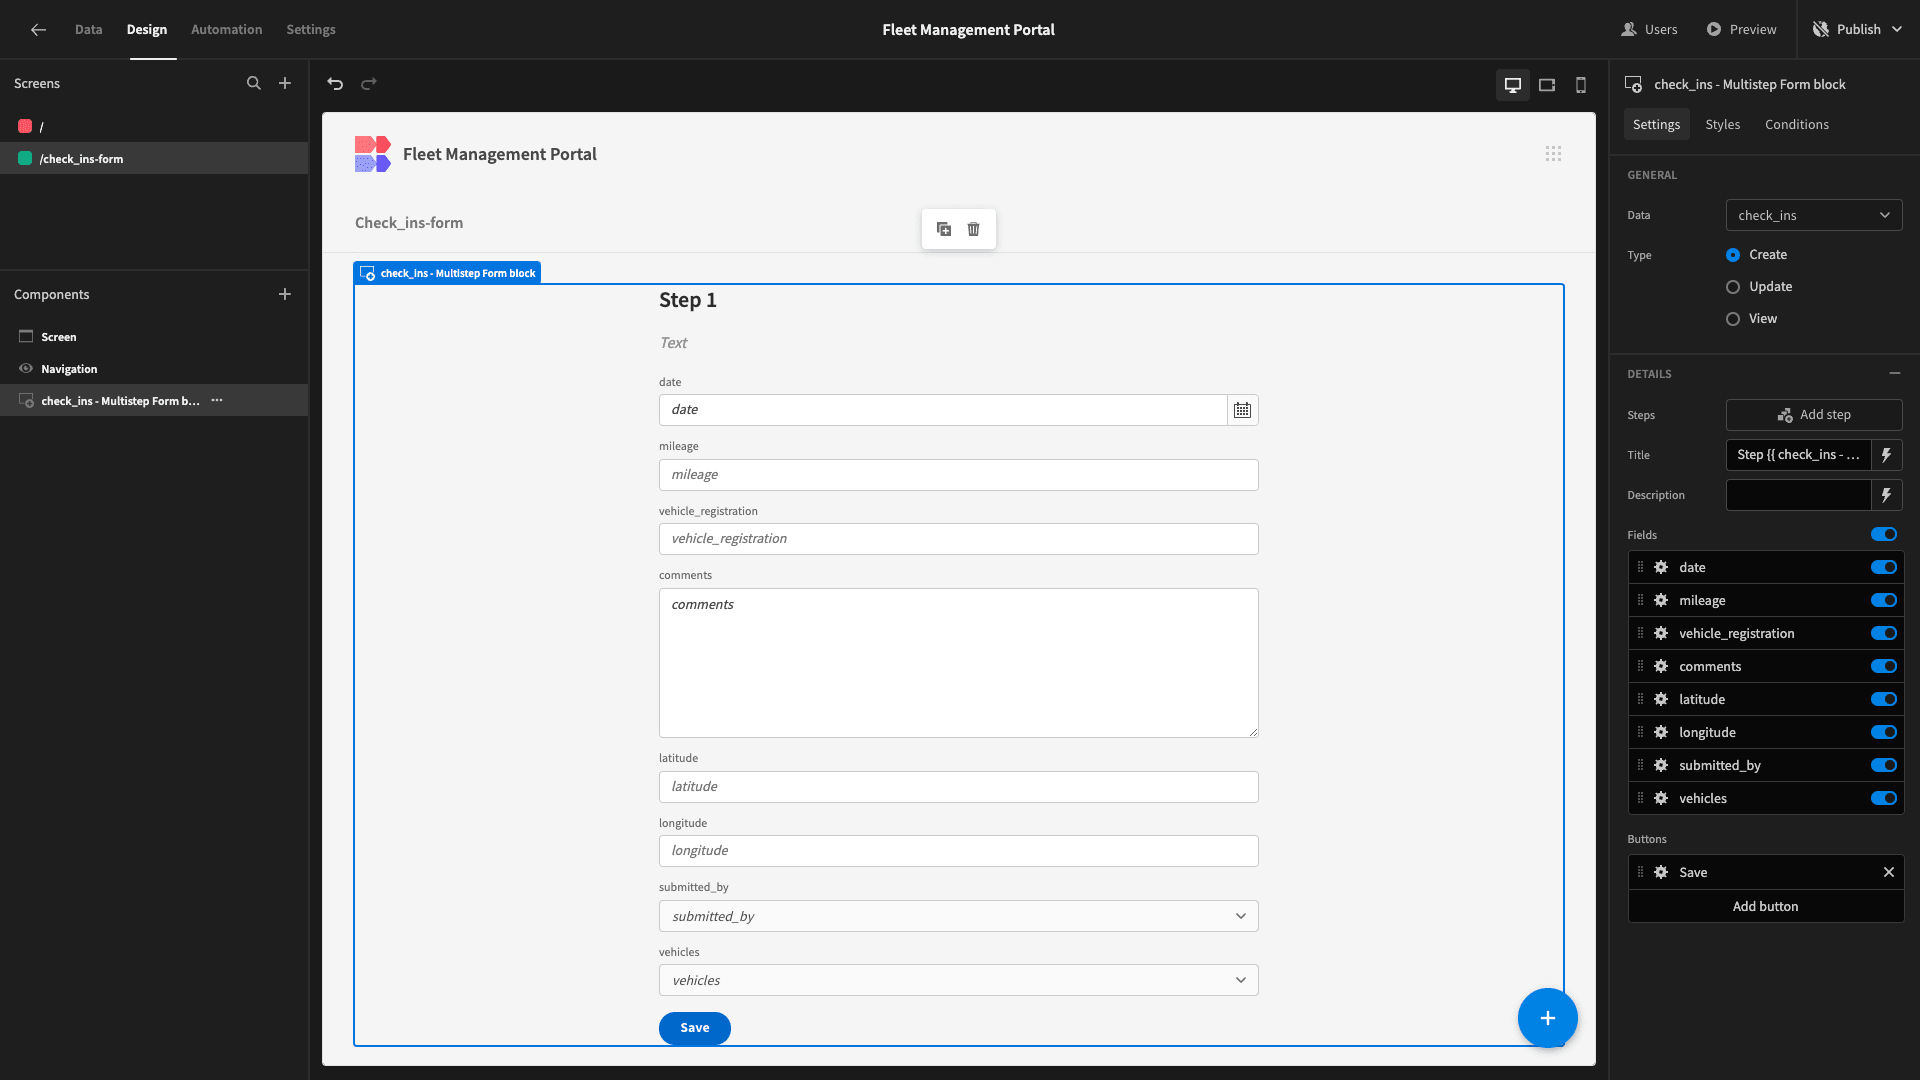
The Form Layout outputs a working, configurable multi-step form UI. However, we’re going to display all of the fields we need on a single step.
Our first task is deciding which of our form fields we need user-submitted values for.
On the right-hand side, we’re going to start by deselecting the vehicles and submitted_by attributes. Since we configured a relationship earlier, the vehicles column should already be populated when a user inputs a valid vehicle_registration.
We’ll assign a value to the submitted_by attribute in a second using contextual bindings.

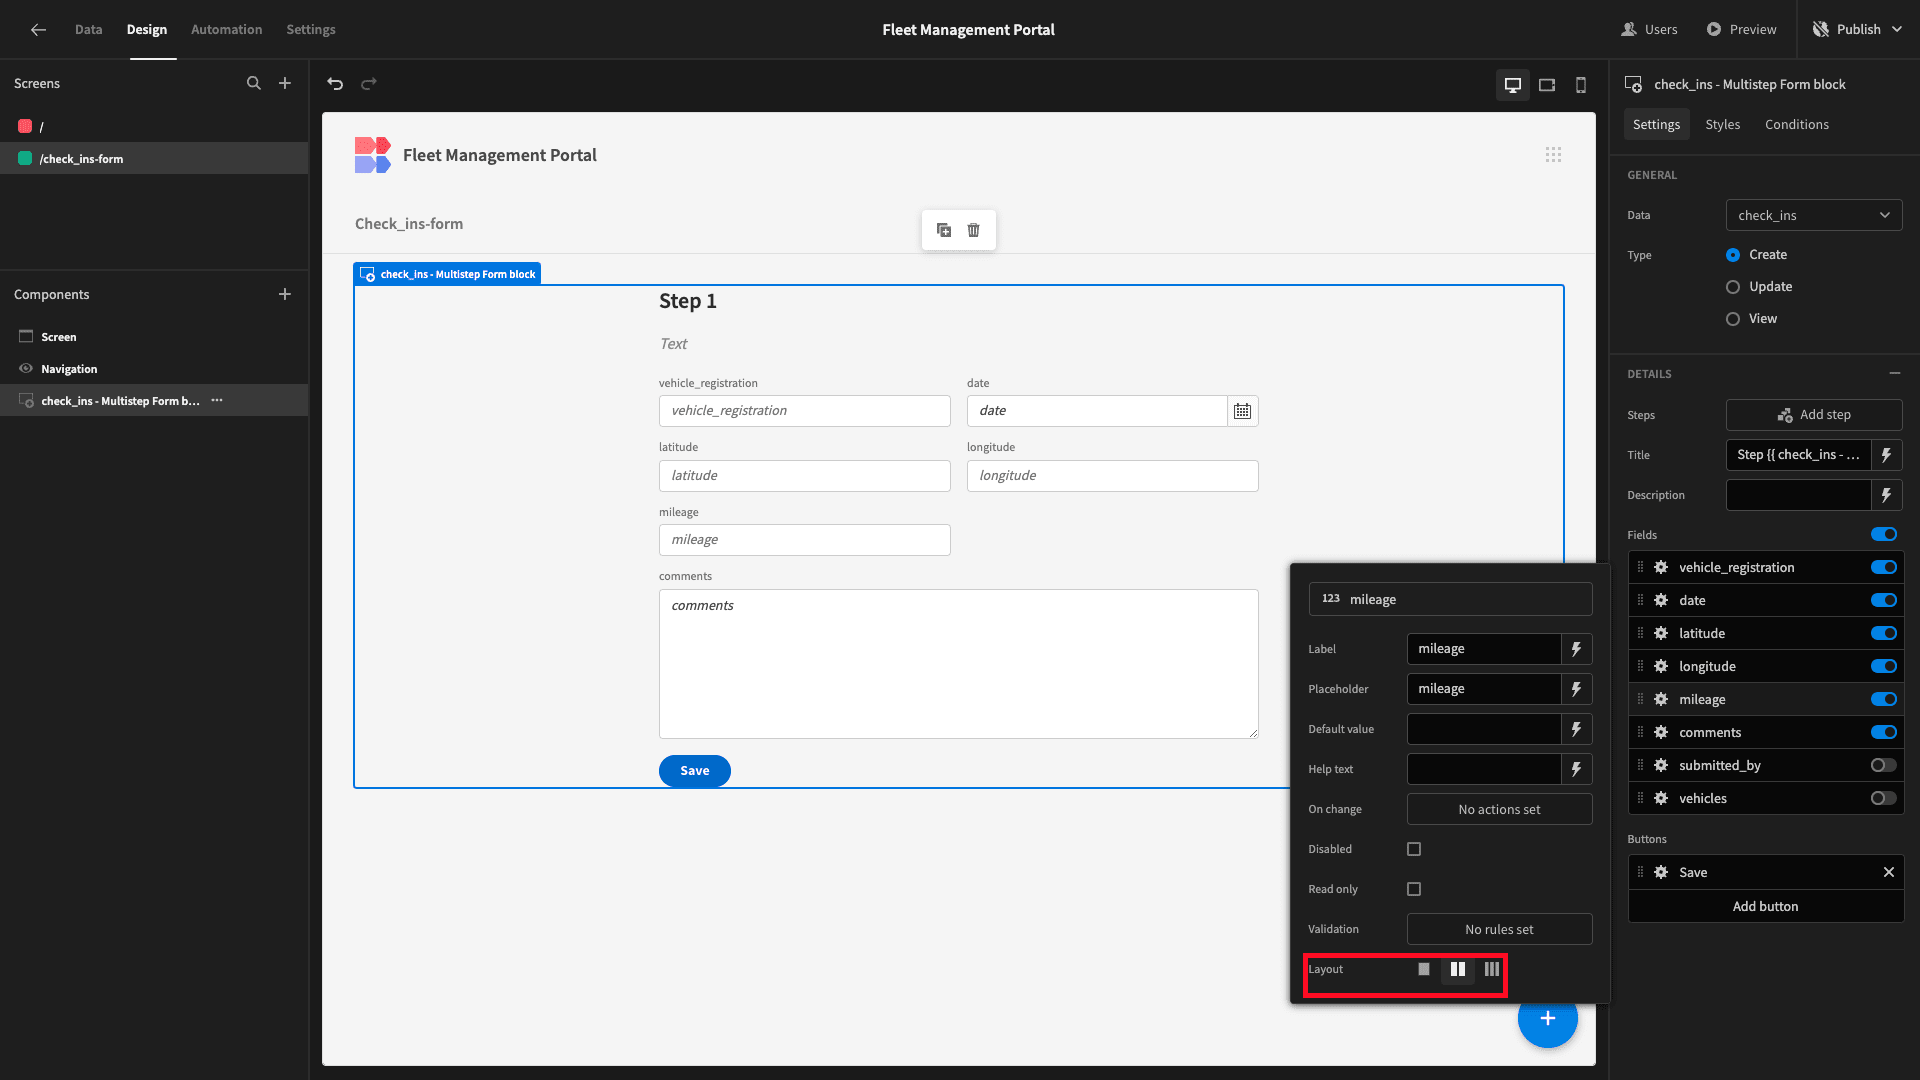
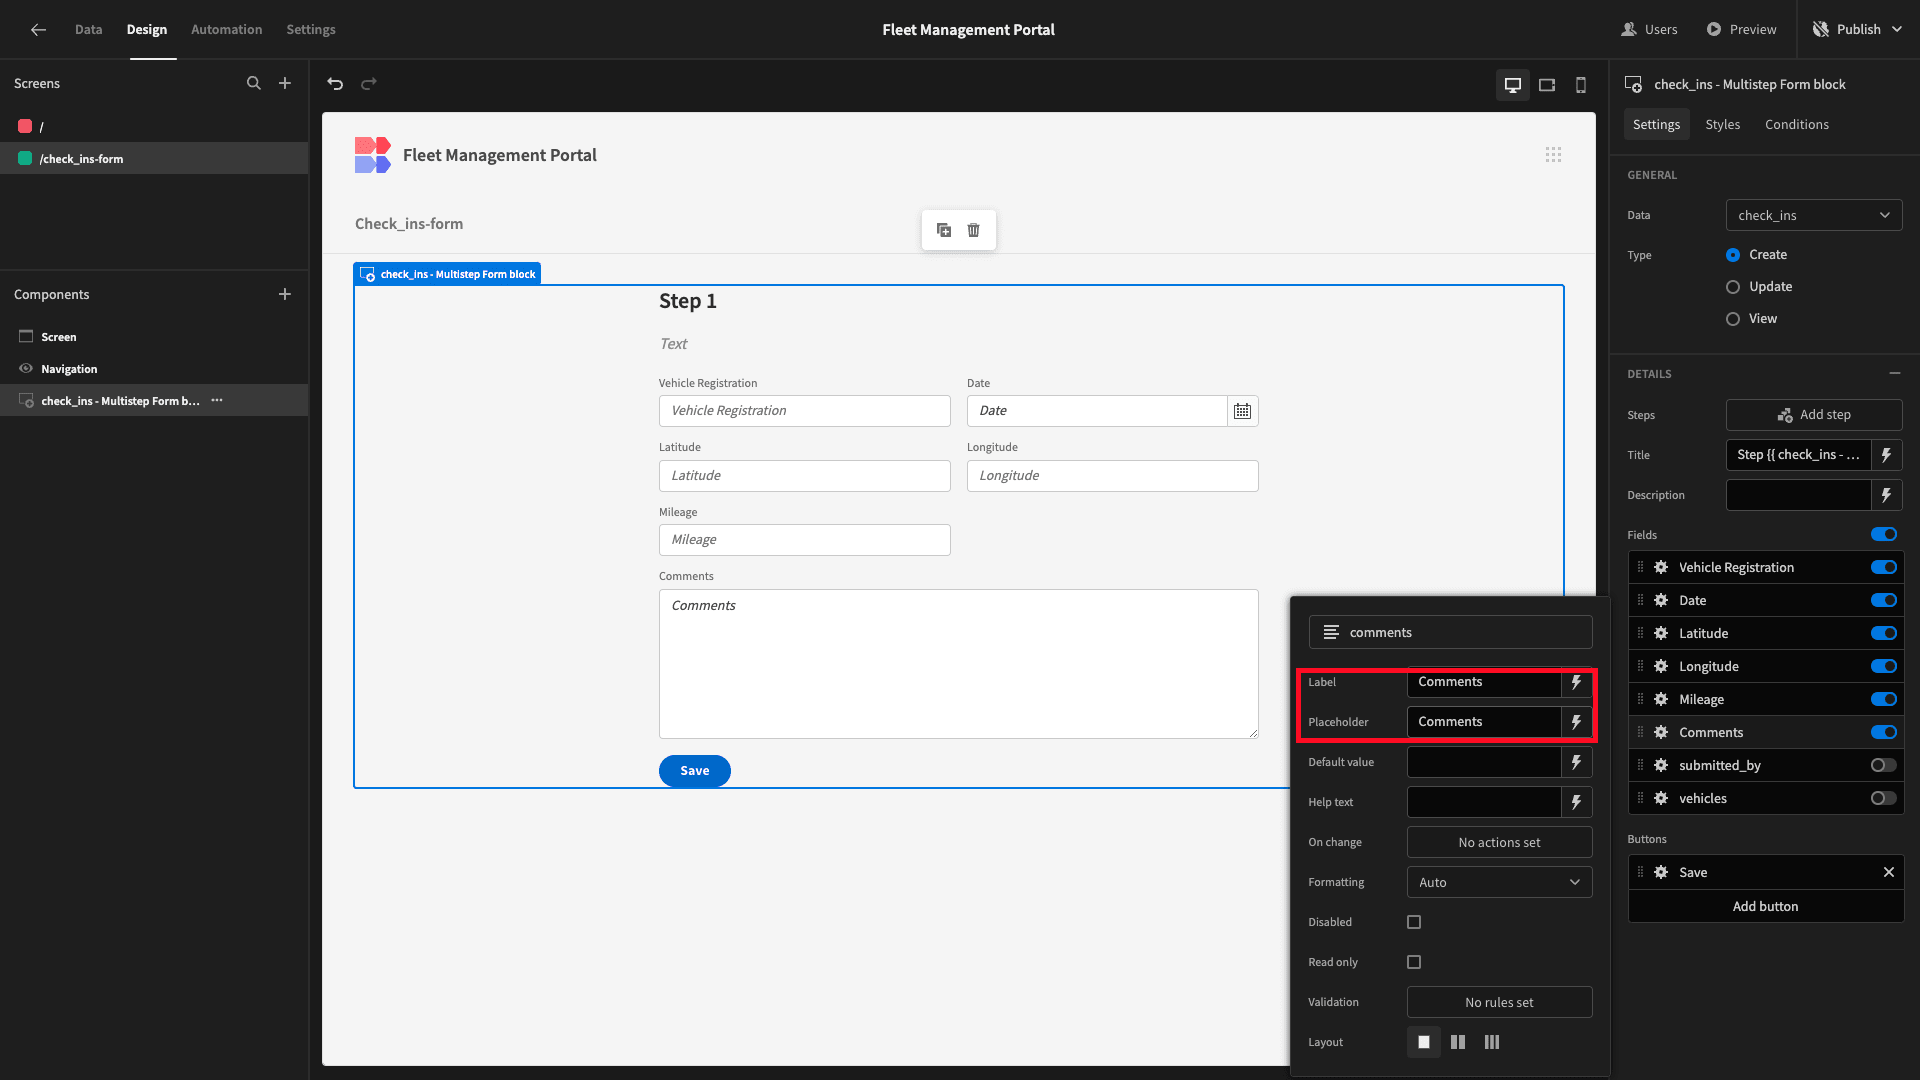
Then, we’ll use the Layout setting on each of our short-form fields to arrange them into columns.
We’ll also use the Label and Placeholder settings to tidy up the display texts for each of our fields.
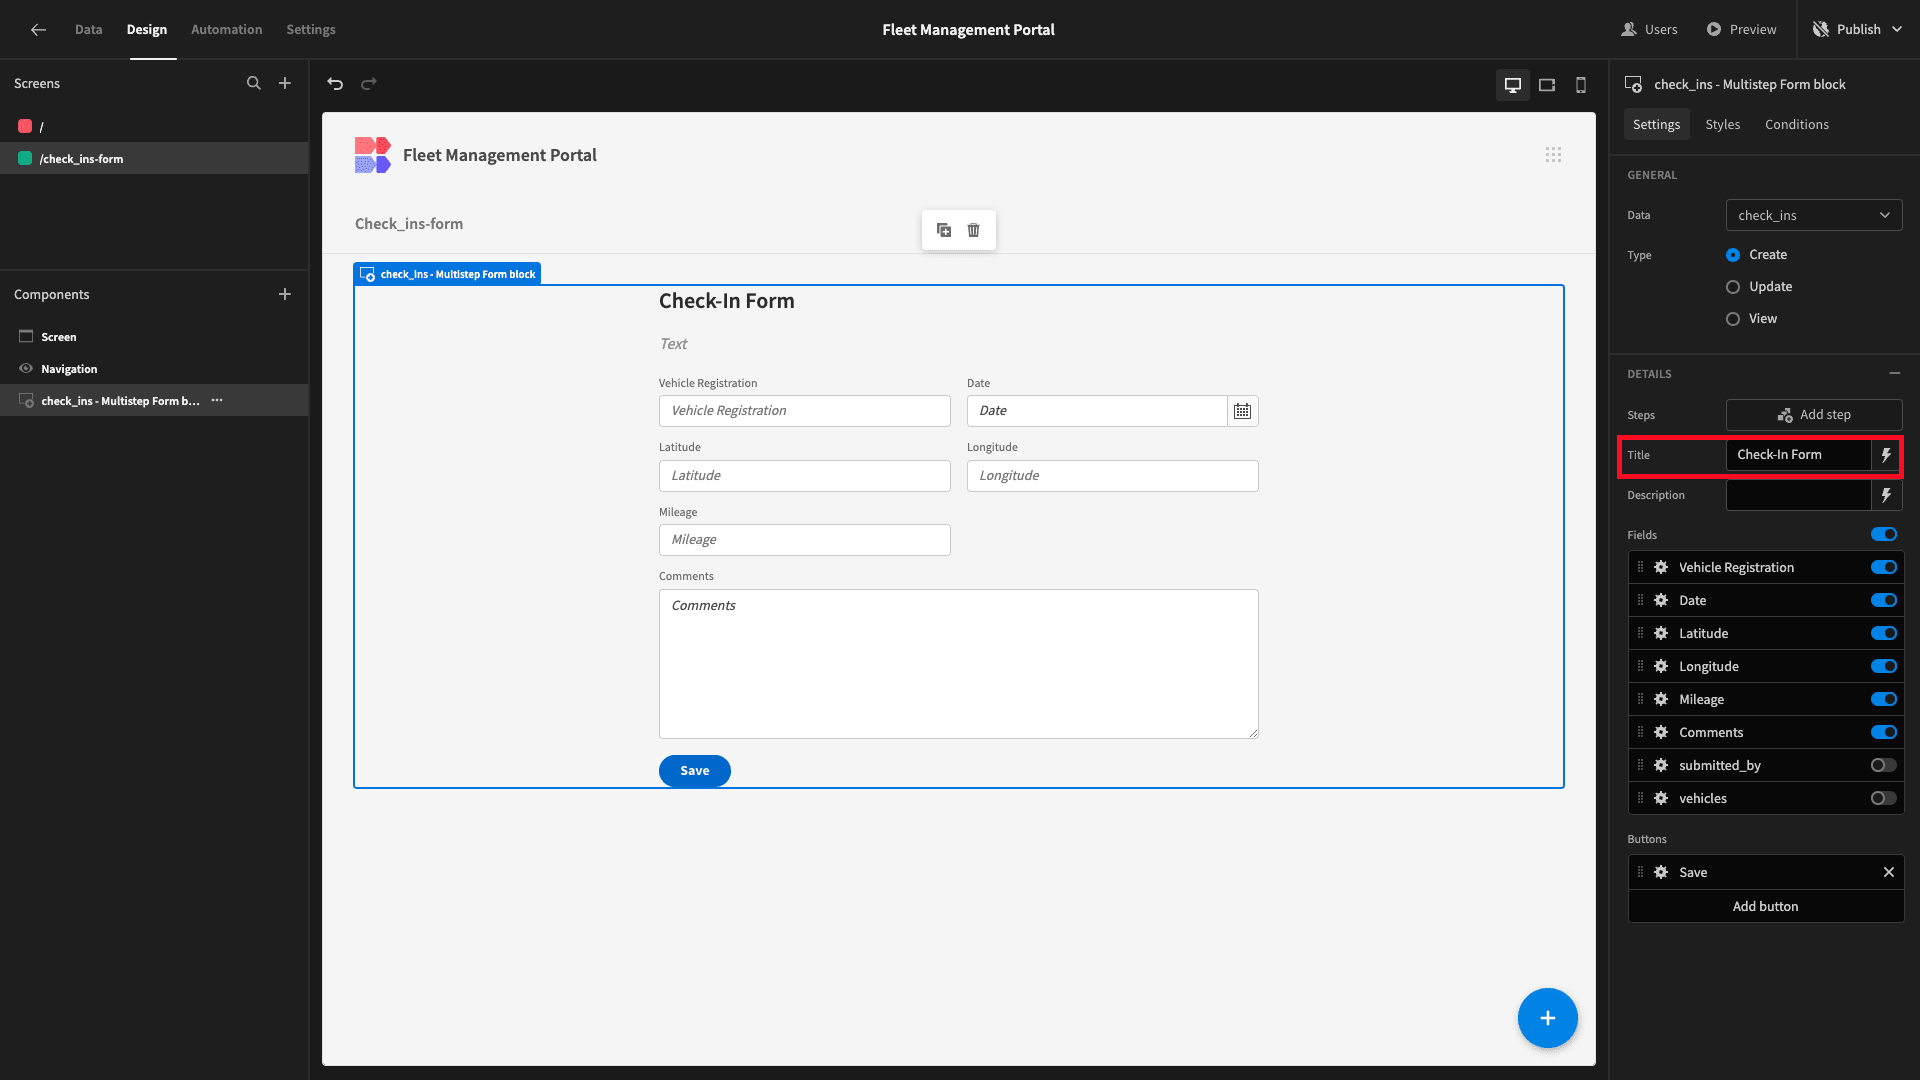
We can then update our display title to something more appropriate.
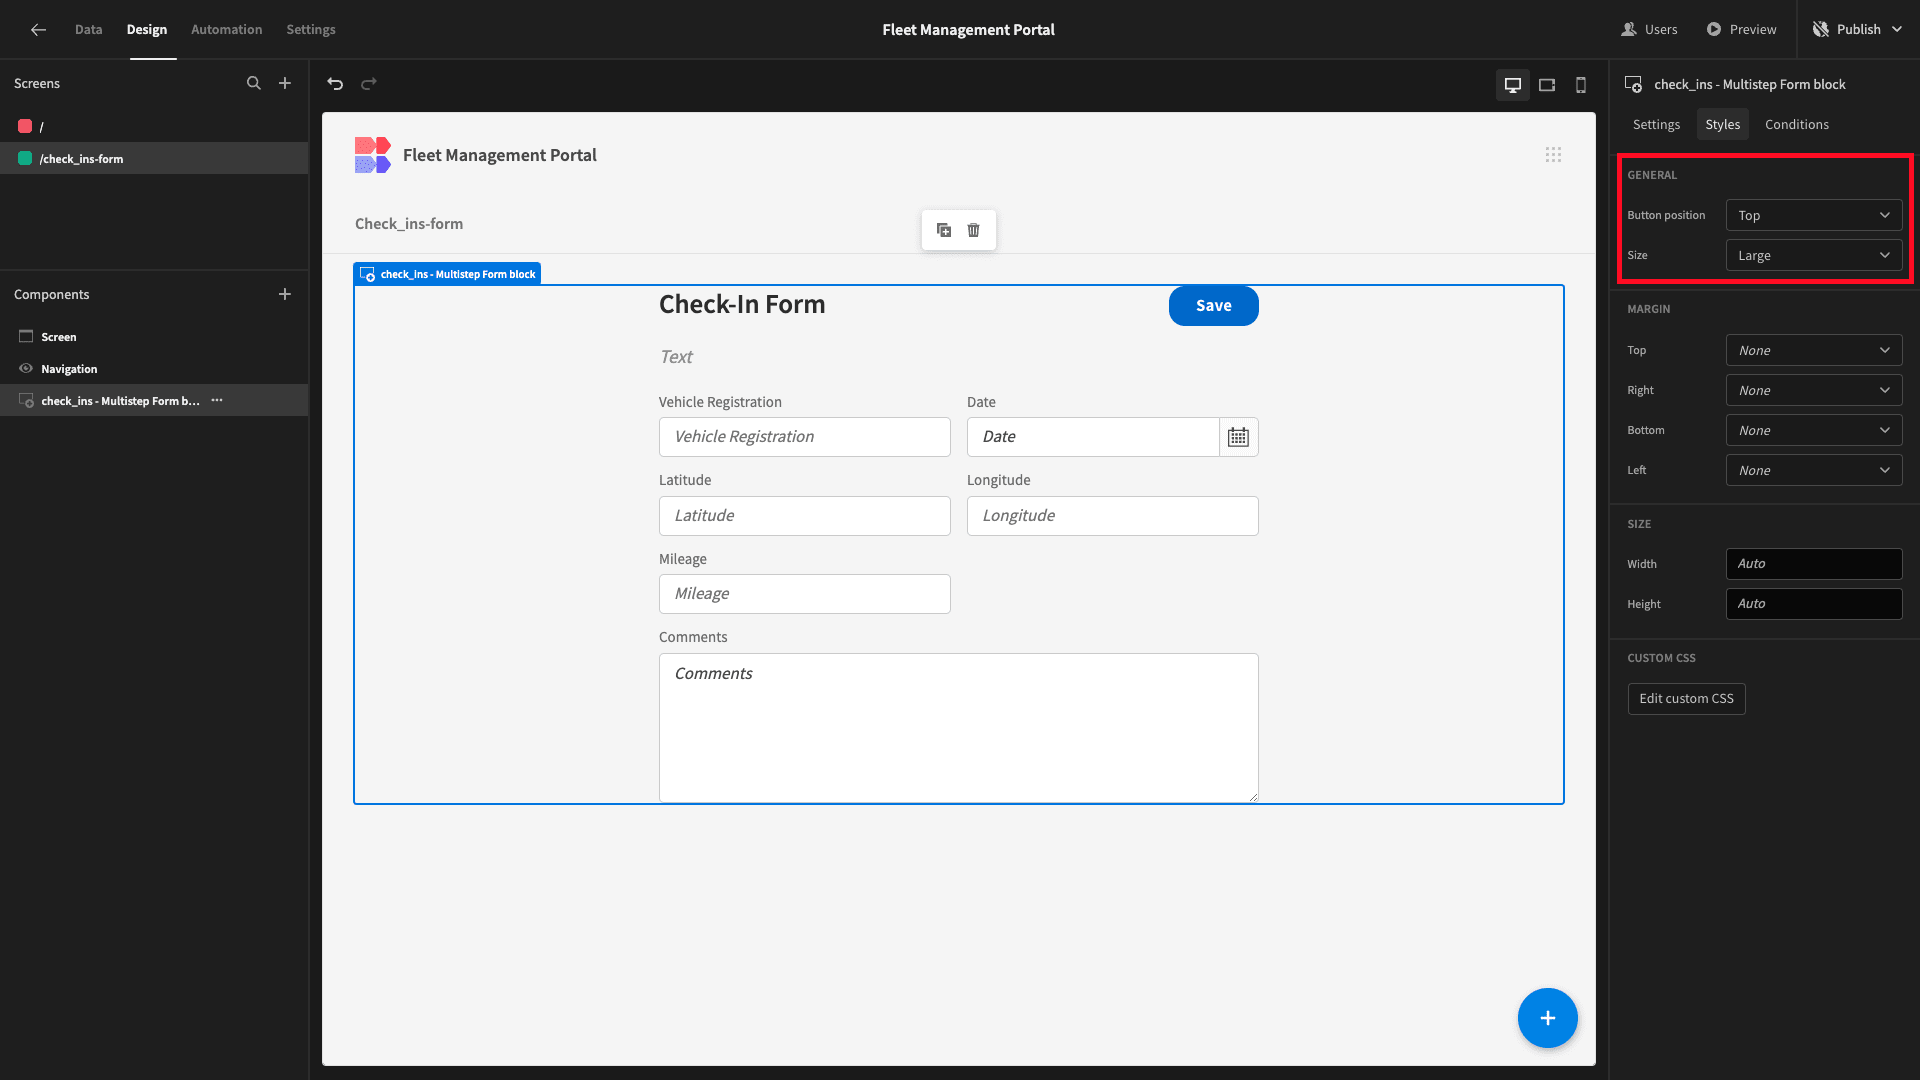
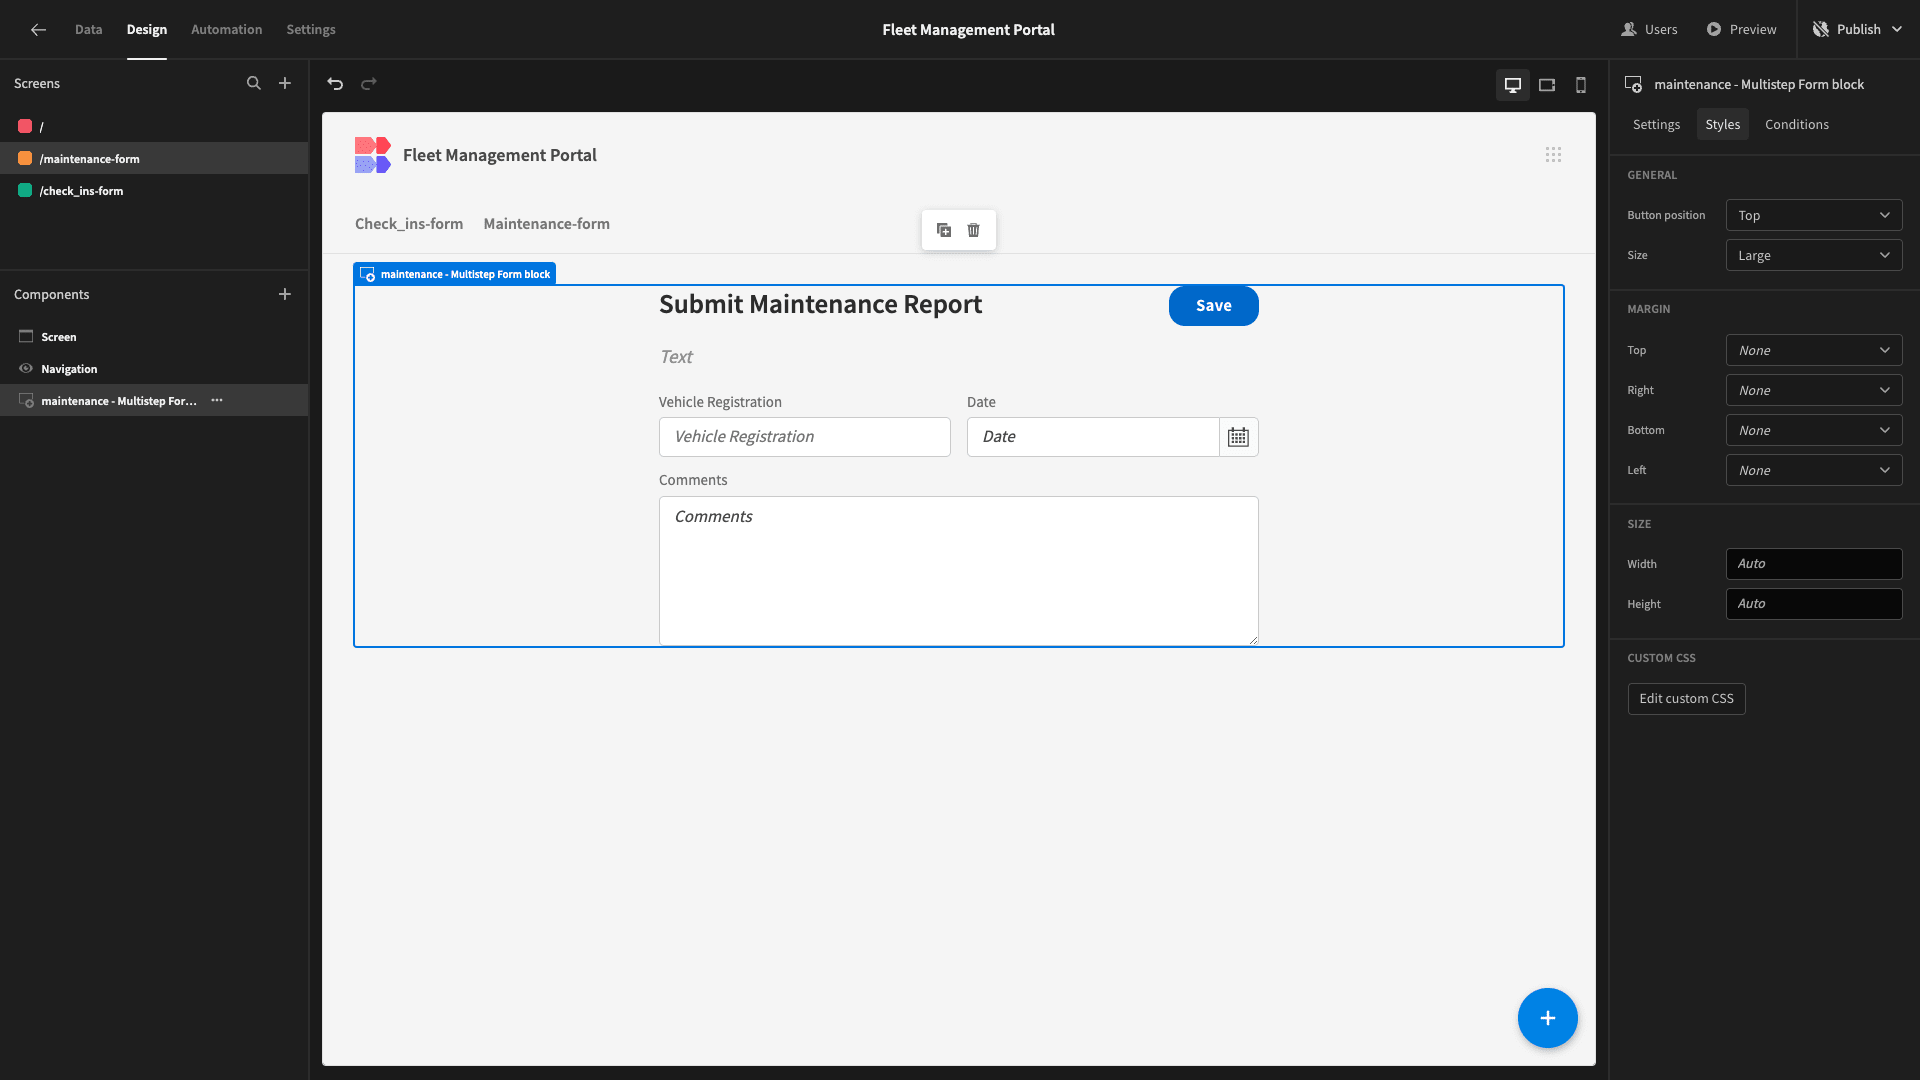
Next, under Styles, we’re going to set the Size to Large, and the Button Position to Top.
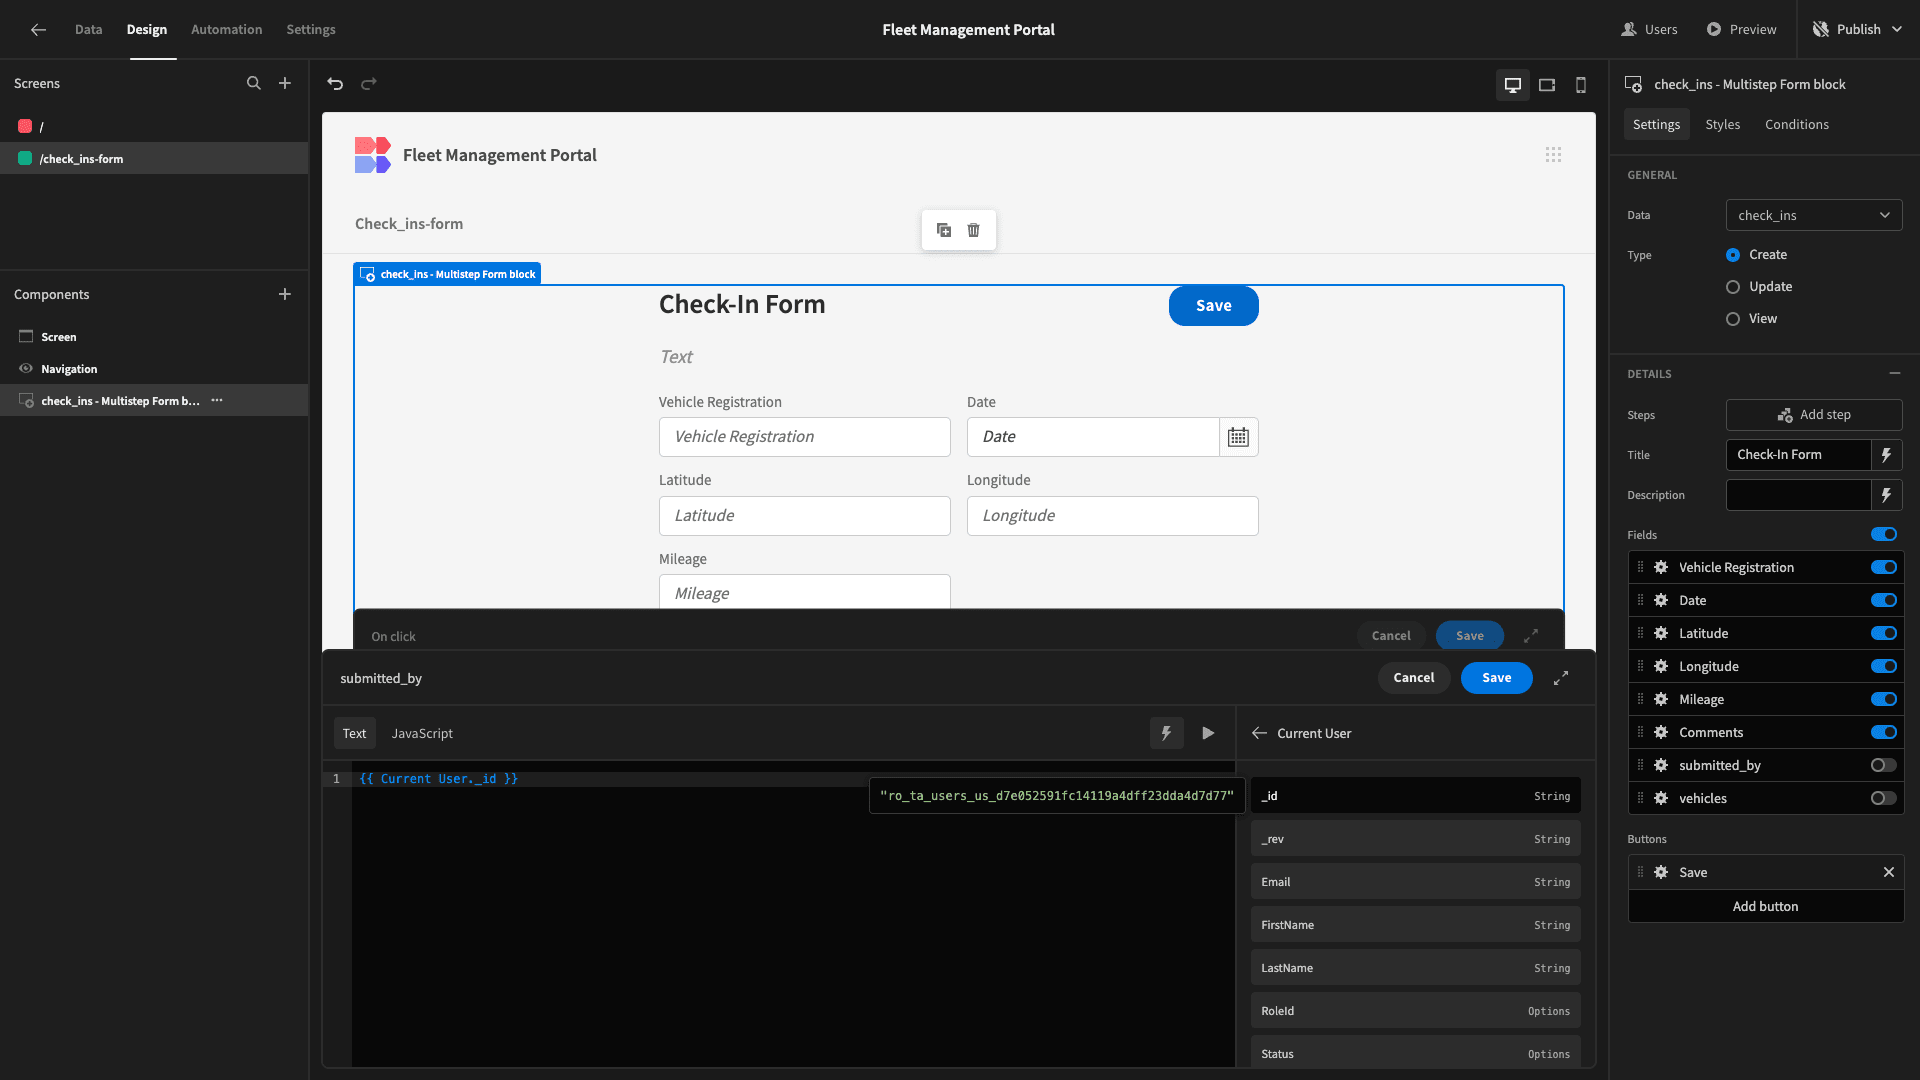
And lastly, we need to assign a value to the submitted_by attribute of the new row when our form is completed.
We’ll start by opening the actions drawer for our save button.
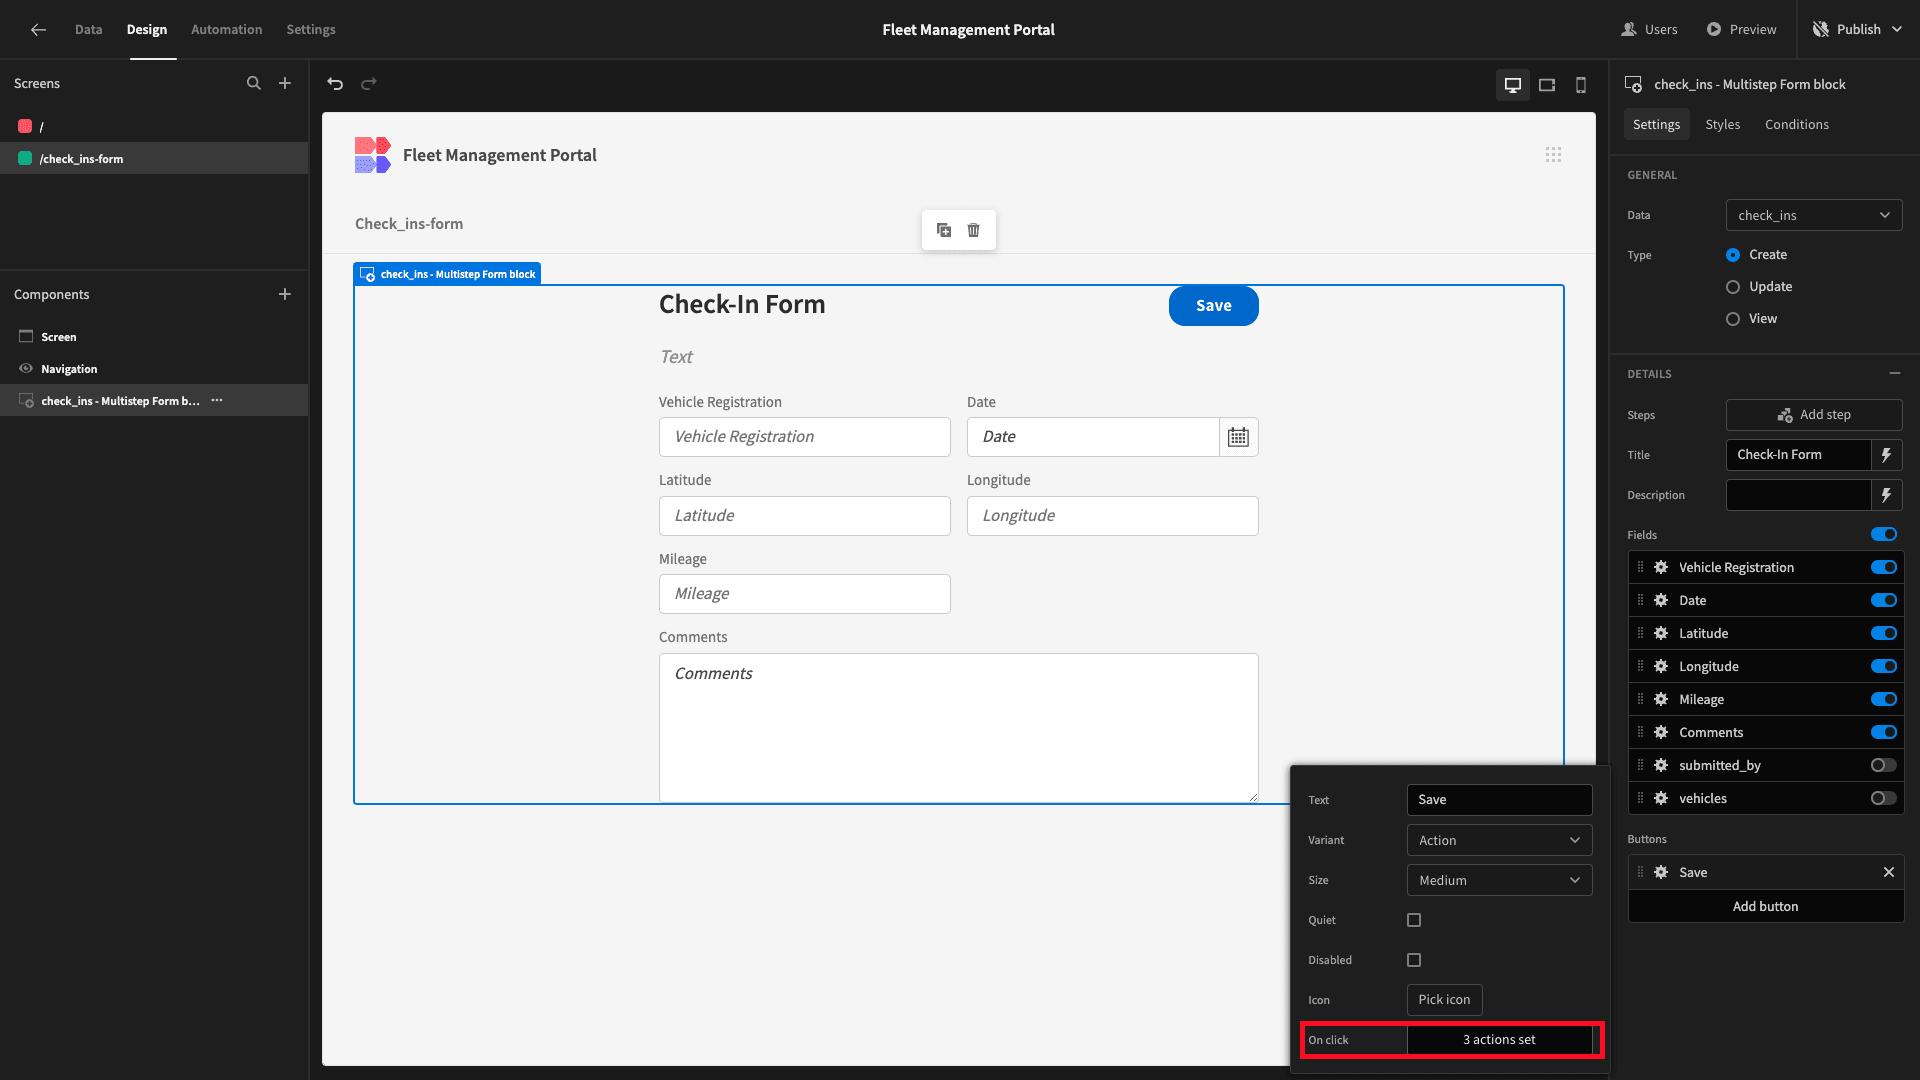
Then, under the Save Row action, we’ll hit Add Column and select submitted_by.

As before, we’ll use the lightning bolt to open the bindings drawer for our value. Here, we can see all of the data that our button is exposed to. We’re going to first click into Current User.

Within this, we’ll pick the current user’s ID.
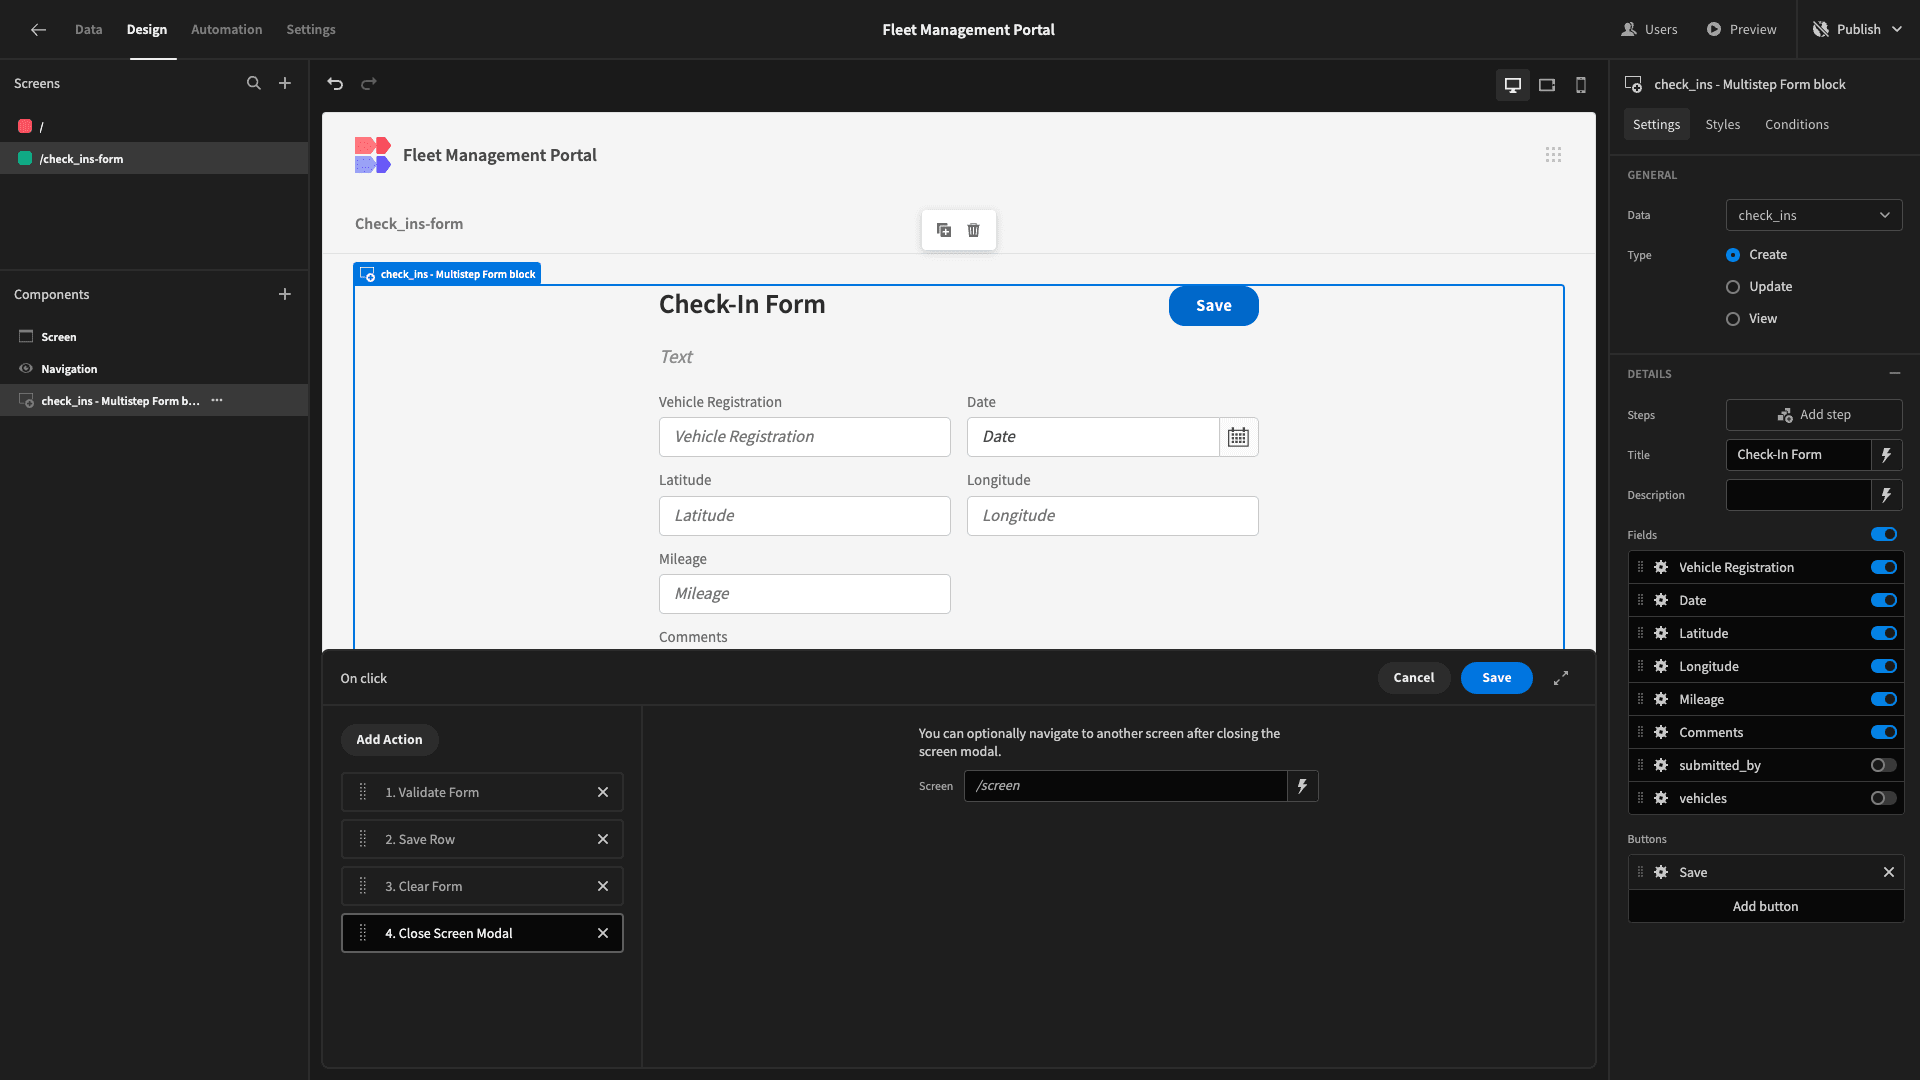
While we’re here, we’ll also add a Close Screen Modal action to our button. So, if a user is viewing our form on a modal, this will close when they hit save.
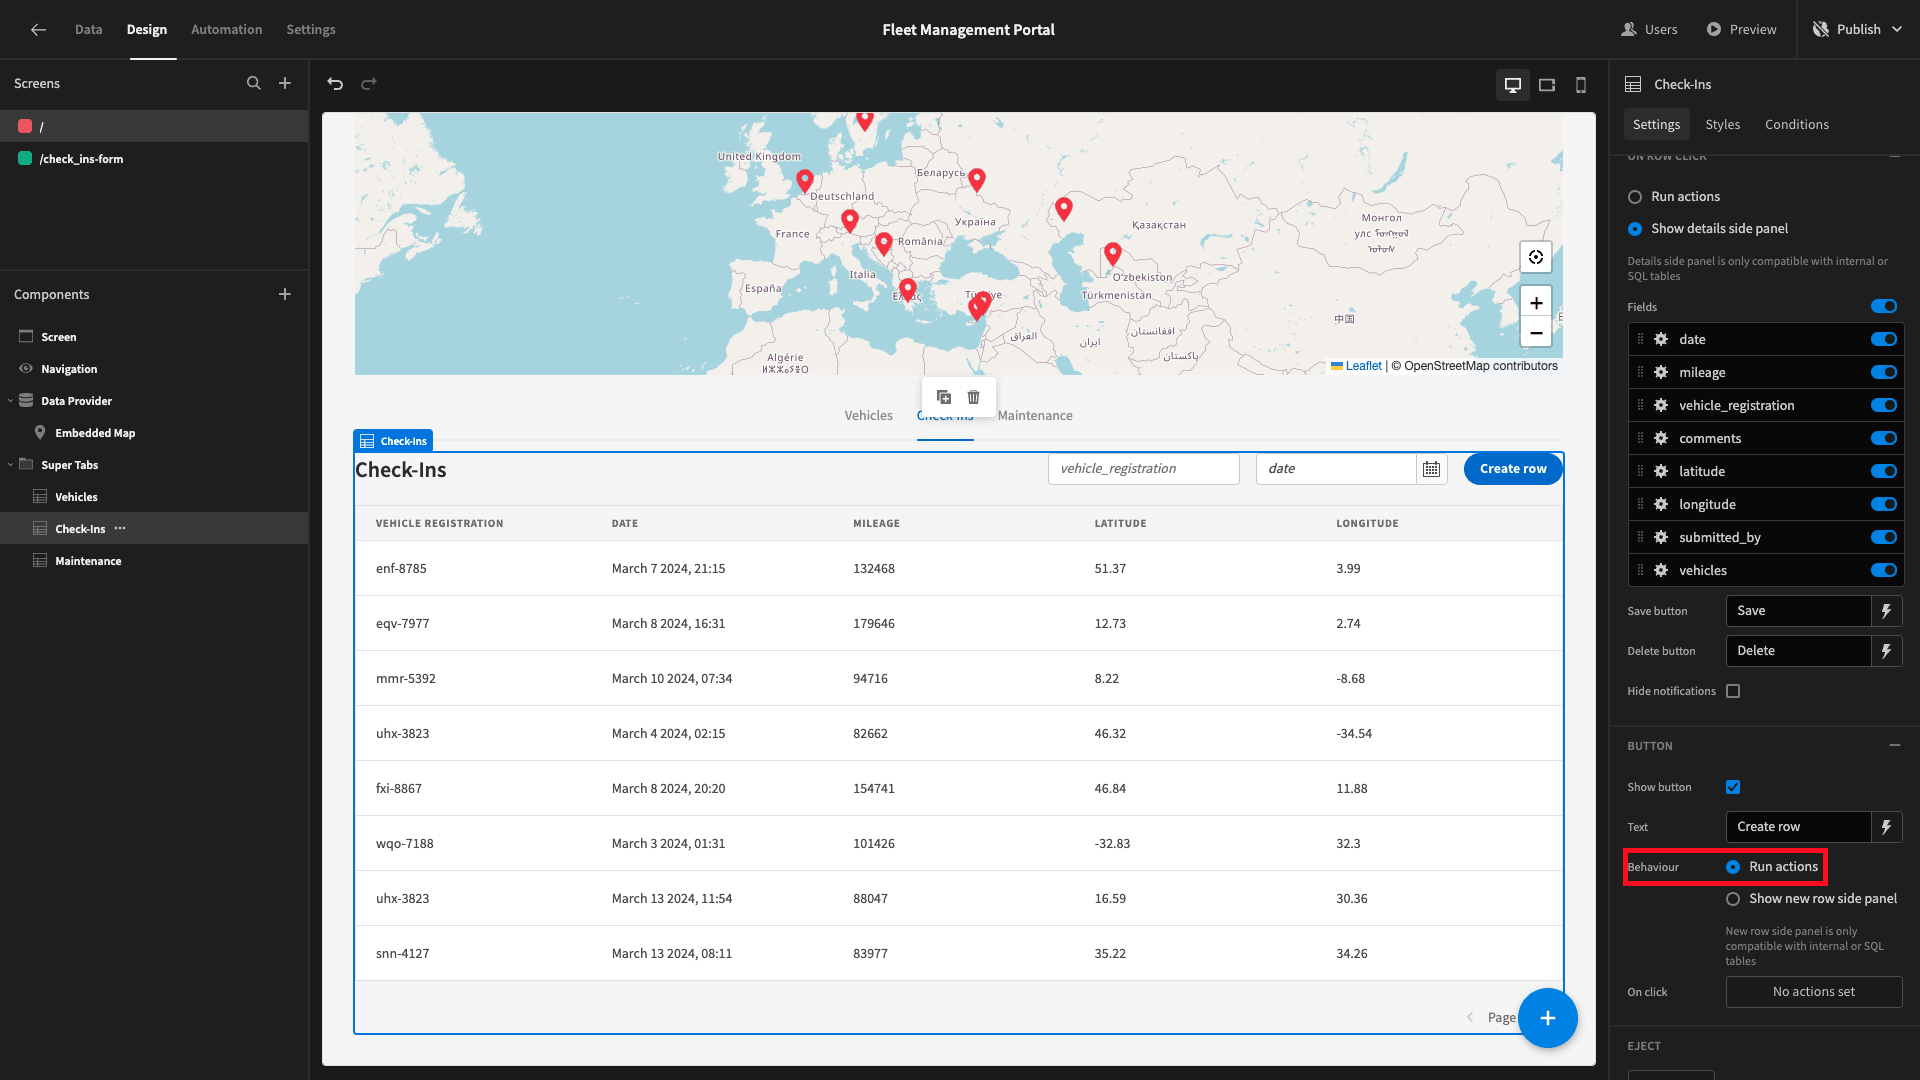
Then, we’ll head back to our original screen, and set the Create Row button for our Check-Ins table to Run Actions.
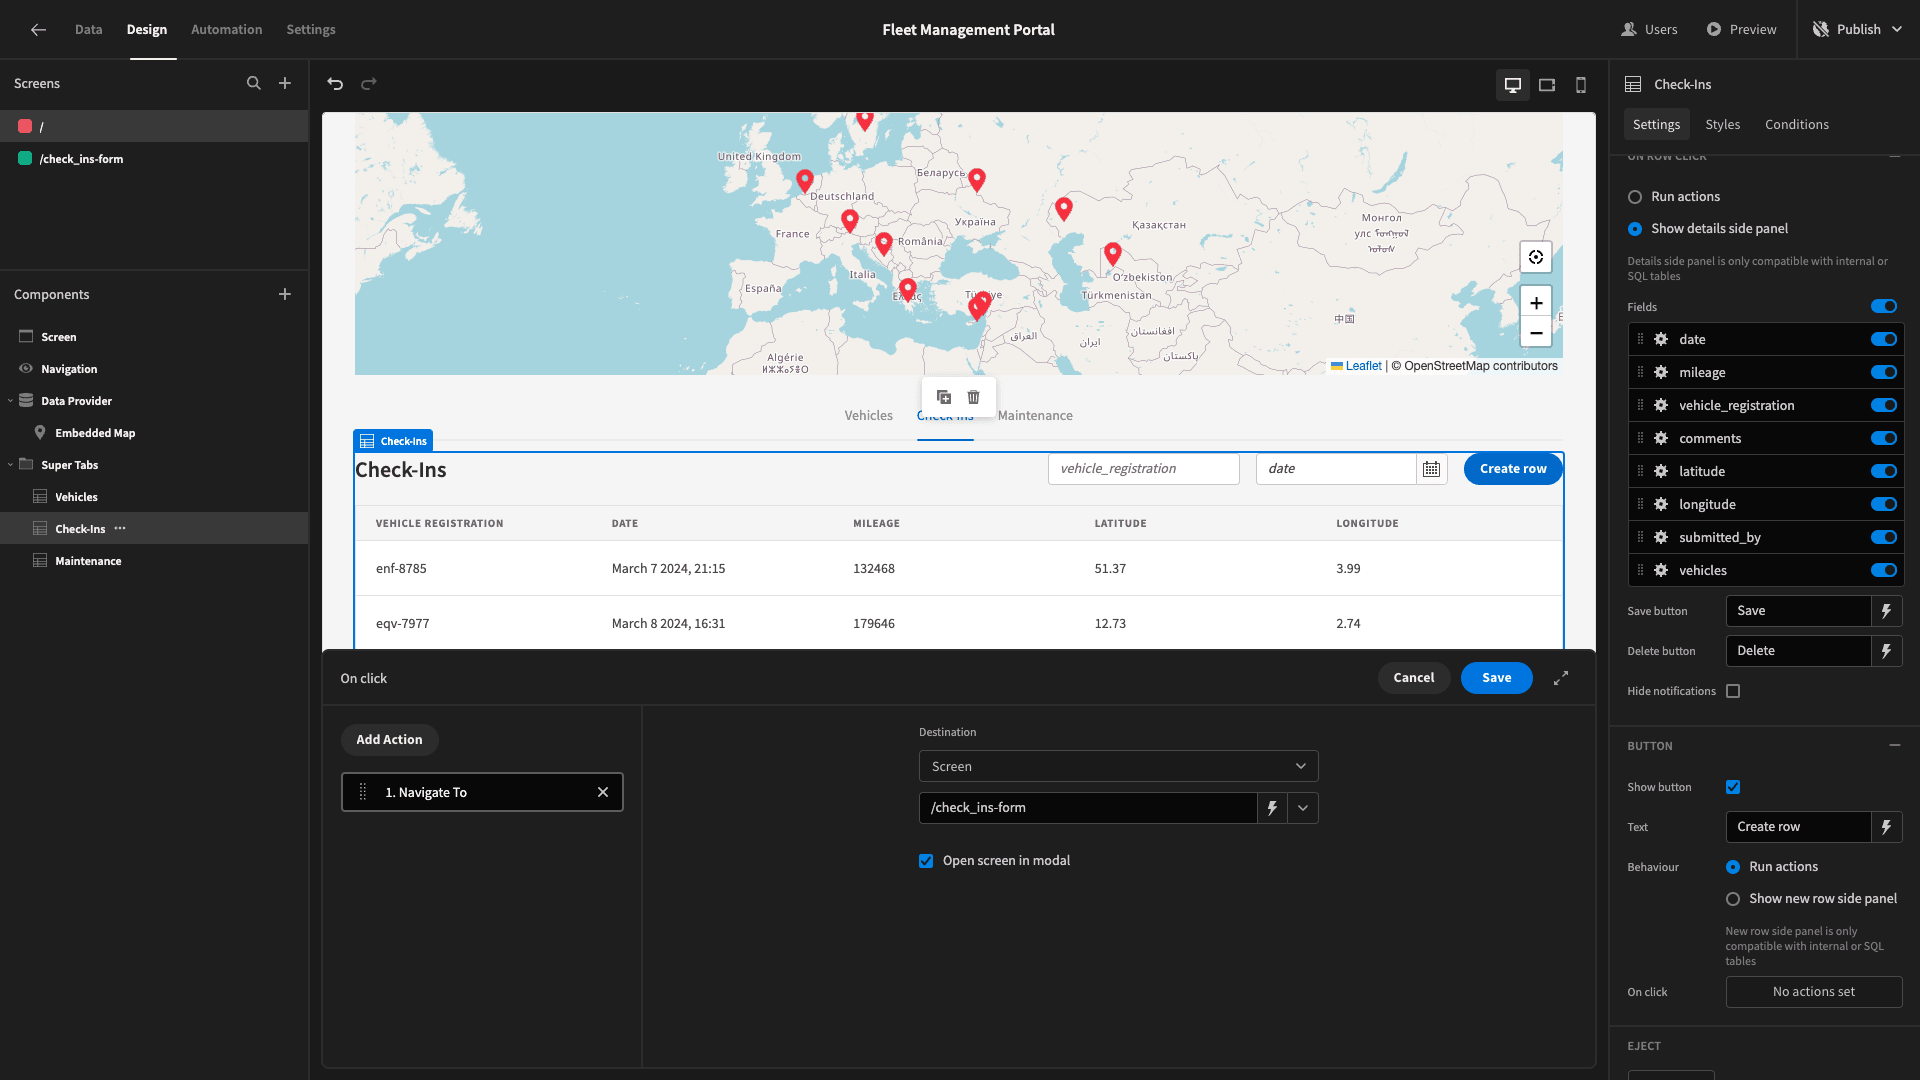
Then, we’ll add an action to navigate to our new screen, selecting the option to open it in a modal.
Here’s what this will look like for Admin users.
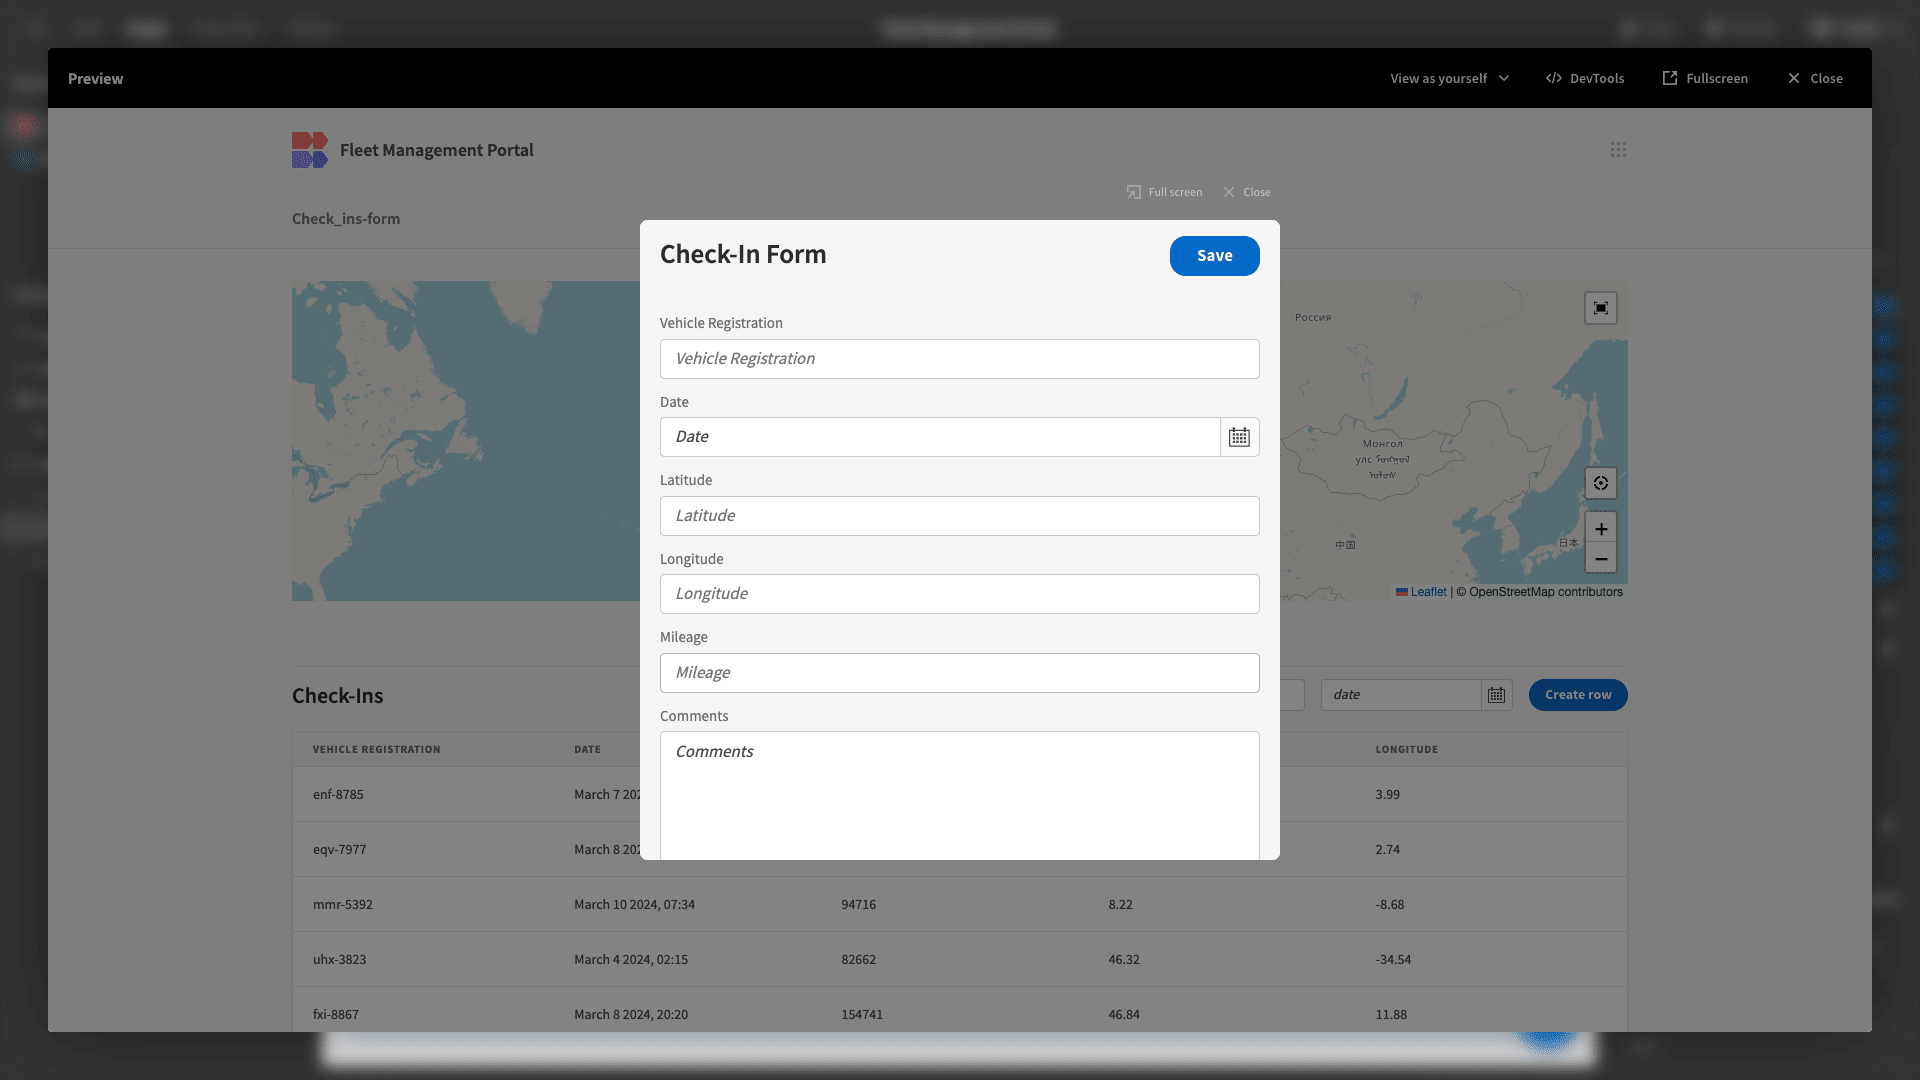
But, for Basic users, it will be the only screen they can access.

5. Adding a maintenance form
Next, we can repeat essentially the same process to create a form for submitting maintenance reports.
So, we’ll start by adding another new screen with the Form Layout. This time, however, we’ll choose our maintenance table.
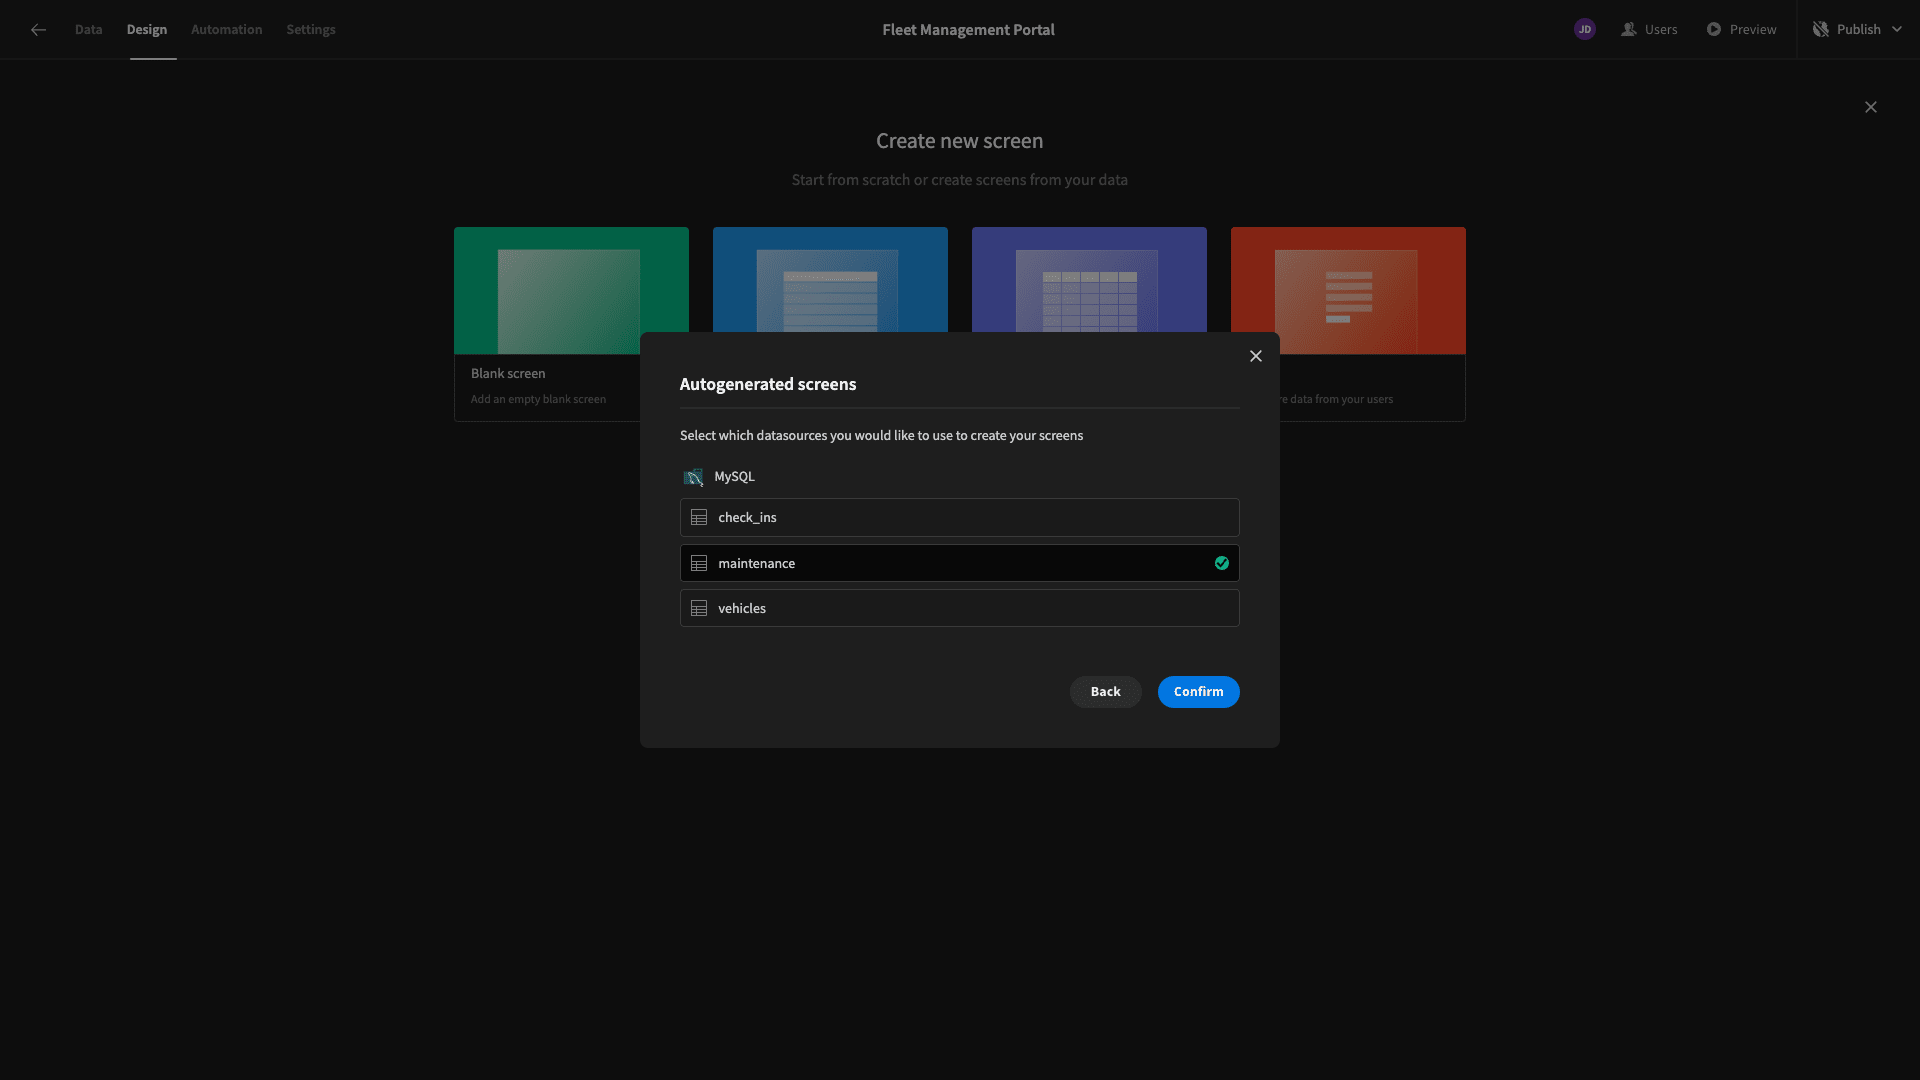
And we’ll choose Power as our access role.
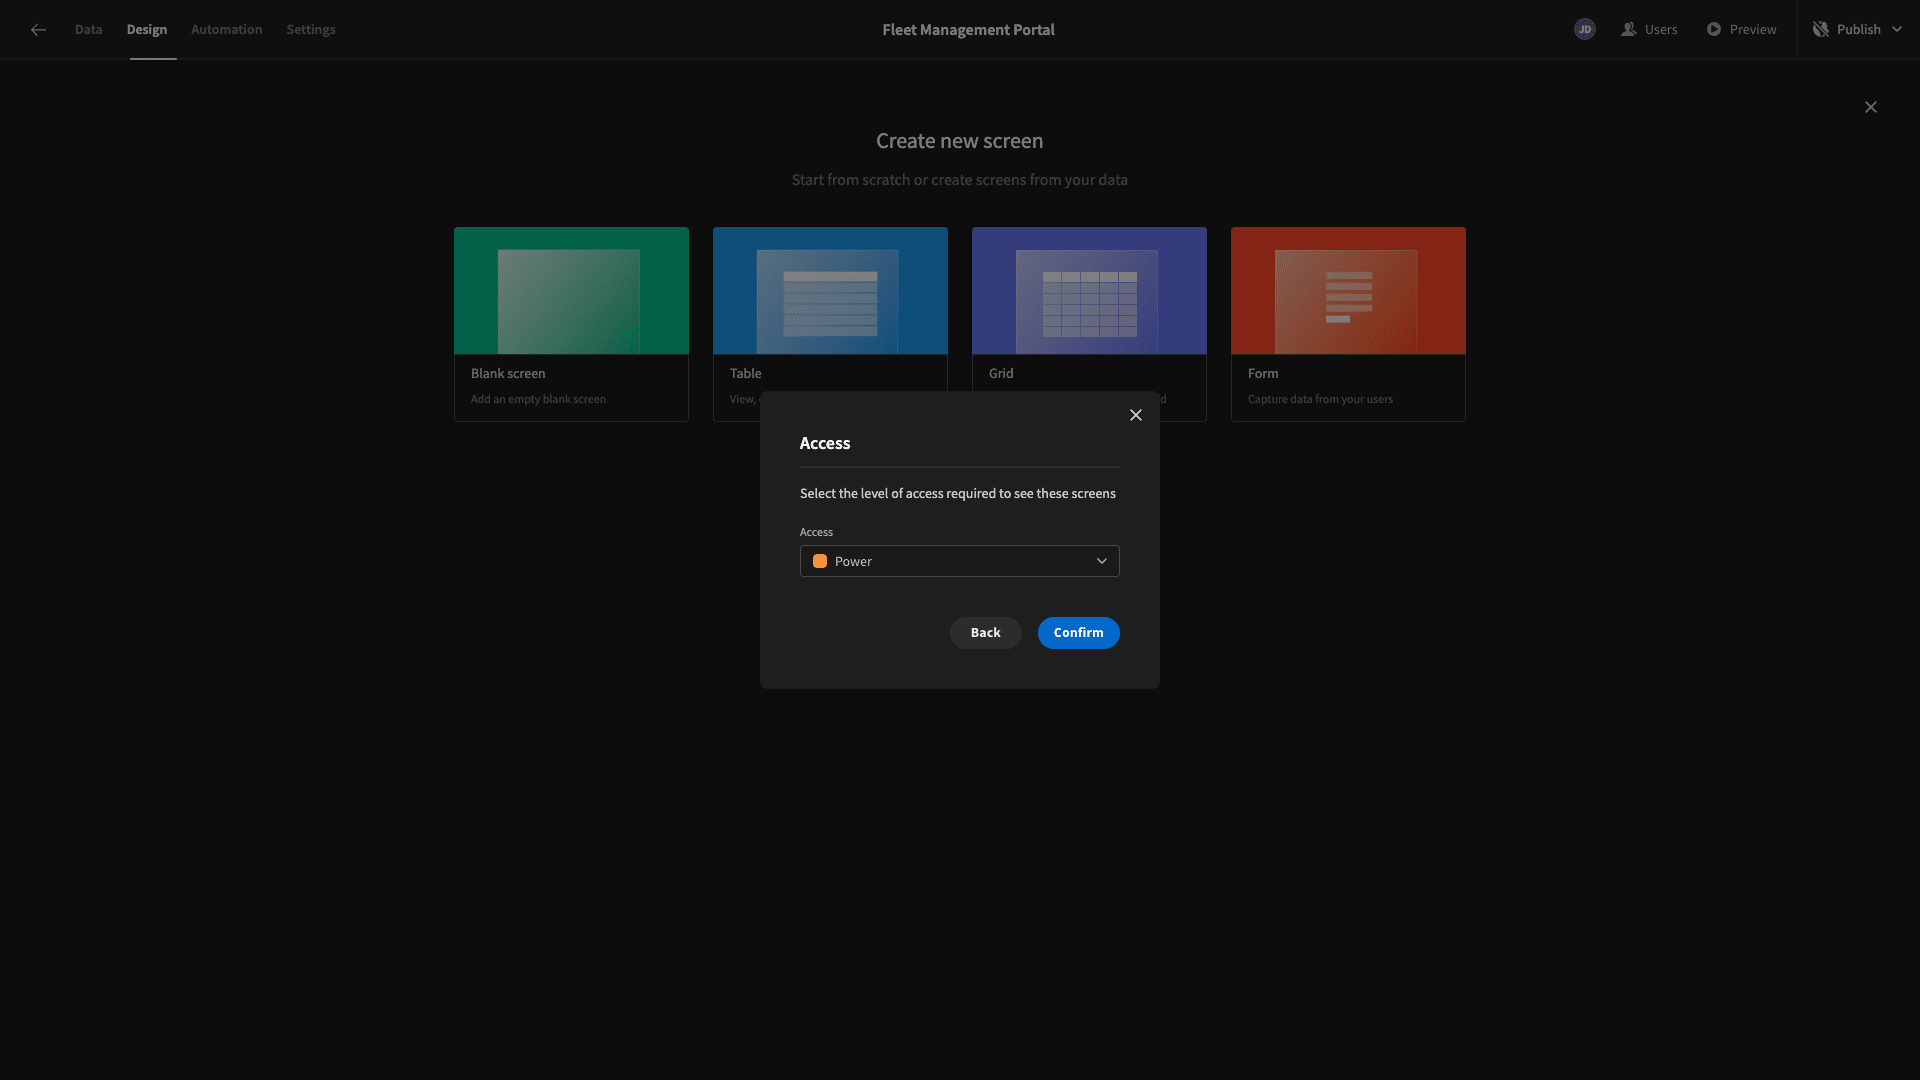
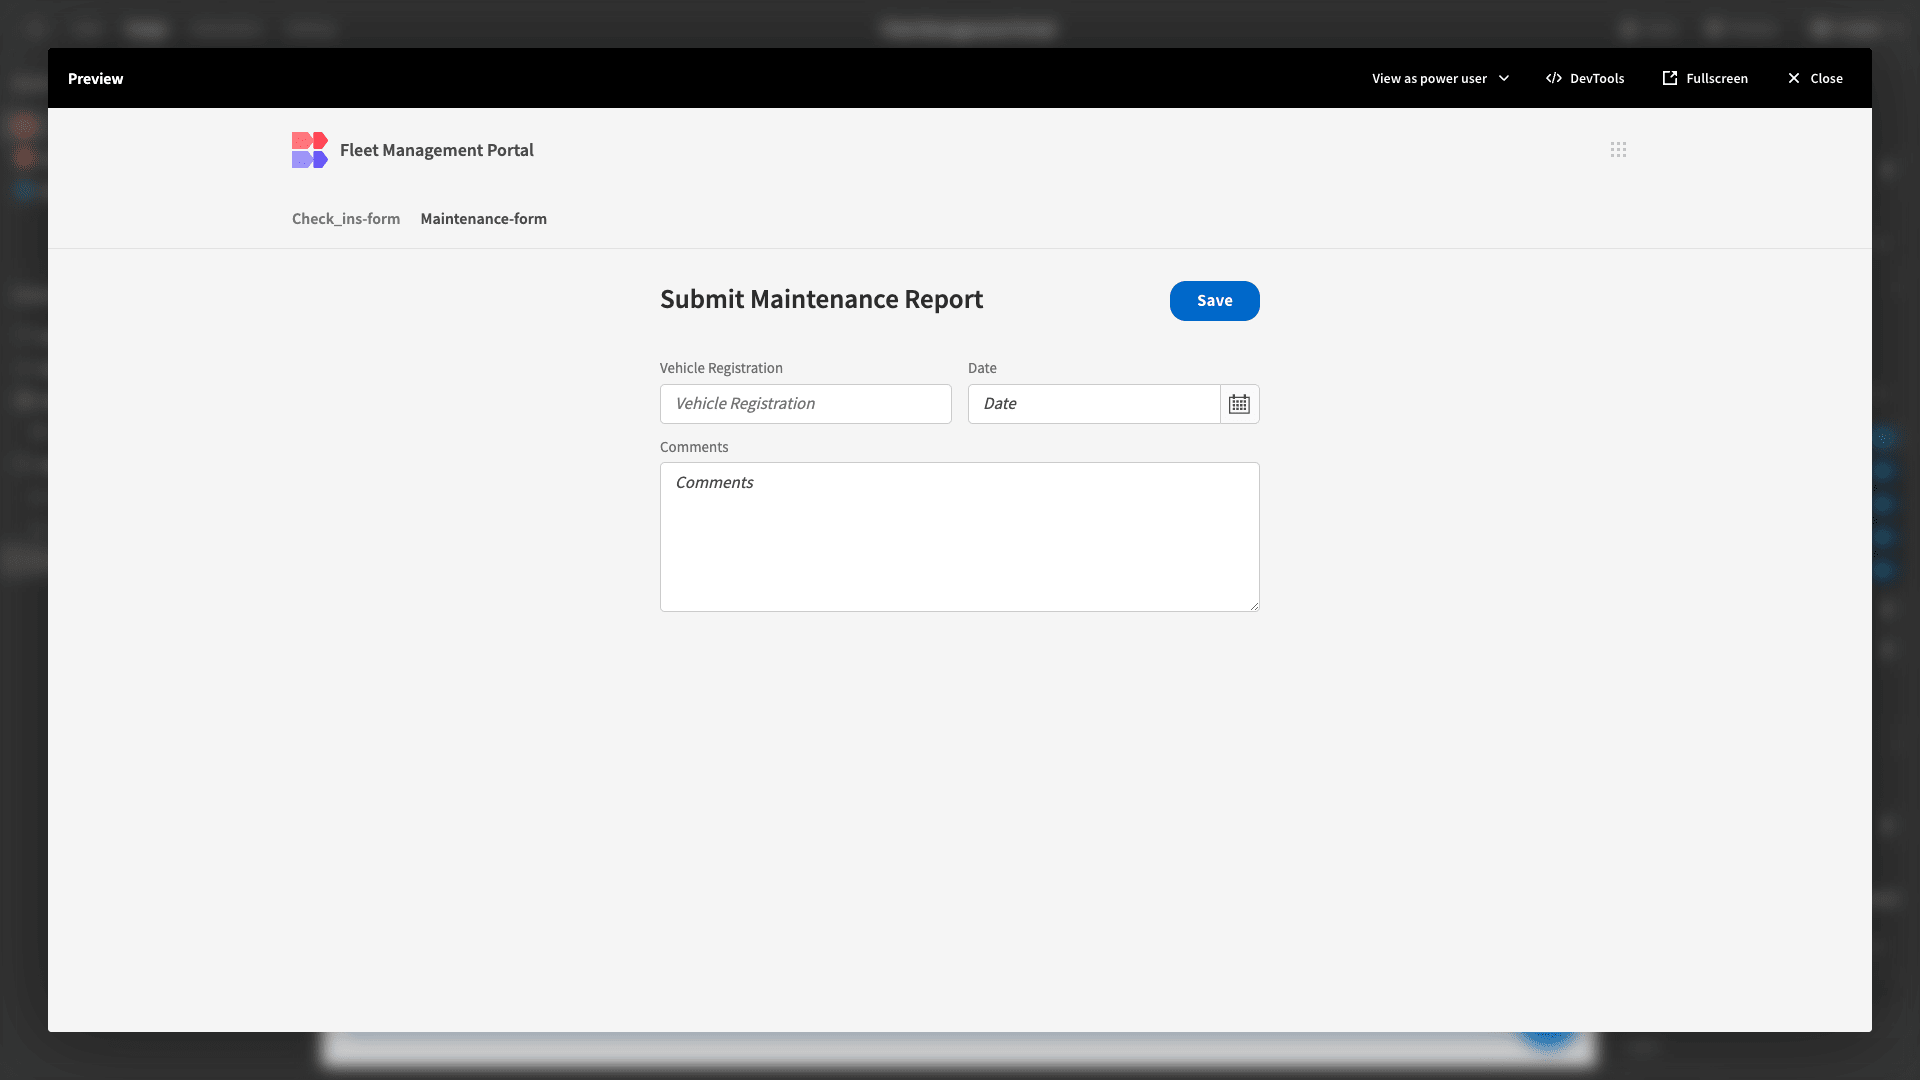
Here’s how this will look.
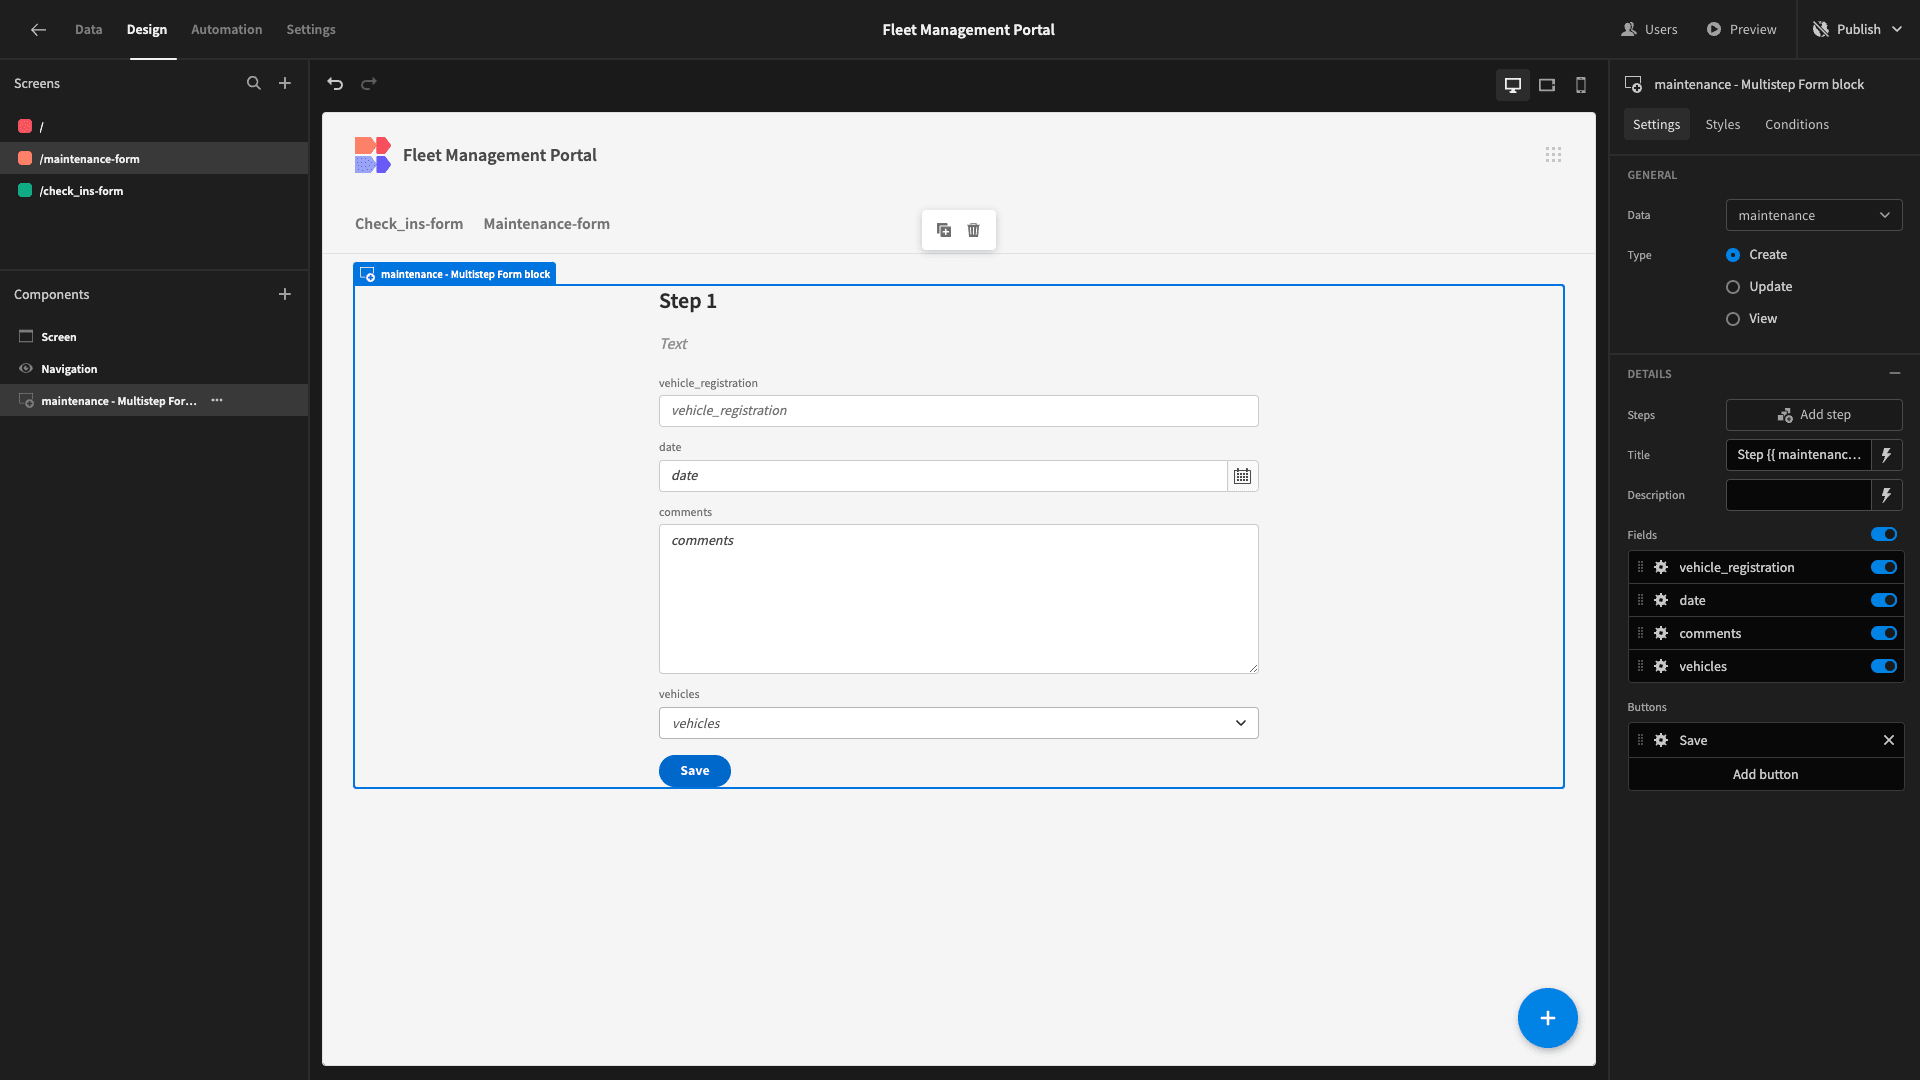
We’re going to deselect vehicles, just like before.
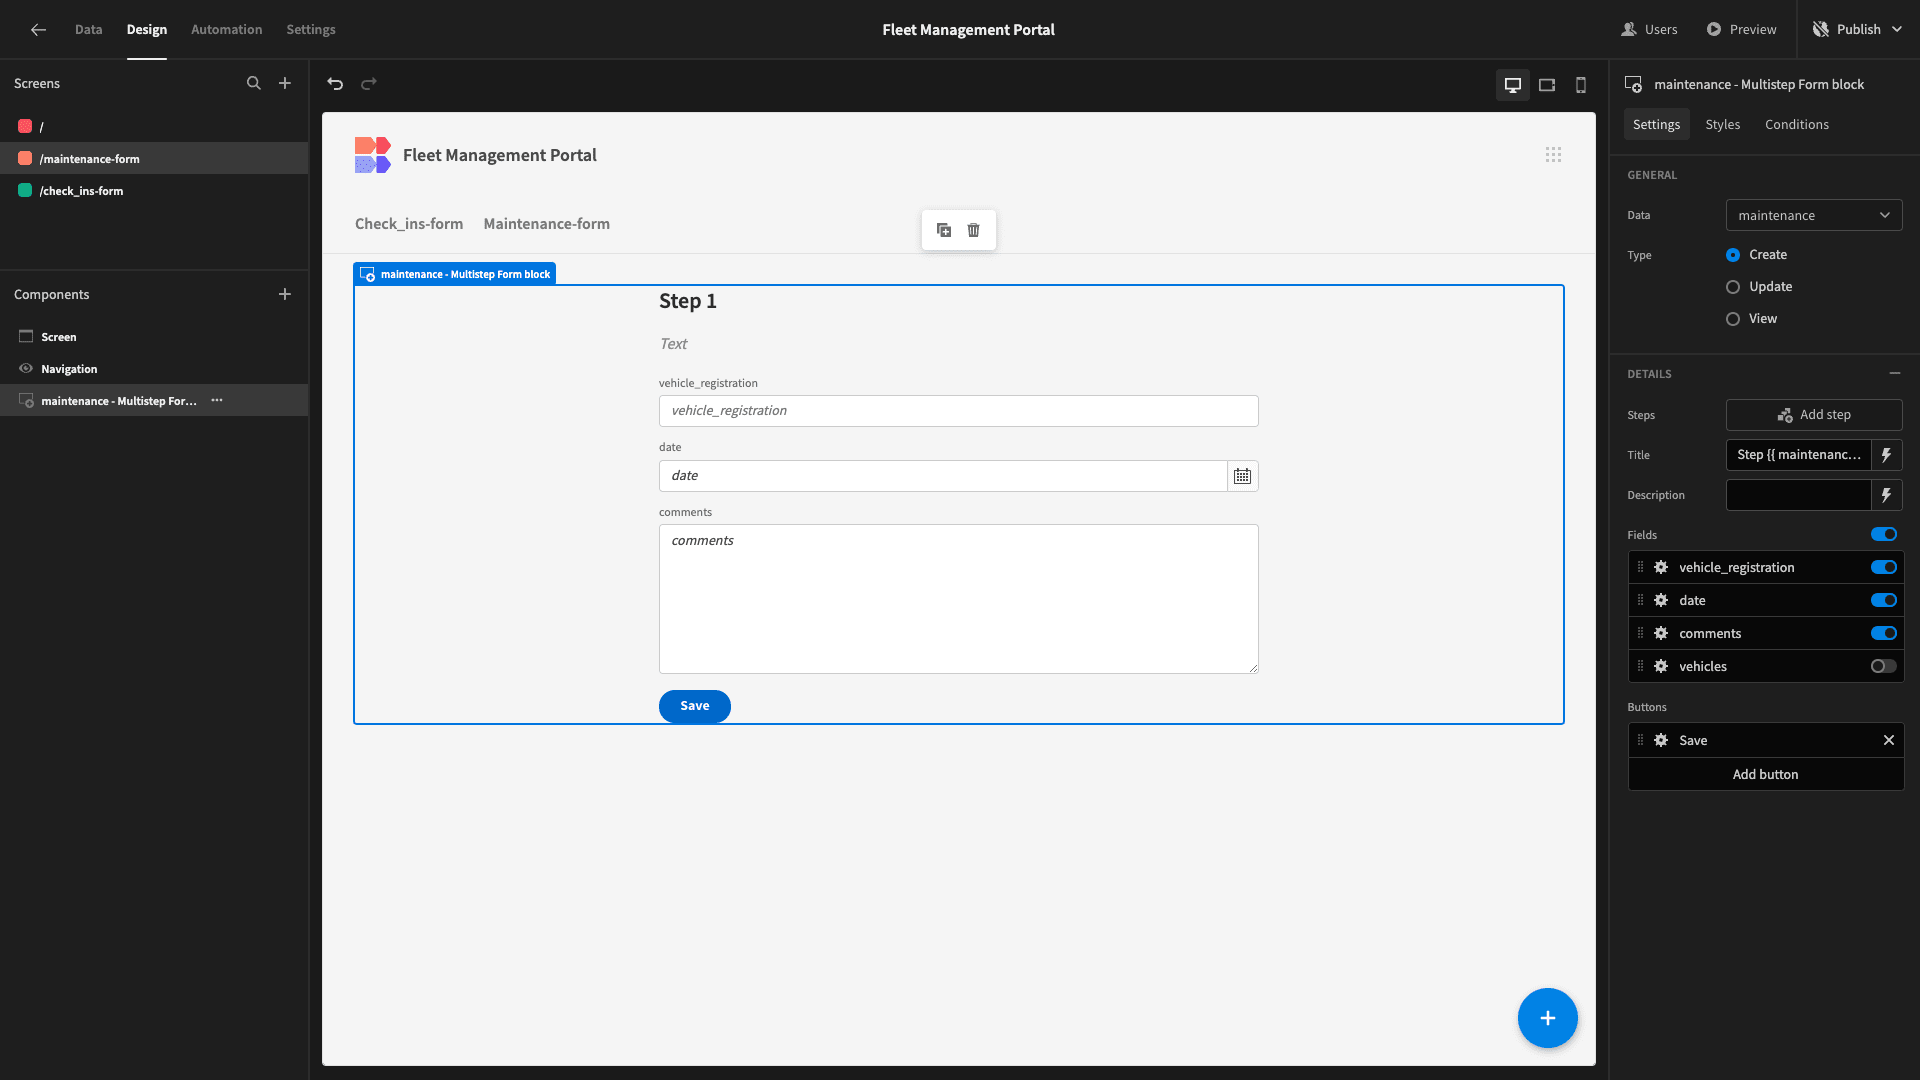
Then, we’ll place our shorter fields into columns and update all of our display texts, just like we did with the other form.
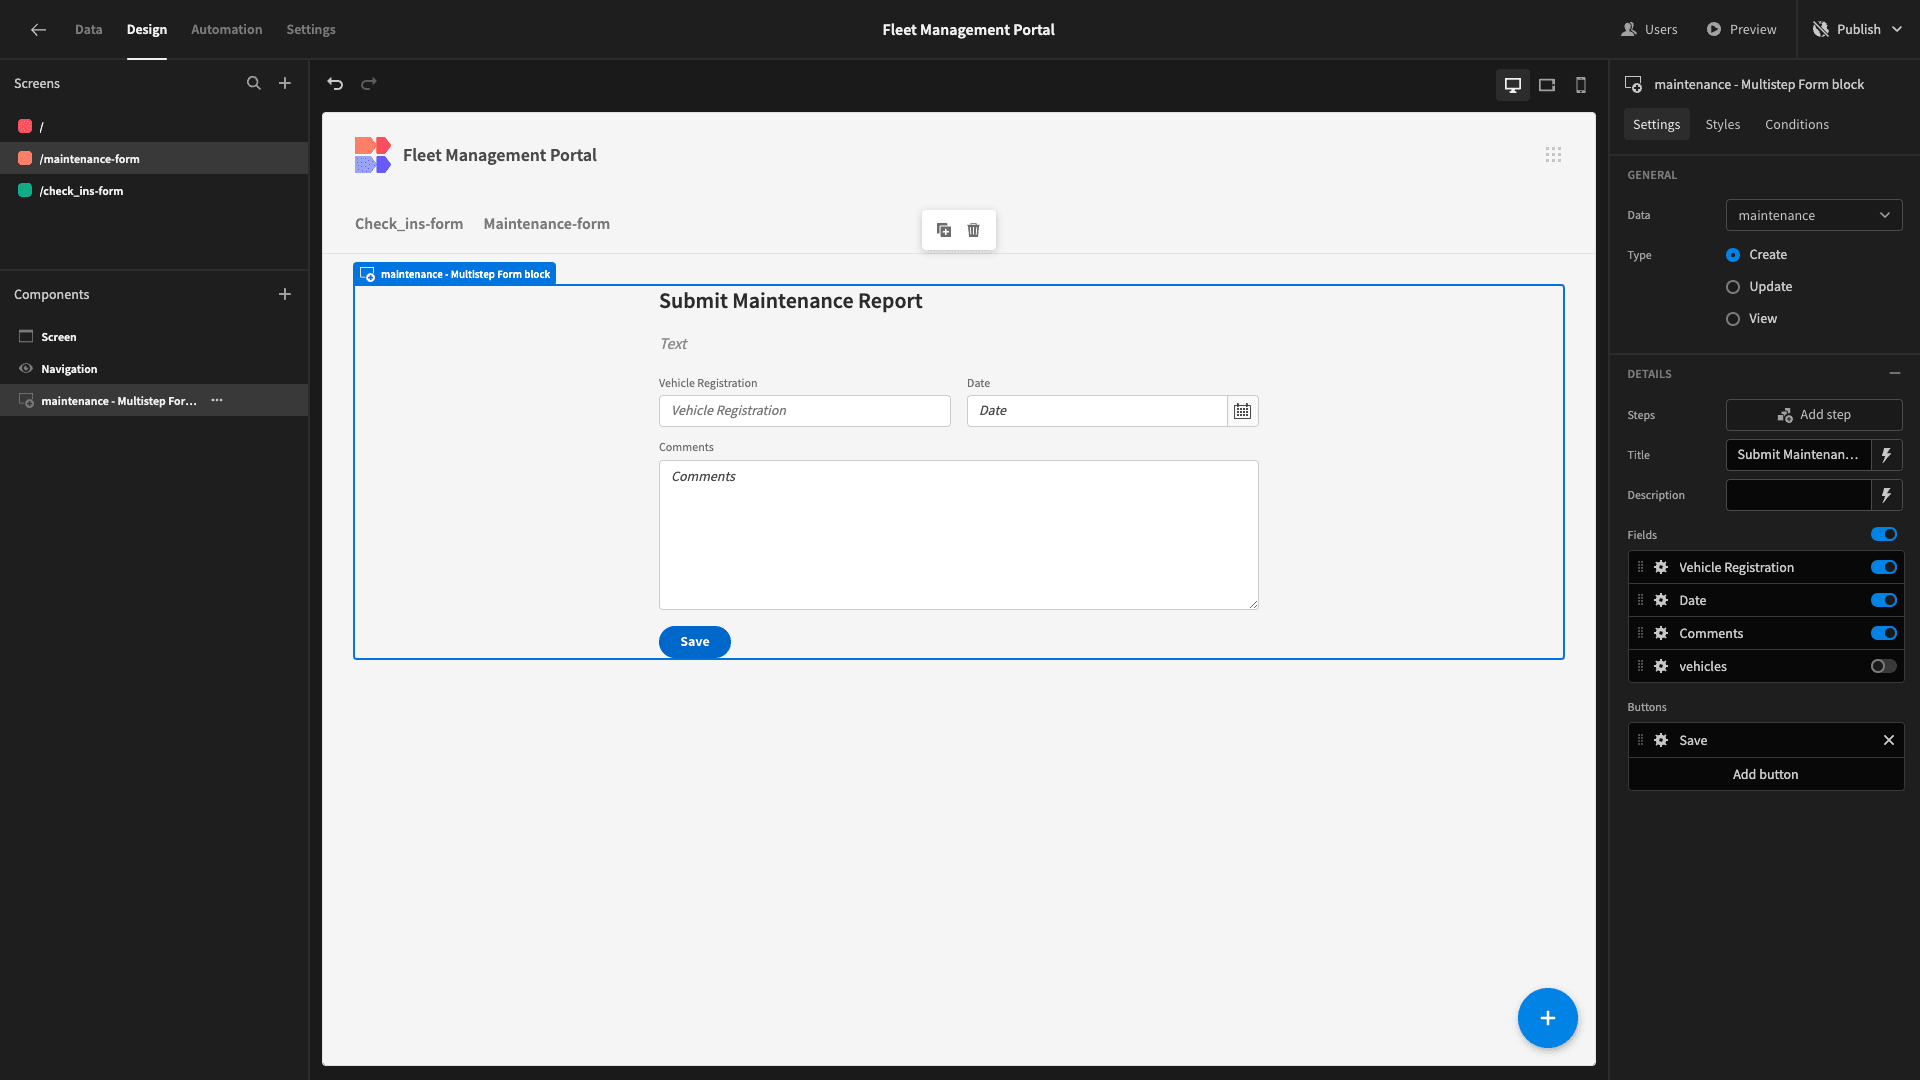
And we’ll also update our Size and Button Position settings.
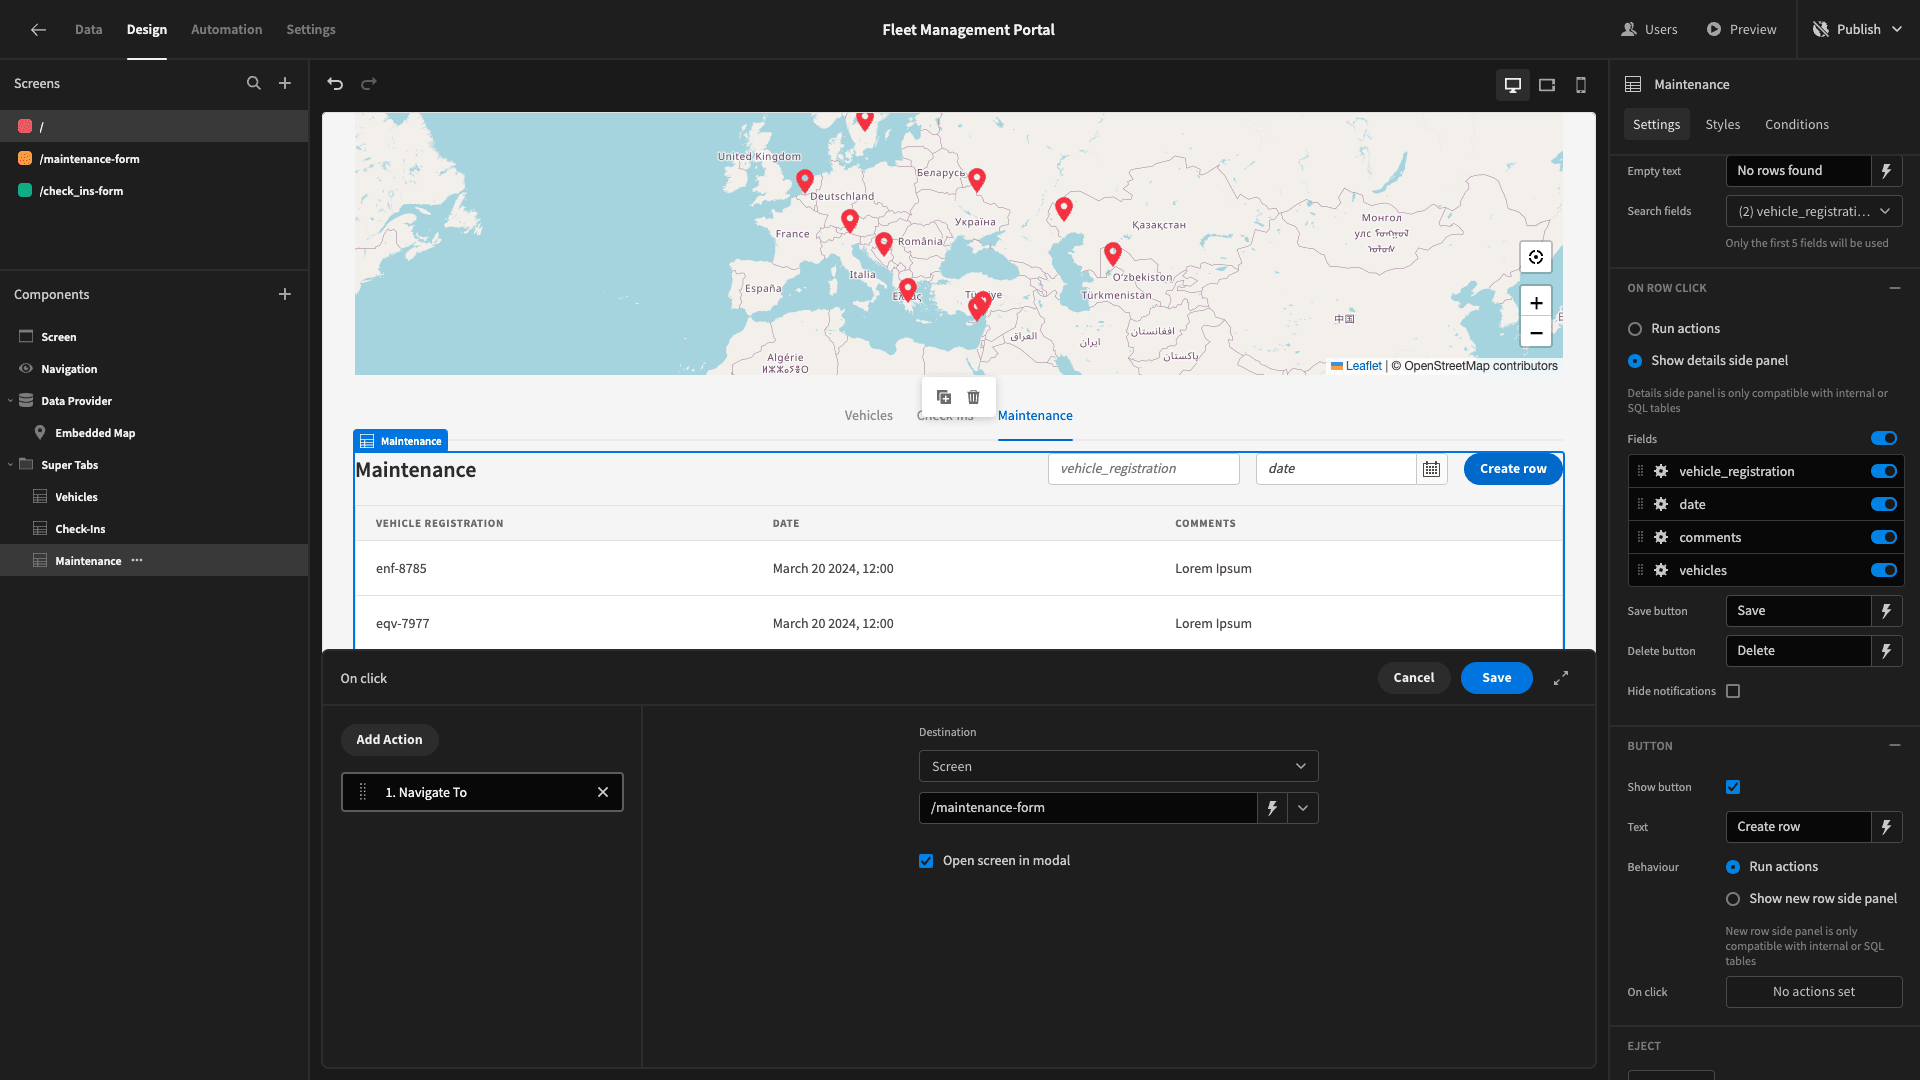
Lastly, on our main screen, we’ll add a button action on the maintenance table to open our new form in a modal.
Here’s how this will look for Admins.
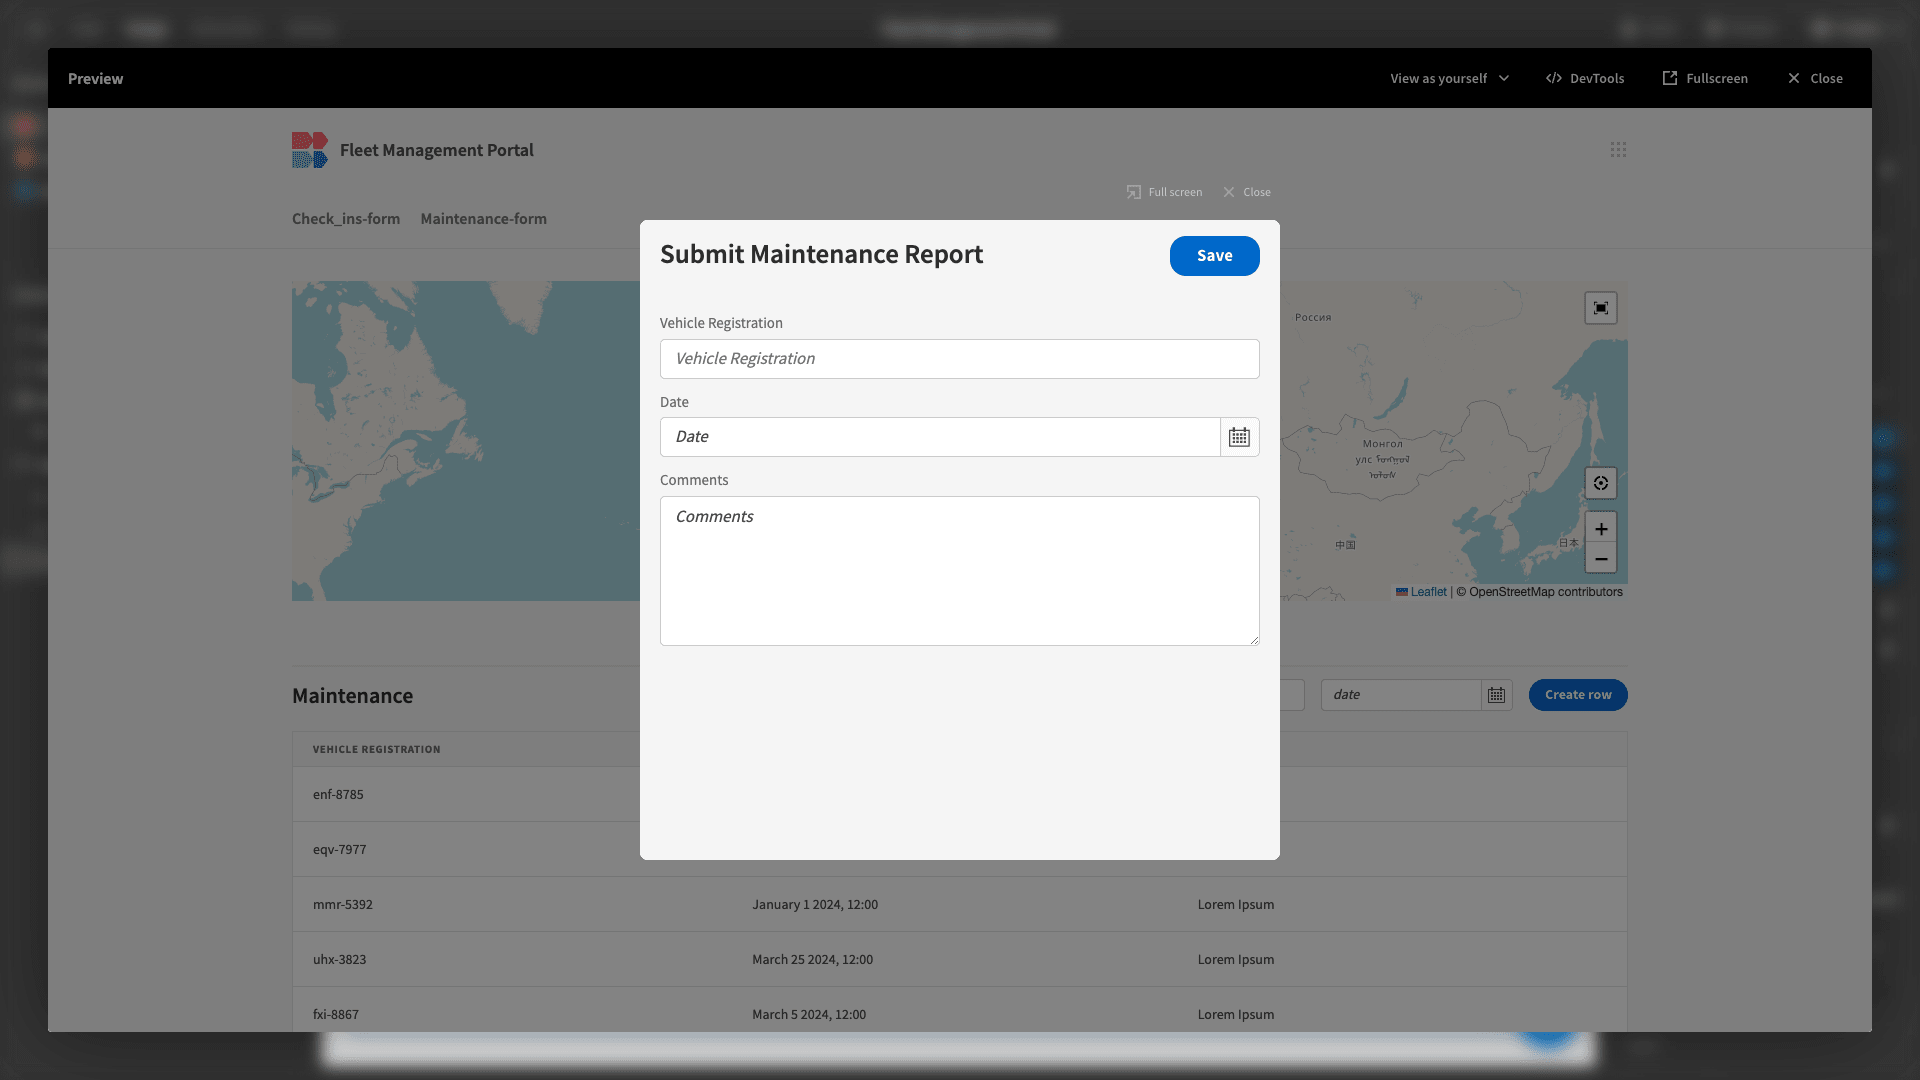
And here’s how Power users will view our form.
6. Design tweaks and publishing
Our fleet management portal is almost finished. But before we push it live, we want to make a few minor design and UX improvements.
First of all, we’re using three separate access roles for our app, but each one only needs to access a single screen.
On each screen, we’ll select the Set as Home Screen option.

This means that when a user opens our app, they’ll be directed to whichever screen is appropriate for their role.
We’ll then head to navigation and configure links, where we can use the X icon to remove each of the items from our menu.

This will make things look a bit cleaner.

Lastly, under Screen and Theme, we’ll select Midnight.
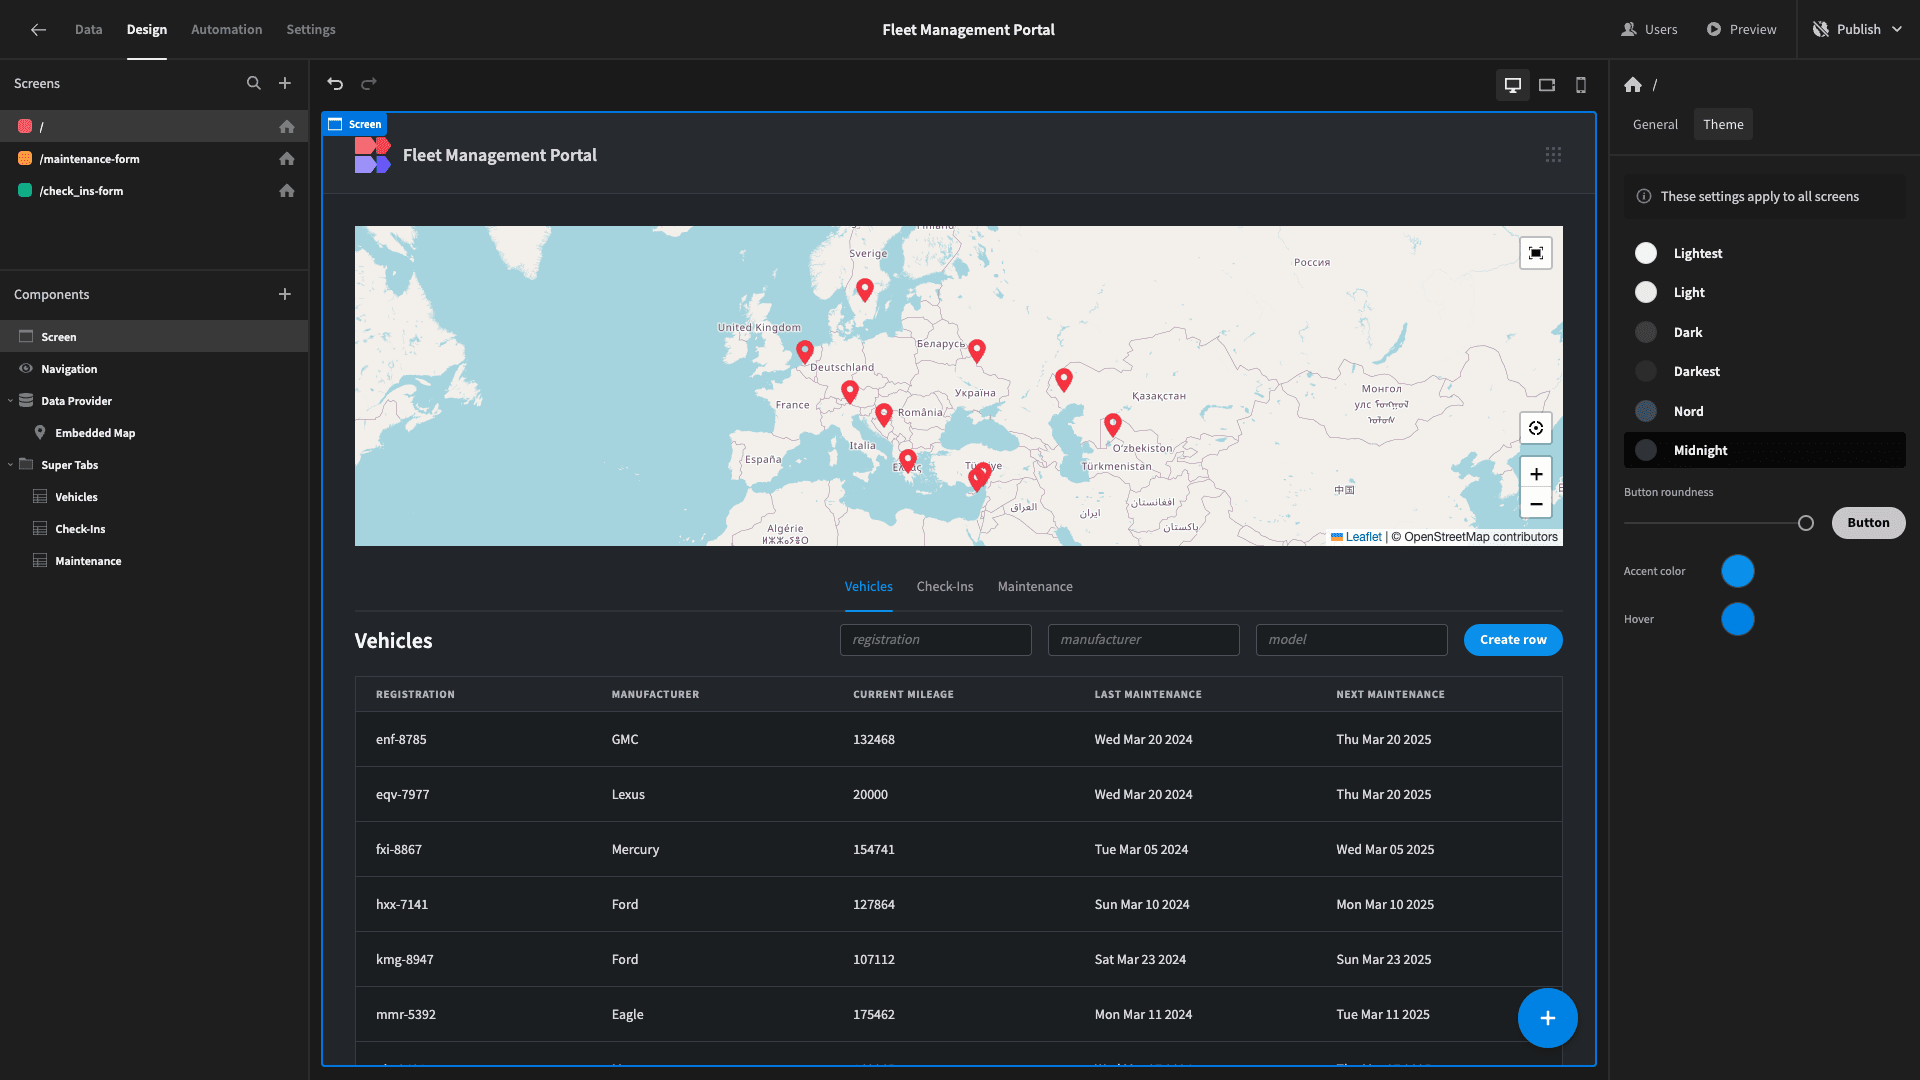
When we’re satisfied, we can hit Publish to push our app live.
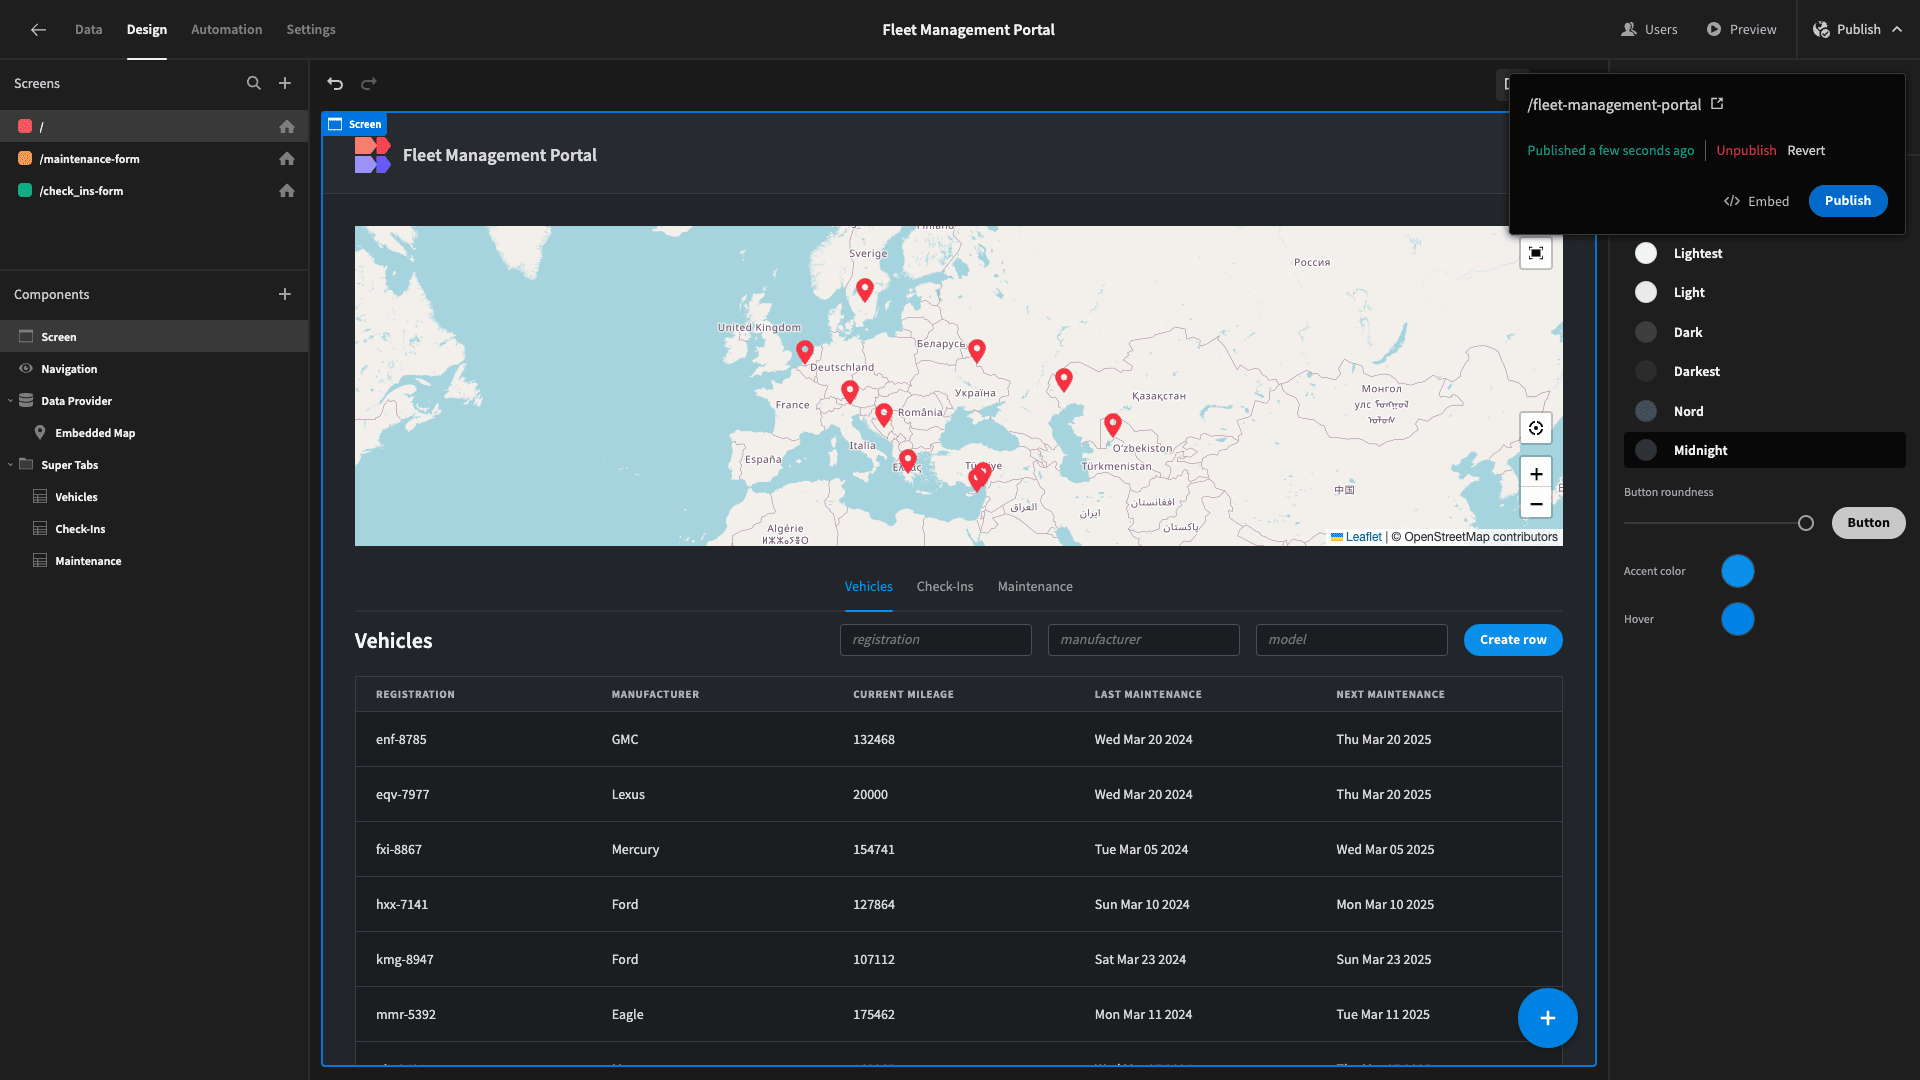
Here’s a reminder of what our fleet management portal looks like.
Budibase is the fast, easy way to build advanced portals on top of just about any data source.
Take a look at our portal development page to learn more.