How to Build a MongoDB GUI in 4 Steps
MongoDB is an amazing NoSQL database technology. But it can get quite tricky to add or retrieve information from it. That’s why a MongoDB GUI (graphical user interface) is a handy tool.
NoSQL by itself can have a steep learning curve. Instead of regular tables and rows, you have collections and documents. And unlike rows that have the same columns by definition, documents can be completely different within a collection.
Thus, a GUI can make NoSQL data management much easier. But these tools can be complex by themselves. Some require users to know the exact JSON notation to filter data. Others have complex interfaces that are hard to navigate.
And sometimes you just need something simple.
Today we’re going to build a MongoDB GUI without coding. This might sound like a complex task, but you’ll see that you can have a very good tool for free in just 4 steps.
The goal here is to create a fully-featured tool that allows you to see your data in a table view, executed SQL queries, and leverage code generation - but also as cards so you’ll see all your data at once as an alternative to the default table view.
Also, you can create a MongoDB GUI tool that allows you to add new data, and delete data.
In the meantime, you also learn how you can use Budibase to do all these tasks. This means that you can build not just a MongoDB GUI, but other GUI or even custom apps.
You might also like our guide to building a REST API GUI .
Let’s get started!
Is there a GUI for MongoDB?
There are many GUI options for MongoDB instances. Options include 3T Software Labs, MongoDB Compass, Robo 3T, Studio 3T, Moon Modeler, command line tools, and NoSQL Manager. But you can build your own tool within minutes with a low-code app builder such as Budibase.
This allows you to create a GUI that does exactly what you want, for free. So you don’t need to install any software and you can use it on any devices you want, even mobiles.
You might also like our in-depth guide to ACID compliance .
What is a MongoDB GUI?
A MongoDB GUI allows you to interact with your MongoDB databases, collections, and documents with a visual query builder. This means that you can search, add, edit and delete data even if you don’t know the commands to do so.
Here is what your free MongoDB GUI app will look like if you follow this tutorial:

This is the first screen you see when you load your app. In it, you’ll see your data and you can search using the dynamic filters. You can click on “edit” to modify a document, and you can click on “add new” to create new documents.
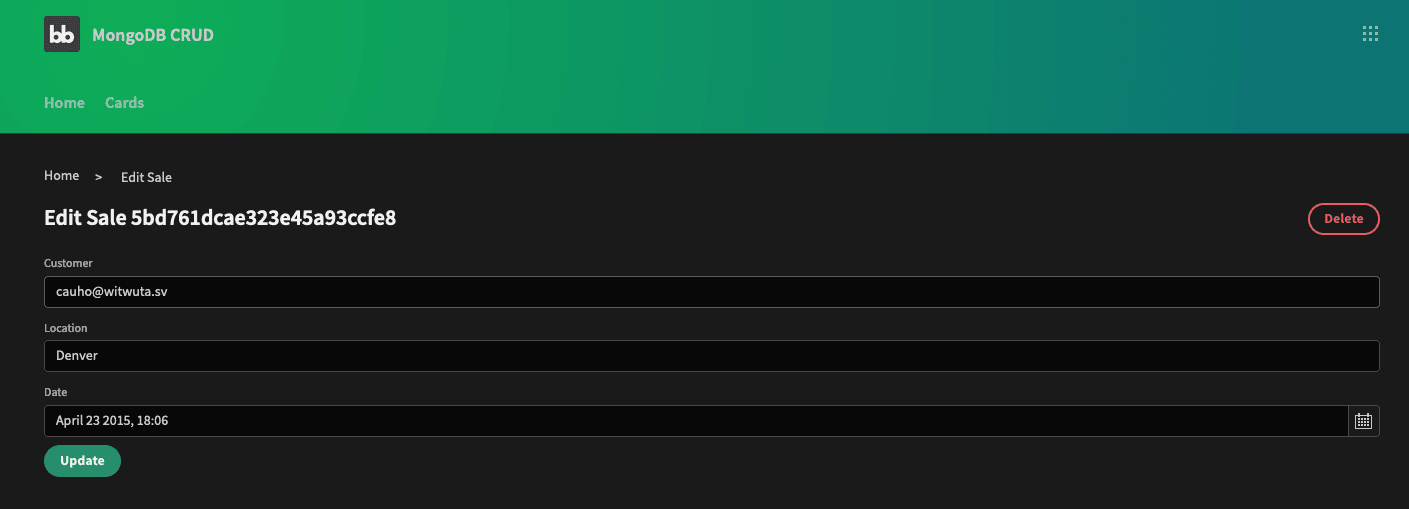
Here you can edit documents or create new ones. This screen has the same schema as the previous one, which is a faster and simpler approach to add just the data you need.

This screen has the same objective as the first one - viewing your data.
But there’s a difference, in this screen you aren’t bound to a specific schema. This means that you can see all data for each of your documents, even if they have different fields. If you click on “edit” you’ll see the simpler edit screen, but the “add new entry” button brings a different page.
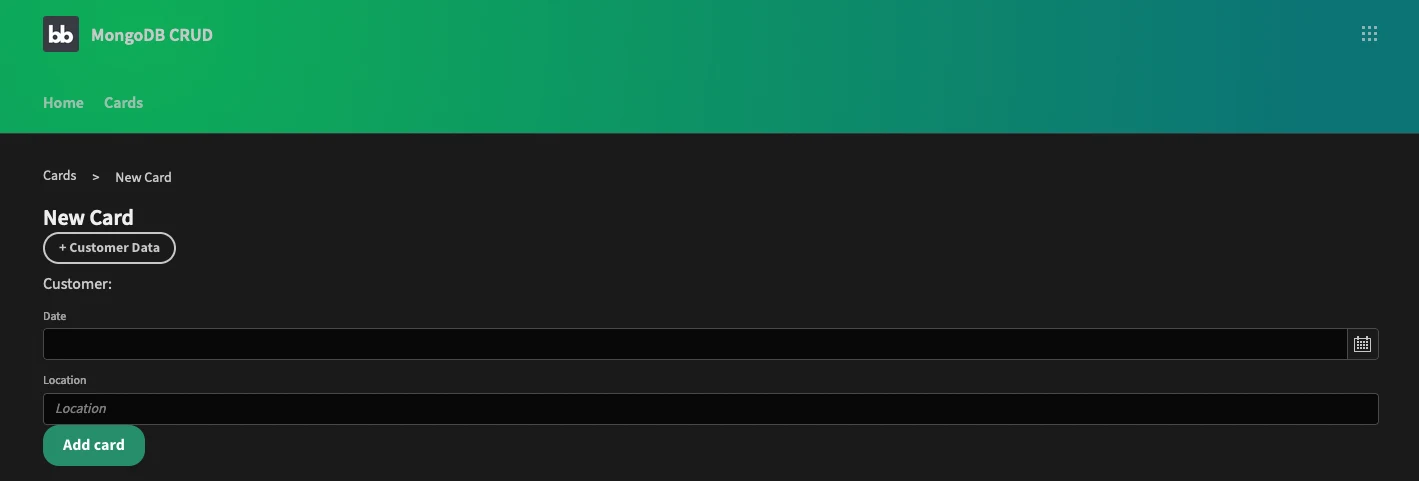
This is the form to add a new item. It might seem quite similar to the previous one, but notice how the customer data doesn’t have a field. That’s because this is a screen in itself.
Here it is:
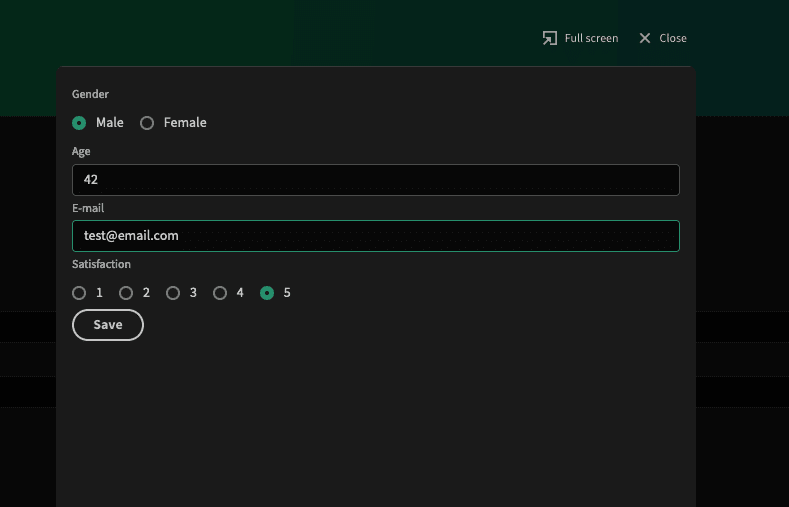
This is a modal screen where you can add customer details. Once you fill in this form and save the modal closes and the customer data is loaded to the new card form:
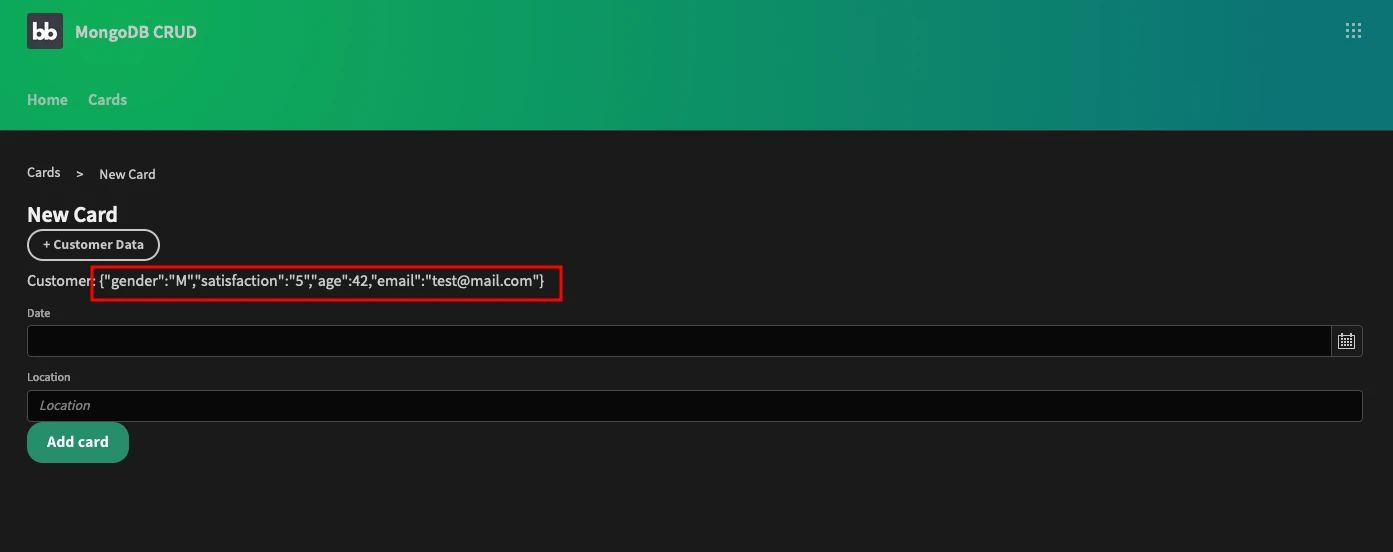
With this method, you can take full advantage of nested elements in your documents. Instead of a simple structure, you can add objects to them.
Now let’s see you you can implement this app in four easy steps.
1. Create your app, and connect to MongoDB
MongoDB and Budibase are free tools. Create your account in each of them, if you don’t have these already.
Now create a new app in Budibase and add MongoDB as your data source .
If you don’t know your connection string, you can find it in your MongoDB account .
To complete your MongoDB connection, let’s create some queries. Our demo app has sales and customer data. We need six queries for it:
- Get_sales,
- Get_sales_unfiltered,
- Insert_sale,
- Insert_sale_unfiltered,
- Update_sale,
- Delete_sale.
And here is what you need to do for each of them:
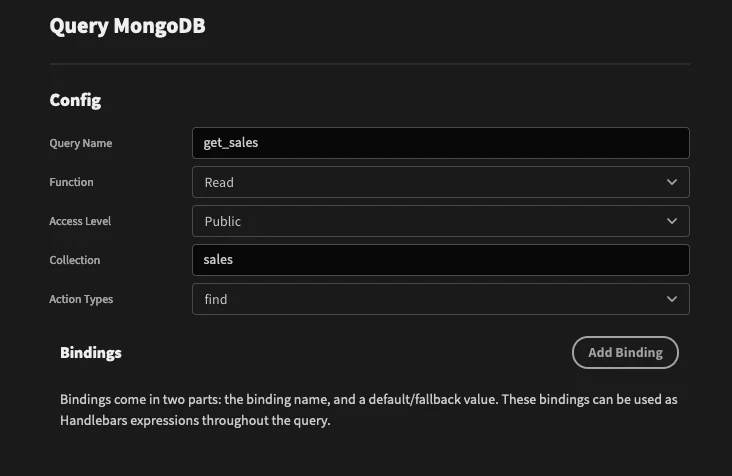
Get_sales
This query reads your sales data. But this query returns specific, priority fields since we use it in the main table.
You can use this setup:
And in the transformers, use this JS code:
return data.map( ({ _id, saleDate, storeLocation, customer }) => ({ “ID”: _id, “Date”: saleDate, “Location”: storeLocation, “Customer”: customer.email }) )
If you run it, you’ll see something like this in the preview:

Get_sales_unfiltered
This query works just like the first one. But the difference is that this query loads all the sales data with no preset schema. It is useful for the cards view. You can duplicate the get_sales query and just remove the transformer.
Insert_sale
This query creates new documents in your MongoDB database. It is also limited to the schema, so we are adding just a few fields for a simpler and more controlled approach.
This is the general setup:
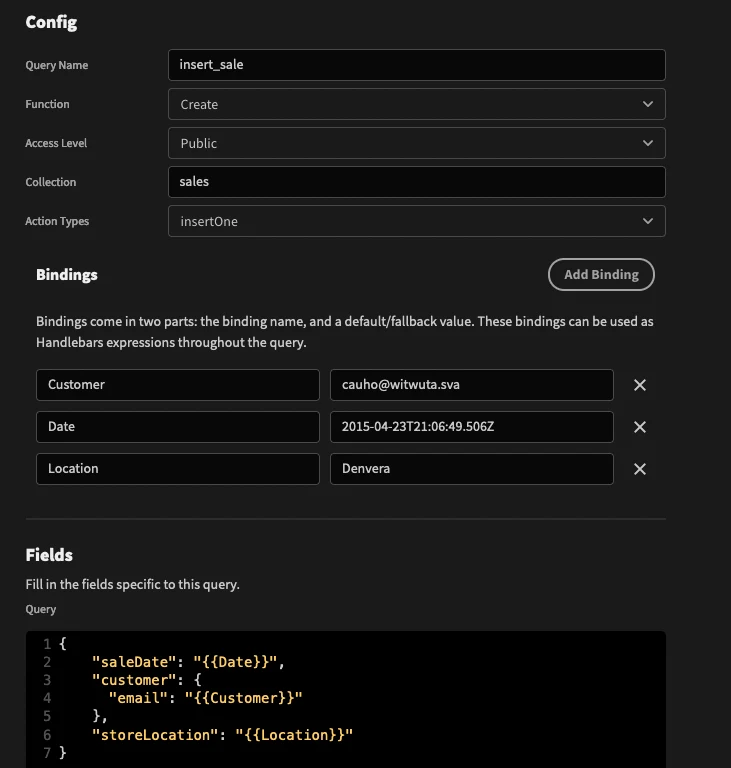
Make sure to use the fields option correctly. This is what the MongoDB GUI uses to insert data coming from your form fields.
Insert_sale_unfiltered
You can duplicate the insert_sale query and rename it to insert_sale_unfiltered. But this time, the entire customer object is added in the form modal.
Thus you can use these fields instead:
{ “saleDate”: “{{Date}}”, “customer”: {{Customer}}, “storeLocation”: “{{Location}}” }
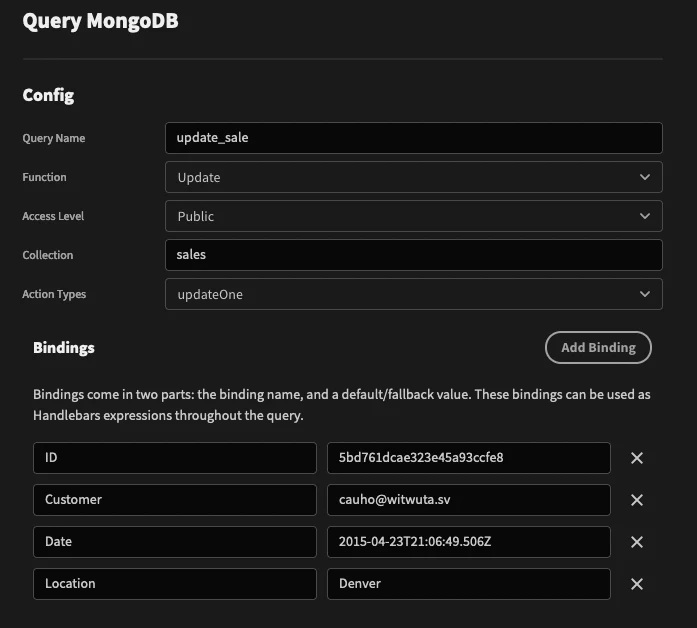
Update_sale
The update_sale query works the same way as the insert_sale query. The difference is that you need to pass the item ID to your MongoDB GUI so it can correctly update the document.
Here is the base setup for it:
And these are the fields:
{ “_id”: “ObjectID(’{{ID}}’)” }, { “$set”: { “saleDate”: “{{Date}}”, “customer.email”: “{{Customer}}”, “storeLocation”: “{{Location}}” } }
Delete_sale
The delete_sale query searches for an element and then deletes it. Make sure to use the delete_one action for it. Here is the setup:
Budibase offers syntax highlighting to make this easier. That’s all you need in terms of queries. Now, let’s turn to our app UI design .
2. Home screen
Head over to the “design” tab. Before adding screens, you can use the “theme” options to change your app to the dark theme. That’s what we did in our example.
Next, click on “screens” and “add screen”:

Let’s create a blank screen for now. We can use Budibase’s drag and drop to add components.
The home screen is quite simple in terms of how it loads data. These are its components and their hierarchy:
- Add new button - to navigate to the “new sale” screen.
- Data provider - with the get_sales query to load sales with ID, Date and Customer email:
- Dynamic Filter - this allows your users to filter through the sales and find a specific sale they want to view,
- Table - this component shows sales in a table format,
- Edit button - if your user clicks on it, they are redirected to the edit form.
Click on “Components” (second icon on the left side) > “_Add Componen_t”. Or, use the big blue plus icon at the button to add new components to your screen. Select the button component.
Then add a name and label to it, such as “Add new”. Then use the “Onclick actions” to add an action to navigate to the /home/0 path.
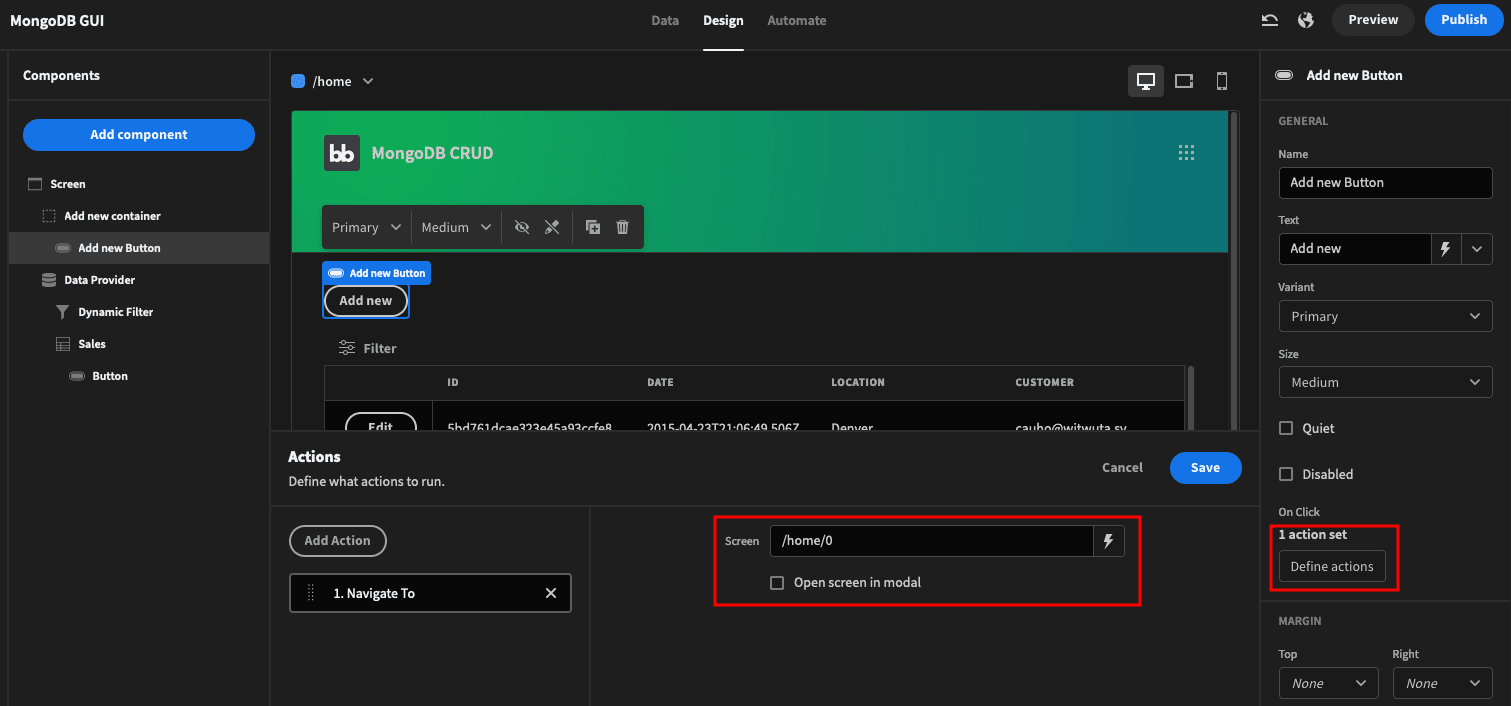
This might seem strange, but we are using the path as a variable on the edit screen. It means that anything after /home/ is read as a variable.
Therefore, on the edit screen, we can get this variable ( “0” in this case ) and run some actions.
The most important actions are to show the edit and add new forms, as well as loading items with a valid ID, so that we can pre-populate the fields with the current sale data.
Now you can add a Data Provider component. This component loads our queries. Load the get_sales query in it and your data is ready to be used.
Next, add a dynamic filter component. This wil automaticallyl understand the fields from your database schema .
It’s time to add a table component and again you’ll see that there are no changes needed on it. It loads your data automatically.
You can add a button inside of the table component so that your components tree looks like this:
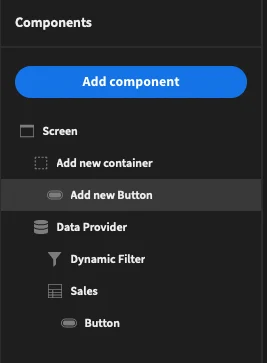
This button is quite similar to the “add new” button. But it should edit elements. Thus we need to pass the current row’s ID to the path. Set up its on-click actions like this:
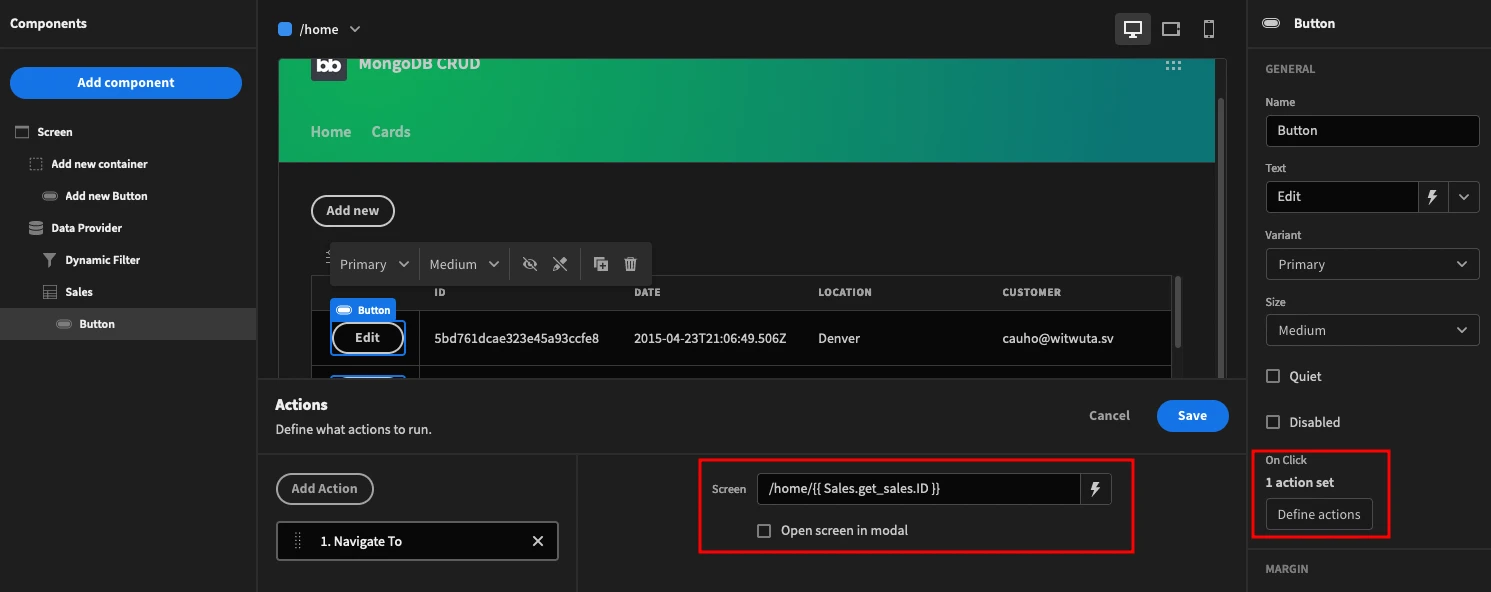
The {{ Sales.get_sales.ID }} binding is what loads the ID value for the current item in the Sales table, which loads the get_sales query.
Now let’s create your add new / edit forms.
3. Add new and edit forms
The home buttons are loading the /home/{{id}} path. To make sure that Budibase understands this, you can create a new screen and use this route - /home/:id. This automatically creates a new variable that you can load with {{ URL.id }}.
The logic behind the add new and edit forms is this:
- If the ID is different than zero:
- Hide the add new form.
- If the ID is equal to zero:
- Hide the update form.
Since components are visible by default we need this reverse logic to hide them.
You can do these visual switches with display conditions. So in your “new sale form” component you’ll add a condition to hide component if {{ URL.id }} isn’t equal to 0. And the other way around for the update container.
The elements tree for that page looks like this:
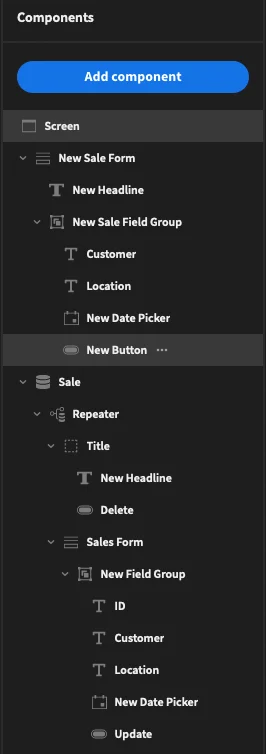
The “New Sale Form” is a simple form with text fields in it. You can add the fields for the customer, location, and a date picker.
Make sure to use the label and name options for these fields, like this:
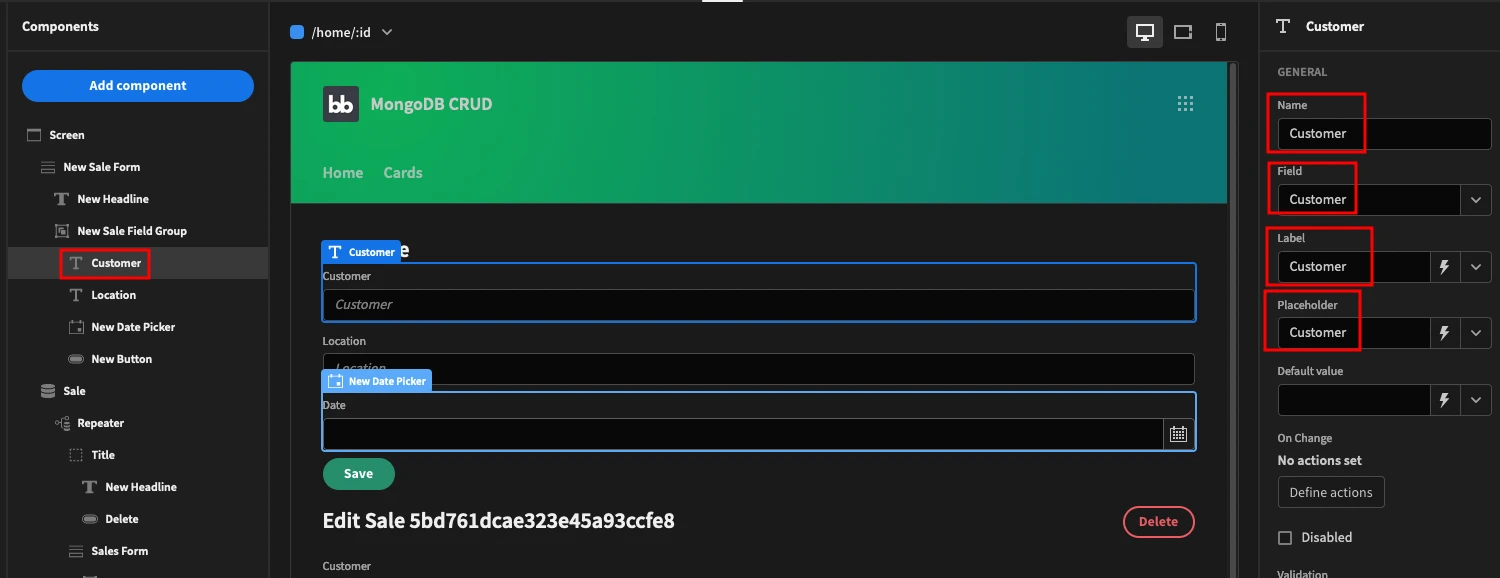
Then, add a button component. In it, you can add an action to execute the insert_sale query. This query gets the form fields and passes them to the query bindings, like this:
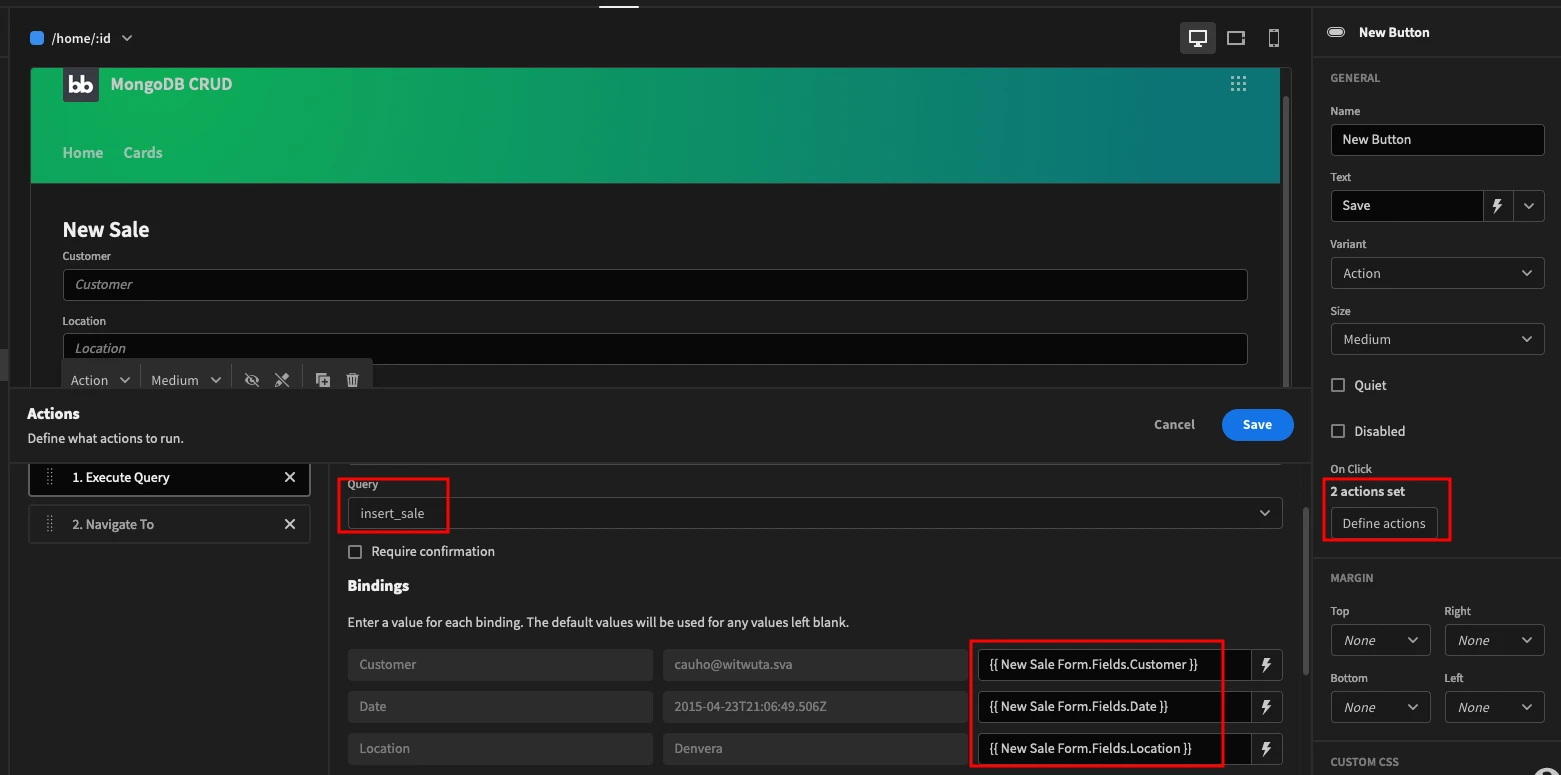
Another action you can add is to navigate to the home screen after the query succeeds.
The update form needs some default data for the current items. You can do this by loading the Sale data provider, which is just the get_sales query with a filter to display only the sale that matches the current ID.
Here is an example:

Then you add a repeater and the form inside of it. With this repeater the query fields are easily available. For example, in the headline component for that section you can use this text:
Edit Sale {{ Repeater.get_sales.ID }}.
And you can repeat this process for all fields, using the bindings as the default values, like this:
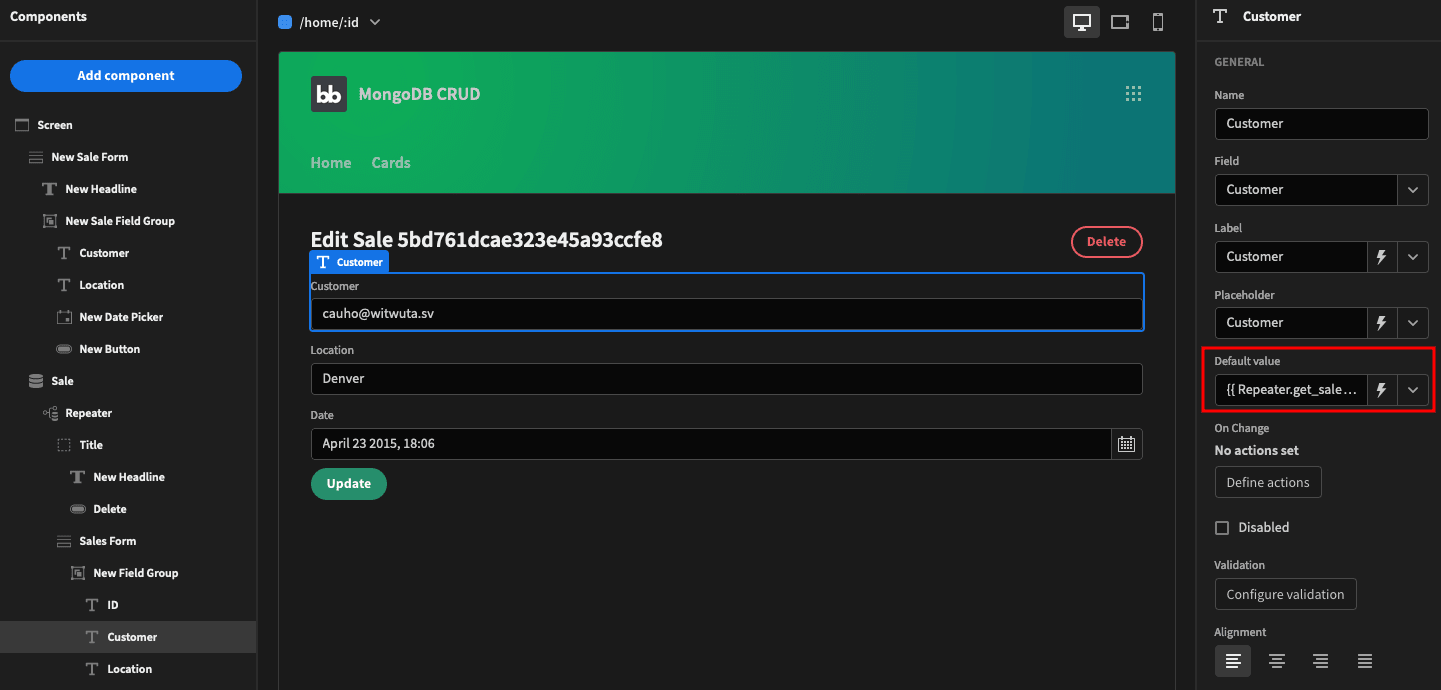
The update button is quite similar to the “add new” button. The difference is that you need to pass the item ID in addition to the form fields:

And now your basic actions are ready. Let’s think about how to add a bit of spice to your MongoDB GUI.
4. Cards view and creation
If you want to see all data from your components, it’s hard to use a table component. That’s because a table assumes a fixed schema, just like in a regular SQL database. This doesn’t reflect the complexity of NoSQL data models .
But you can achieve the same results with a data provider and a repeater. So instead of using a premade table, you can build your own components whether you want them to look like a table or not.
Cards view screen
Create a new screen with the /cards route. Its structure is just like the homepage, but instead of just using a table we use a repeater and some other components. This is the elements tree:
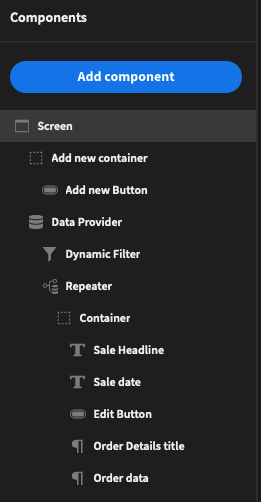
The add new button is the same as the previous one. But this time, set the onclick action to /cards/new.
Instead of using the get_sales query, use the get_sales_unfiltered now. This allows you to access all the sales data from any of your sales.
The dynamic filter component works the same way, and it’s powerful as ever.
Then you’ll use a repeater instead of the table. You can add multiple items per line by changing the direction of the repeater. Also, you can make all items to have the same height by changing the vertical alignment, like this:
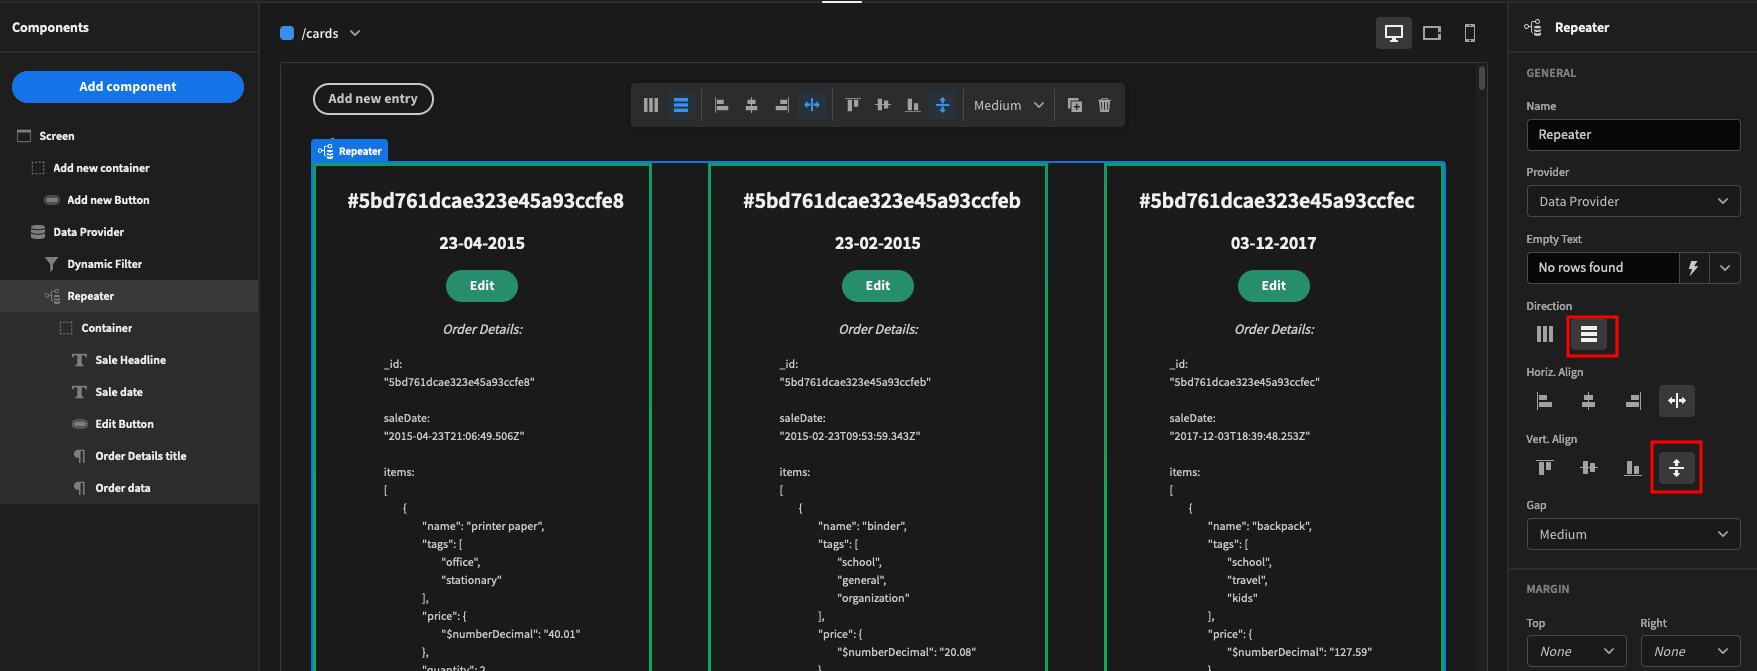
Then the internal components can use the repeater data as bindings. For example, the sale headline is this:
_#{{ Repeater.get_sales_unfiltered.id }}
You can use binding helpers for simple operations. For instance, you can output the date value in a custom format using this binding:
{{ date Repeater.get_sales_unfiltered.saleDate “DD-MM-YYYY” }}
The edit button loads the previously created edit screen for a simpler approach. So its onclick action is to navigate to _/home/{{ Repeater.get_sales_unfiltered.id }}.
Now you can output the entire sales data by using a JS function instead of a binding. Like this:
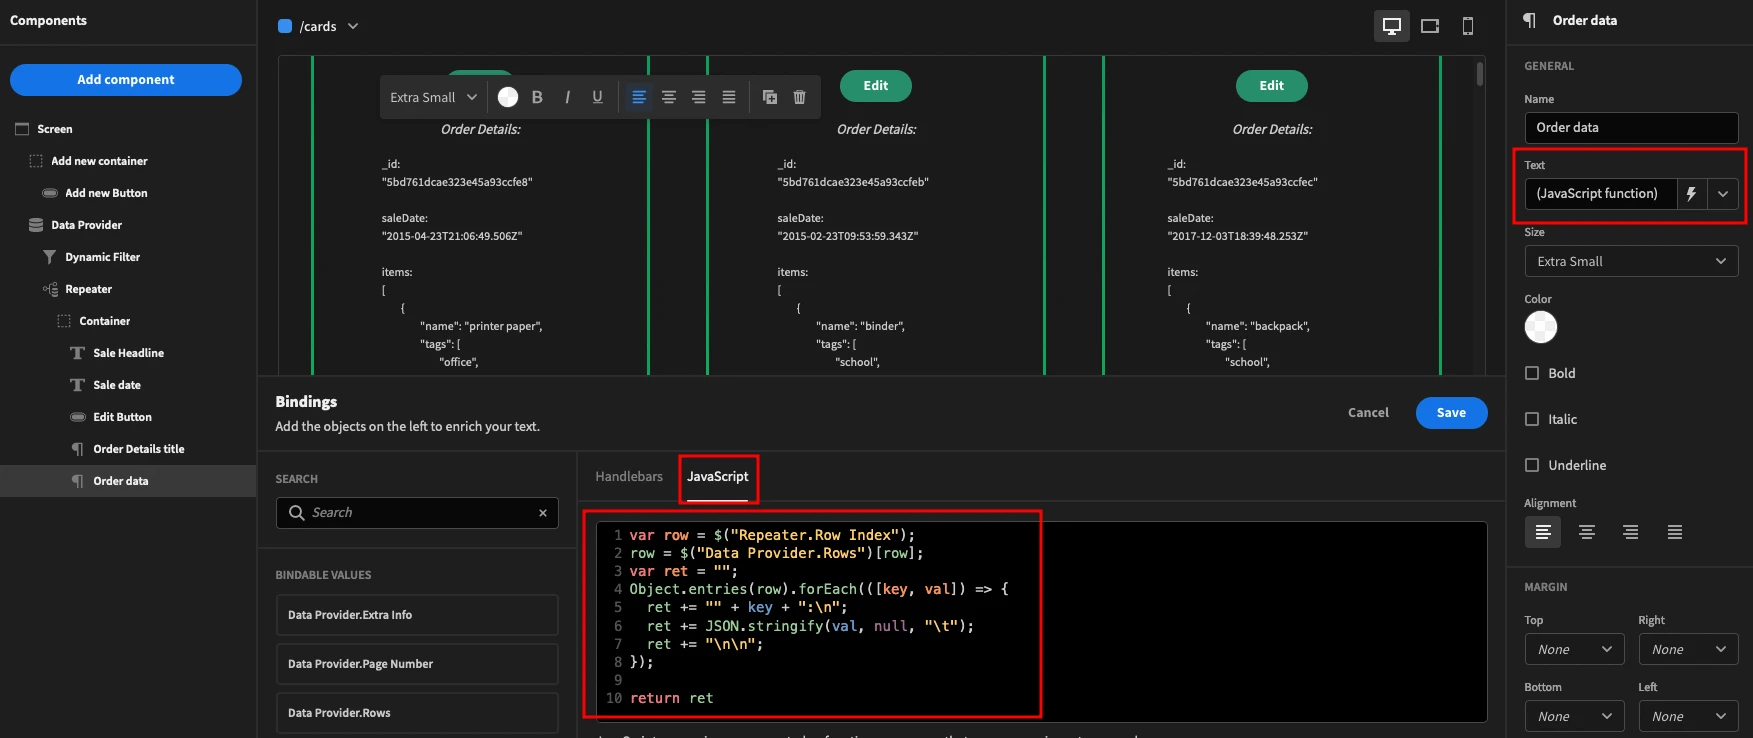
This is the JS code:
1var row = $("Repeater.Row Index");
2row = $("Data Provider.Rows")[row];
3var ret = "";
4Object.entries(row).forEach(([key, val]) => {
5ret += "" + key + ":\n";
6ret += JSON.stringify(val, null, "\t");
7ret += "\n\n";
8});
9return ret;
This function is running through each of the sales properties, it outputs the property name and a string version of the property value.
New Cards & Customer Data Screens
For this tutorial, we’re just creating new items, but you can use a similar approach to update items or even add more sales data in your MongoDB GUI.
Let’s start with the customer data screen. Create a new screen with the customer-data route. In it, you’ll use this components tree:

It’s quite similar to the previous form pages. It has some options pickers and you can use custom options in them, like this:
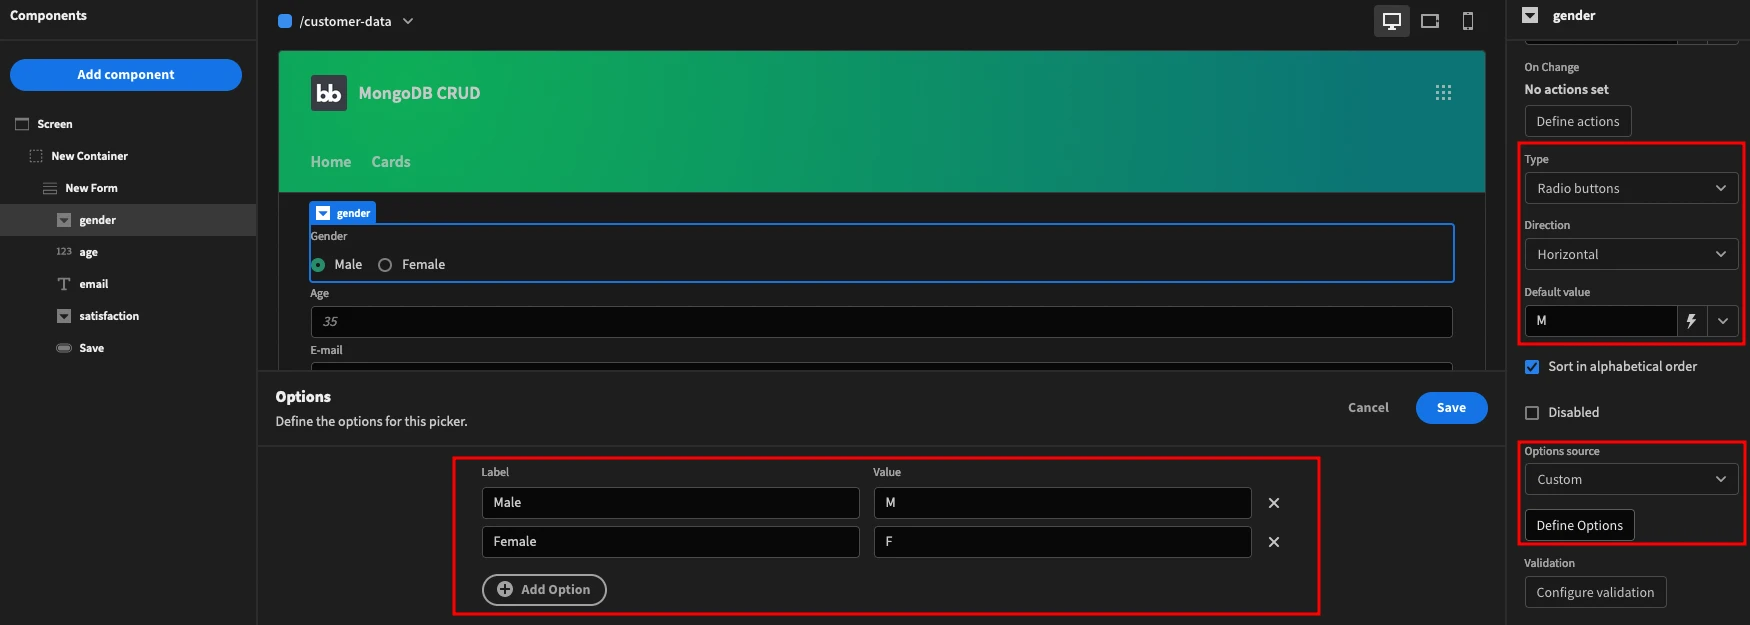
The real magic of this form is in the “save” button. These are the onclick action that you’ll use:

So, once you click this button the entire customer data is saved in an app state. These are variables in your app that you can use to store data and use it between different screens.
Since the form data is passed as a JSON it is in the perfect format to use in your insert query.
Then, there’s a close-screen modal action. This allows you to just close this form and go back to the add new form.
Now create a new screen with the /cards/new route. This is the components tree for that screen:

The logic here is quite similar to the previous forms. So the fields should be almost the same.
The main difference is that the customer data is created in that other screen. Thus, your button is going to load that screen in a modal:

And that’s all you need. Now use this onclick action for the “add card” button:

Notice how the customer data is sent as JSON data. This should be enough to correctly save all your customer data in your MongoDB GUI.
How to build a MongoDB GUI
Today we looked into how you can create your own MongoDB GUI. This allows you to create a tool to easily interact with your MongoDB data, using visual components, and for free.
In addition, we explored many aspects of app creation. You learned how to create screens and queries, how to save data, how to use app states, and how to send data between different screens.
We hope you’ve enjoyed it, and see you again next time!
Check out our in-depth guide to database GUIs .
To get a broader view of everything that Budibase can do, why not check out our 50+ free, deployable app templates ?